Pages

July 30, 2011

Asparagus Ribbons with Lemon Parmesan Dressing

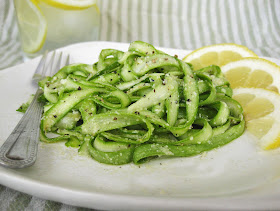
asparagus ribbons with lemon parmesanWith the ridiculous heat we've been having here lately (not that I'm complaining one bit about it!), I thought I'd post a recipe that doesn't require turning on the oven or grill. I know it's not really asparagus season here anymore, but if you can still find some tasty asparagus at the grocery store, why not try something different with it?

I love roasted or grilled asparagus as much as the next person (assuming everyone loves it of course, since I can't see why you wouldn't), so I didn't expect to like this dish because the asparagus is not cooked at all. I've tried a bite of raw asparagus before out of curiosity, and it was not very pleasant. But I decided to go ahead with the recipe, mostly because making asparagus ribbons sounded like so much fun! (Although when your life involves sitting in front of a computer doing research all day, organizing your sock drawer can seem like fun in comparison.)

All you do is take a vegetable peeler and peel the asparagus stalks into thin strips. You end up with a mountain of ribbons that look so pretty you won't even want to eat them, but once you add the dressing they reduce in size and turn into a lovely looking little salad. I ended up being so pleasantly surprised that the asparagus soaked up the lemony dressing so it tasted delicious, but still maintained a bit of crunch instead of getting wilted. Plus, it's so easy to throw together, yet elegant enough to impress all your friends. Not that I had any friends over to test this on, but Gen was impressed and she has high standards when it comes to food, so I assume others would also love this.

Since I was just making one serving for myself (I'm really making it seem like I have no friends here), I didn't really measure anything out, but the recipe is over at Bon Appetit so you can adjust it according to however many people you're serving.

I can't wait to try other ways to eat asparagus ribbons, like Cooking Light's asparagus ribbons with lemon and goat cheese, or Cooking Canuck's shaved asparagus salad with balsamic syrup and almonds. The ribbon method also works well on zucchini and squash - vegetables are just so much more fun when you eat them in unexpected ways!

July 29, 2011

Nectarine Pizza with Basil and Balsamic Vinegar

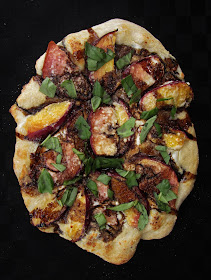
nectarine pizza with basil and balsamic
Okay, I realize some of you may have already stopped reading after the title - balsamic vinegar on a pizza? I also realize the rest of you may have clicked away after seeing the picture - did somebody squirt ink all over that thing? Well for those of you who remain, I promise your doubts will be squashed and you will be running to your kitchens to make this pizza!

Pizza was one of the only things I knew how to make back when I first moved out with my sister. And by pizza I mean some cheese and tomatoes on a piece of storebought naan bread. It was still delicious, but my pizza making skills have improved just a little since then. I can now make my own dough, I use a pizza stone, and I try to come up with creative toppings. Admittedly, I don't often make my own dough - it's easy, but it does require a fair bit of time, which I don't always have before dinner. And when you can buy fresh balls of dough from the grocery store for a couple of bucks, I don't see anything wrong with that.

Although cheese and tomato pizzas will probably always be my favourite, it's fun to experiment with new toppings. I first tried out this nectarine pizza last summer when I was making three different pizzas for my family and wanted to have at least one option that they wouldn't have tried before. I learned a couple of things from that experience. One was to never try to make three different pizzas at the same time again, unless I'm feeling mad at myself for some reason. The other was that it pays off to try new things - the nectarine pizza was everyone's favourite by far!

I forgot about that pizza until I was reminded by a similar recipe for a peach pizza that recently appeared on Two Peas and Their Pod. With fresh peaches starting to appear in the farmers markets, now was the perfect time to revisit this recipe.

Since I was cooking for just myself as usual (even on a Friday night, sad, I know), I just made a personal sized pizza. So instead of posting the exact amounts of each ingredient I used, which will vary according to the size of the pizza, I'll just list them below, along with some possible substitutions, and you can adjust accordingly. Hope you enjoy, and happy Friday!

nectarine pizza with basil and balsamic
Nectarine (or Peach) Pizza with Basil and Balsamic Vinegar

Adapted from Alexandra's Kitchen

Ingredients:

pizza dough
olive oil for greasing
light ricotta (or goat cheese or mascarpone)
1 nectarine or peach, sliced thinly (I used a combination of both on this one)
~ 1 tbsp parmesan
handful of chopped fresh basil
balsamic vinegar (I'd suggest reducing about 1/2 cup for a full sized pizza)

Directions:

Preheat the oven to 500ºF, or to the temperature specified on the pizza dough package.

Lightly grease a baking pan with olive oil. Roll out the dough into a circle on the pan and let rest, according to package directions. Alternately you could make your own dough if you have time, or buy a precooked base if you're in a hurry.

Bring the balsamic vinegar to a simmer in a small saucepan over medium-high heat. Watch closely and remove once it is reduced by half (leaving about 1/4 cup) and has a syrupy consistency. You can taste it to make sure it's sweet enough, but be careful not to burn - err on the side of underreduced.

Brush a bit of olive oil over the dough, then spread a layer of ricotta (or desired cheese) as the base. Add the nectarine or peach slices in a single layer then sprinkle a bit of parmesan on top.

Bake the pizza for 10-15 minutes or according to package directions, until crust is slightly brown and cheese is melting. Remove from oven and drizzle the balsamic reduction on top, followed by the fresh basil. Wait a few minutes before cutting, then enjoy!

July 28, 2011

Banana Whoopie Pies with Caramel Cream Cheese Filling

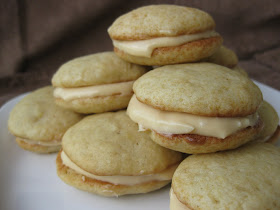
banana whoopie pies
I'm sure most people buy a bunch of bananas with the intention of eating them all before they get too ripe, which always seems to happen too quickly. I, on the other hand, buy a bunch of bananas with the explicit purpose of waiting for them to get ripe before I will pay any attention to them. Sure, regular bananas are great too, but there's not a whole lot you can do with them (other than putting them in my very favourite sandwich - grilled peanut butter and banana, aka the Elvis sandwich). Ripe bananas, on the other hand, are the key ingredient to so many of my favourite snacks and desserts.

There are three things I use ripe bananas most often in, all of which you have to try if you haven't before!

1. Green Monster smoothies

These may sound and look like something that came from the swamp, but they are so good and good for you too. Keep a bunch of ripe bananas in the freezer, then add them to this smoothie with some milk, a bit of nut butter, ground flax seeds, and the secret ingredient, spinach. The spinach adds a ton of nutrients but the best part is that you can't even taste it. The classic green monster recipe, developed by Angela from Oh She Glows is here, but check out this page for a ton of other ideas!

2. One ingredient ice cream

This has been very popular in the blog world, but if you haven't heard of it before, prepare to be amazed! Throw a frozen ripe banana in the blender or food processor and sit back to watch. Pretty soon, you will see it magically reach the consistency of soft serve ice cream, and that's all there is too it! It's great for quickly satisfying an ice cream craving, but leaves you guilt-free! Feel free to experiment with other add-ins, like this peanut butter banana ice cream on Two Peas and Their Pod.

3. Baked goods

This one is a no-brainer. Banana bread, muffins, and cake are pretty much the best things in the world. Ripe bananas even make a healthy substitute for fatty ingredients like butter in some baked goods.

This brings me to this recipe for banana whoopie pies, which may be one of the least healthy uses for ripe bananas, but just whip up a green monster smoothie after you make these and I think that will balance it out.
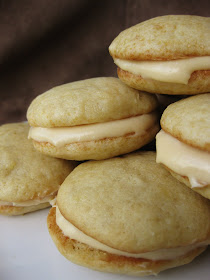
banana whoopie pies
The recipe comes from Annie over at Annie's Eats, who has never failed to disappoint me with her recipes. I only discovered whoopie pies recently, but have since been trying as many flavour combinations as possible. If you haven't heard of a whoopie pie before, it's basically a little cake sandwich with frosting in the middle. You actually might want to introduce them as cake sandwiches when you offer them to people, as I've found most people don't really jump to try a whoopie pie when they have no idea what it is.

The original recipe called for a swiss meringue buttercream in the middle, but since cream cheese icing is and will always be my favourite, I used it instead. I brought these to a party and probably ended up eating half of them myself, but anyone who got a chance to try one loved them!

Banana Whoopie Pies with Caramel Cream Cheese Filling

Slightly adapted from Annie's Eats

Makes
30-36 sandwich cookies

Ingredients:

Caramel sauce:
½ cup sugar
½ cup plus 2 tablespoons heavy cream
¼ teaspoon salt
½ teaspoon vanilla extract

Cookies:
2 cups all-purpose flour
½ teaspoon baking soda
½ teaspoon baking powder
½ teaspoon salt
½ cup mashed ripe banana (about 1-1½ bananas)
½ cup sour cream
½ cup unsalted butter, at room temperature
½ cup granulated sugar
½ cup light brown sugar
1 large egg
½ teaspoon vanilla extract

Cream cheese frosting:
4 oz cream cheese (about half a block)
2 tablespoons unsalted butter
½ teaspoon vanilla extract
1 cup icing sugar
½ cup caramel sauce (above)
 

*This may make more filling than you will need for this recipe. I used the leftovers on my pancakes the next day!

Directions:

Caramel sauce:
1. Pour the sugar in an even layer in a medium saucepan over medium heat. Watch closely, and once the sugar starts to liquefy around the edges, stir it gently with a spatula towards the center. Continue stirring gently until all of the sugar is melted and no hard bits remain.
2. Once the caramel reaches a deep amber color, remove it from the heat.
3. Carefully whisk in half of the cream. The mixture will bubble and steam violently. Stir until the cream is thoroughly combined, then whisk in the remaining cream.
4. If the mixture has clumped up at all, return the pan to medium-low heat and whisk gently until smooth. Stir in the salt and vanilla.
5. Remove from the heat and let cool. (The sauce can be stored in an airtight container in the refrigerator and reheated.)

Cookies:
1. Preheat the oven to 350˚ F and line baking sheets with parchment paper.
2. In a medium bowl, whisk together the flour, baking soda, baking powder and salt.
3. In a small bowl, combine the mashed banana and sour cream.
4. In the bowl of an electric mixer, beat the butter and the sugars on medium high speed until light and fluffy, about 3 minutes. Blend in the egg and vanilla.
5. With the mixer on low speed, alternate adding in the dry ingredients and the banana mixture, mixing each addition until just incorporated.
6. Drop the mixture onto the prepared baking sheets a few inches apart and smooth into about 1¼ inch rounds. If you want the cookies to be more perfectly shaped, you can use a pastry bag with a round tip to pipe them into circles, but I just use a spoon.
7. Bake about 10 to 12 minutes, until the cookies are just set and the edges are starting to brown. Let cook on the baking sheets 5-10 minutes, then transfer to a cooling rack to cool completely.

Filling:
1. In the bowl of an electric mixer, blend the cream cheese until smooth. Add the butter and continue beating until smooth and well blended. Add the vanilla and mix to combine.
2. With the mixer on low, gradually add the icing sugar until combined, then increase the speed to medium-high to continue mixing until smooth and creamy.
3. Stir in the caramel sauce until well blended.

Assembling the whoopie pies:
1. Spread out the cooled cookies with the flat sides facing up, and match them into pairs by size as best as you can. Spread a dollop of filling onto the flat side of one cookie of each pair, then sandwich the cookies together. Store in an airtight container.
July 26, 2011

Eggplant, Tomato & Mozzarella Stacks

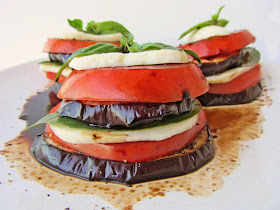
eggplant, tomato, mozzarella stacks
If I had to pick my favourite summer vegetable, I think it would have to be the tomato. And for those who say a tomato is a fruit, I think it still beats out any other summer fruits too. I can't think of any flavour that's better than a plump, juicy tomato, sprinkled with salt and pepper and drizzled with a little balsamic vinegar. Mmmm, I'm drooling just thinking about it. When I picked up some monster tomatoes and a giant bunch of basil at the farmers' market the other week (I'm pretty sure I made the whole bus smell like basil on the way home, but in my opinion I did the bus a favour), I knew I had to make a caprese salad.

However, I'd promised myself earlier that I would use that pesky eggplant I'd had for a while and didn't know what to do with. That's when I remembered seeing a recipe for eggplant, tomato and mozzarella stacks on Eating Well - problem solved! The recipe called for pesto to be added to the stacks, which I'm sure would be delicious, but I decided to leave it out so it wouldn't overpower the taste of the tomato, which I wanted to be the star of the dish.

The stacks were exactly what I was looking for, and I can't wait to make them again! I ate three as a light meal since I was just cooking for myself, but they would be ideal as a side dish to a main course. It almost seems unnecessary to post a recipe since the ingredients are clearly visible from the picture, but here goes anyway!

Eggplant, Tomato & Mozzarella Stacks
Adapted from Eating Well

Makes 4 stacks

Ingredients

2 large tomatoes (I used about one and a half - amount may vary according to their size)
1 eggplant (I used about half of one)
About 8 oz mozzarella, or 8 slices
Handful of basil leaves
Balsamic vinegar
Salt & pepper

Directions

Slice the eggplant into 1/4 to 1/2 inch thick slices, using the smaller end of the eggplant so the size of the slices will roughly match the tomato slices. Line a baking sheet with aluminum foil and spray with non-stick cooking oil. Lay the eggplant slices in a single layer on the baking sheet. Spray the tops with cooking oil and season with salt and pepper. Broil until tender and golden brown on both sides (mine took about 5 minutes a side). Alternately, use your favourite method to cook the eggplant - grilling, pan frying, or baking should all work.

Slice the tomatoes and mozzarella. Arrange stacks by placing the largest slices of eggplant on the bottom, followed by a tomato slice, a bit of salt and pepper, mozzarella, and basil leaves. Repeat, finishing with a basil leaf on top.

Drizzle balsamic vinegar over the stacks. If you want a slightly sweeter taste, make a balsamic reduction first by bringing the balsamic to a boil then simmering until syrupy and reduced by about half.

July 25, 2011

Mango Banana Bread

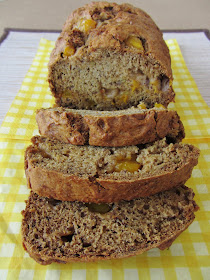
mango banana bread
When my twin sister first started eating vegetarian, I had no problems with it, as our older sister had become a vegetarian long ago. But some of the meals she made disgusted me. I mean, lentils? The name alone was enough to turn me off, not to mention their puke green colour. And quinoa? I couldn't even pronounce it, let alone cook it. However, as I started learning more about healthy cooking and the benefits of protein-rich legumes and grains like lentils and quinoa, I finally decided to give them a try myself, and reluctantly admitted that as usual, my sister was right. They were not only healthy and filling, but versatile and delicious. I never would have imagined that something called lentil loaf would become one of my favourite meals, but it did.

Then she started branching out into even weirder foods. Bags of strangely named ingredients started overpopulating our cupboards, like chia seeds, chickpea flour, and flax seed. Whenever she tried to make me try her popcorn that she topped with nutritional yeast, I flat out refused. But, as you've probably guessed, I've since discovered that ground flax seed is a great source of fiber to add to smoothies, and nutritional yeast is not only healthy but adds a delicious cheesy flavour to vegetables and other foods.

Now, she's started using her weird ingredients for baking, and this is where I drew the line. Experimenting with meals is one thing, but baking is something that I've learned not to mess with. As much as I'd love to make all my baked goods fat-free and healthy, no matter what, they just never taste as good as the real thing.

So when I saw this recipe for a vegan mango banana bread, I was hesitant. But I had a bunch of ripe bananas on the counter that were starting to attract fruit flies, I absolutely love mango, and this recipe didn't contain any strange ingredients, so I decided to be brave and give it a try. And once again, I was wrong to doubt. This bread was everything I love about banana bread; it was moist and dense with a strong banana flavour, but kicks it up a notch with a hint of spice and surprise bites of sweet mango.

mango banana bread
I didn't change any of the ingredients, so head on over to Joy the Baker's blog to get the recipe. And if you haven't looked around her site before, you should definitely spend some time there, she has tons of amazing recipes and is really funny too!

In addition to discovering a great healthy banana bread recipe, I've learned to be more willing to try new ingredients and recipes, as they might surprise you. And I've also learned that my sister is usually right, and I'm usually wrong.

July 24, 2011

Lemony Pasta with Zucchini and Tomatoes

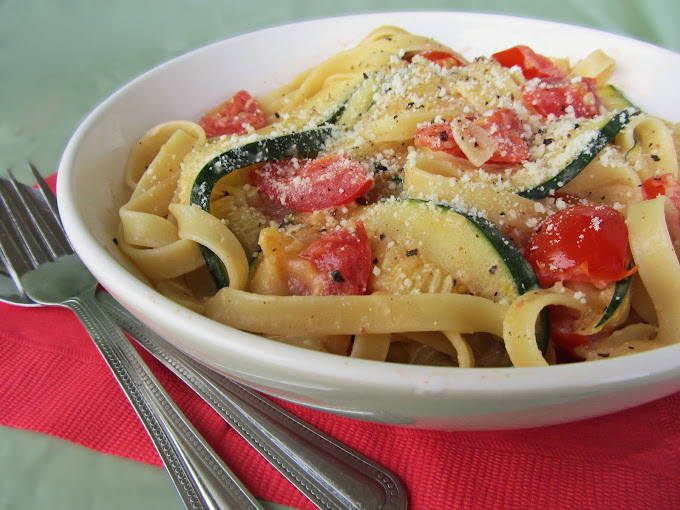
lemon pasta with zucchini and tomatoes

Well, I finally did it, I finally start a food blog! This is something I've been wanting to do for at least a year now, but never worked up the motivation to actually start. Any time my friends suggested it to me, I'd quickly list off all the same excuses I'd been giving to myself: I don't have the time, my photos aren't good enough, I don't want cooking to become a chore just to give me blog material, I don't have anything interesting to add to the hundreds of food blogs already out there, and most importantly, I don't even know how to start a blog.

Yet at the same time, I was always dreaming of what my blog would look like, what I would call it, what recipes I would post, etc. I don't know what finally changed my mind, but one day I decided to just start researching this blog thing - how hard could it really be? Turns out it is ridiculously easy (as long as you don't get into all the weird html code stuff, which I am staying far away from), and within about 30 seconds you could have your own blog up and running on Blogger.

I started playing around with the template, and pretty soon I realized I wanted to give this a real try. I had already come up with responses to all my previous excuses: I'm already taking the time to cook and photograph my food, so posting them online will be the least time consuming part of the process, if I start a blog then I will be forced to improve my photography and cooking, it would give me a fun hobby to help me avoid schoolwork, and it would be the best way to share my favourite recipes with family and friends. So, after a minor debate between the go-getter and the procrastinator sides of myself, the latter lost (which rarely happens), and this blog was born.

For my first post, I thought I'd choose a recipe that is simple, fast, healthy, and summery, and this pasta fits the bill perfectly. Even though there are a few different components to assemble, it doesn't take much time at all, and the end result is summer in a bowl (or plate, depending on how you like to serve your pasta). Zucchinis and tomatoes are all over the farmers markets lately, and this dish is a great way to highlight them. The star, however, is the tangy lemon yogurt sauce - I'm not ashamed to admit that I licked my bowl clean afterwards.

Here's the recipe!

Lemony Pasta with Zucchini and Tomatoes

Slightly adapated from Ezra Pound Cake, who adapted it from Jillian Michaels' The Master Your Metabolism Cookbook

Serves 4

Ingredients

1/2 cup non-fat plain yogurt
1/4 cup grated parmesan cheese, plus extra for topping
1 teaspoon lemon zest
1/4 teaspoon salt
1/4 teaspoon ground black pepper
8 ounces (227g) fettucine (or pasta of choice)
1 tablespoon olive oil
3 medium or 2 large zucchini
2 garlic cloves, thinly sliced
1/2 pint grape or cherry tomatoes, halved or quartered

Directions


Prepare the tomatoes, garlic, and zucchini. To prepare the zucchini, slice into thin strips, about 3 inches long and ½ inch wide. I found it easiest to slice the zucchini in half down the middle first, then slice each half lengthwise into very thin strips, then slice each strip in half lengthwise.

In a large bowl, stir together the yogurt, parmesan cheese, lemon zest, salt, and pepper. Set aside.

Cook the pasta in a large pot of boiling water, according to package directions. Drain the pasta, reserving about ¼ cup of the cooking water.

Heat the olive oil over medium-high heat in a large skillet. Add the zucchini and cook until just wilted and somewhat see-through, gently stirring occasionally.

Push the zucchini aside to clear a spot on the bottom of the pan and add the garlic. Cook for 15 to 30 seconds, until just golden. Mix in with the zucchini.

Stir in the tomatoes and cook until softened, about 2 minutes.

Transfer both the zucchini mixture and the pasta to the bowl with the yogurt sauce, and toss gently until completely coated. If necessary, add the reserved pasta water a tablespoon at a time to thin the sauce.

Divide among four bowls to serve, and sprinkle the top with parmesan, and extra salt and pepper if desired.