Pages

February 29, 2012

Chocolate Peanut Butter Rice Krispie Roll

chocolate peanut butter rice krispie rollI don't know if it's just me, but I feel like I've been seeing Rice Krispie treats everywhere lately. I've never really thought that I like Rice Krispie squares, probably because I'm not big on things with marshmallows in them. So I hadn't really been paying attention to all the Rice Krispie recipes I'd been seeing, until I came across this chocolate peanut butter Rice Krispie roll from Made that someone had pinned on Pinterest (can't remember who now, sorry!).

The pictures immediately brought back childhood memories of a very similar roll that my mom used to make and that I remember loving so much. Only a couple days after seeing that pin, I went out to buy the ingredients to make it myself!

This is probably the easiest dessert I've ever made - the only equipment you really need is a microwave, and the whole thing probably took me about 15 minutes to make. All you do is mix some Rice Krispies with melted marshmallows, peanut butter, and a bit of butter, then spread the mixture on a pan. Next you melt chocolate with more peanut butter (though the original recipe called for peanut butter chips) and spread that in a layer on top, then roll the whole thing up like a jelly roll, and slice! The hardest part is waiting for it to harden in the fridge before you can slice and eat it!

chocolate peanut butter rice krispie rollThese didn't turn out exactly how I remember my mom's Rice Krispie roll to be because hers had a much more visible and solid chocolate swirl in it, whereas with these, the chocolate spread out a bit so that you couldn't really see the swirl as well. However, once I took a bite I didn't really care about whether you could see the swirl or not because they tasted amazing! My whole family couldn't stop eating them - they're quite addictive!

When I ate a slice straight from the fridge, I thought the chocolate taste was a lot stronger than the peanut butter, but the peanut butter seemed to become more noticeable after they warmed up a bit to room temperature. If you're looking for a really strong peanut butter flavour, you could probably just increase the amount of peanut butter in the filling, but I thought the balance was pretty good as is.

I'd definitely make these again when I need a really easy dessert to whip up for a crowd, as these would please both kids and adults! And now that I seem to have a renewed love for Rice Krispie treats (and tons of Rice Krispies left in the Family-sized box I bought), I'm eager to go back to some of those recipes I've been seeing lately and try one out! Here's a few recent recipes that I have my eye on:

Butterfinger Rice Krispie Treats from Recipe Girl
Chubby Hubby Rice Krispie Treats from The Sweets Life
Nutter Butter Krispie Treats from Cookies and Cups
Salted Brown Butter Cocoa Nib Rice Krispie Treats from Food + Words
Chocolate Butterscotch Marshmallow Treats from Gingerbread Bagels
Nutella Rice Krispie Bars from Sugarcrafter
Cinnamon Roll Rice Krispie Treats from Cooking Classy

If you have any other good ideas for using up Rice Krispies, let me know!

Happy Leap Day :)
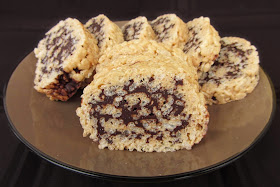
chocolate peanut butter rice krispie roll
Chocolate Peanut Butter Rice Krispie Roll

Adapted from Made

Makes about 25 pieces

Ingredients:

10 oz mini marshmallows
1/4 cup unsalted butter
3/4 cup peanut butter, divided
6 cups Rice Krispies
1-1/2 cups semisweet chocolate chips

Directions:

Line a large jelly-roll pan (mine was 18 by 13 inches but I didn’t quite fill the whole thing) with waxed paper, and spray the paper with non-stick spray.

Place marshmallows, butter, and 1/4 cup peanut butter in a large microwave-safe bowl. Heat on high in the microwave for 2 minutes, then stir until smooth. Add the Rice Krispies and stir until coated.

Spread mixture onto the greased wax paper. Coat hands in non-stick spray and pat down the Rice Krispie mixture until even and smooth (I left about a 1-inch border on one long edge of the pan because my mixture didn’t quite cover the whole pan).

Add chocolate chips and 1/2 cup peanut butter to a separate microwave-safe bowl. Heat on high in the microwave in 30 second intervals, for about 1 minute and 30 seconds total, until melted. Stir until smooth.  

Pour chocolate mixture over the Rice Krispies and smooth to cover the surface. Don’t spread it quite to the edge on the long edges.

Roll the mixture jelly-roll style into a log, starting with one of the longer edges and rolling towards the opposite long edge. Pull the wax paper from under the log as you roll towards the opposite side to help it along.

Place log in refrigerator for at least 30 minutes, then slice into pieces about 1/2" thick.

For helpful pictures on how to roll the log, see the original post here.

February 26, 2012

Tropical Chicken Cups

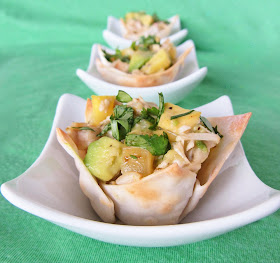
tropical chicken cups with pineapple and avocadoI've never been to an Oscars party and I usually don't last through the whole awards show, but I've been seeing a lot of Oscar menu ideas lately and I decided to make myself an Oscar-themed appetizer this year to eat during my favourite part of the show, the red carpet!

The four Best Picture nominees that I've seen are Moneyball, The Help, Midnight in Paris, and War Horse, so if I wanted to make something to match one of those, it would mean either baseball food, Southern food, French food, or.. horse food? None of those really appealed to me today, but when I read that The Descendants takes place in Hawaii, I decided to make something Hawaiian to eat because it seemed like the perfect thing to brighten a cold winter day. Even though I haven't seen The Descendants, I may have to root for it now - it deserves to win just for inspiring these delicious tropical chicken cups!

My sister showed me the original recipe for coconut mango chicken cups on Liv Life because she thought they'd be up my alley, and she was right! I hadn't seen this blog before, but it has tons of fantastic looking recipes and photos so I can't wait to try more from it. Kim says that she's made her chicken cups for lots of different gatherings, so I knew they would be good. Hers had mango chutney and curry paste in them, but I decided to give them a Hawaiian twist by using pineapple instead, and I added in avocado because I think it pairs really well with pineapple. I left in the coconut milk and lime juice so that the whole thing would have a tropical taste!

tropical chicken cups with pineapple and avocadoThese were pretty easy to make and were bursting with bright flavour! I think they'd make a perfect party appetizer that would be very quickly gobbled up (I know from the surprising rate that these disappeared from my own plate!) You could probably make a vegetarian version of them too by replacing the chicken with black beans, or even adding some coconut sticky rice for a bit more substance.

I realize you won't have time to make these in time for tonight's Oscars yourselves, but they'd be great for any occasion (and really, it's a bit of a stretch for me to call them Oscar-inspired anyway)! And now that I know what a great vessel wontons make for appetizers, I keep thinking of other filling ideas that would be fabulous in these - and if you decide to experiment, let me know what works!

Are you watching the Oscars tonight, and did you make any Oscar-inspired food?

tropical chicken cups with pineapple and avocado
Tropical Chicken Cups (with Pineapple, Avocado, Coconut, & Lime)

Makes 24 cups

Ingredients:

24 wonton wrappers
1 tsp canola oil
1 small onion, diced
3 cloves garlic, minced
1-1/2 tablespoons minced fresh ginger
2 cups cooked diced chicken (or you could use fish instead!)
3/4 cup light coconut milk
2 tablespoons fresh lime juice
1-1/2 cups diced fresh ripe pineapple
1 ripe avocado, diced
salt and pepper
cilantro for topping (optional)

Directions:

Preheat oven to 350°F. Spray a mini muffin pan with non-stick spray. Press 24 wonton wrappers into the mini muffin tin, pressing any folds firmly to the sides. Bake for 5-10 minutes, until golden. Set aside to cool.

Heat oil in a large non-stick skillet over medium-high heat. Add onion and sauté about 5 minutes, or until soft. Add the garlic and ginger and cook for another minute. Add the chicken, coconut milk, and lime juice, and cook for a few minutes until coconut milk is mostly absorbed. Gently stir in pineapple and avocado. Season generously with salt and pepper, tasting to adjust any amounts to taste. Remove from heat and cool slightly.

Spoon filling into wonton cups (you may have a bit of extra filling, which you can taste before filling the wonton cups to make sure it’s to your liking). Sprinkle chopped cilantro on top, if desired (if you're serving these to a big group, you may only want to put cilantro on half of the chicken cups because a lot of people don't like it). Serve warm or at room temperature.

February 22, 2012

Sesame Soy Spaghetti Squash with Broccoli and Edamame

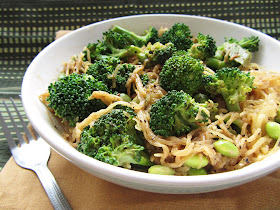
sesame soy spaghetti squash with broccoli and edamame
After the rather indulgent caramel latte pancakes I last posted (not to mention the amount of pancakes I ate yesterday), I felt like I should post something healthier today. This sesame soy spaghetti squash with broccoli and edamame is a dish I’ve made quite a few times lately because it’s so healthy and really tasty!

I think the inspiration for this dish originally came from this steamed broccoli and squash with tahini dressing that I saw in a Whole Living magazine. I liked the idea but ended up changing everything around to my own tastes, so that the only parts of the original that really remained were the broccoli and tahini.

For my tahini sauce, I wanted to give it more of an Asian flavour with sesame and soy sauce. After a bit of experimentation, I came up with a sauce that I thought was full of flavour, and is filling and healthy from the addition of the tahini (sesame seed paste).

The first time I made the sauce, I paired it with steamed broccoli and sweet potato over brown rice (pictured below):

sesame soy broccoli and sweet potatoes on riceWhile I loved the sauce and veggies, I didn't like the way the rice absorbed all of the sauce and didn't think the textures of the dish were quite right.

So for my second try, I decided to make the same dish over soba noodles instead:

sesame soy broccoli and sweet potatoes on soba noodles
The soba noodles provided a much better base for both the sauce and the vegetables, and I really loved this version.

But a few days later I had a spaghetti squash to use up, so I decided to try the dish again, using the spaghetti squash as the base instead of soba noodles. Since I already knew that the sesame soy tahini sauce went well the sweet potatoes, I figured squash would also pair well with it.

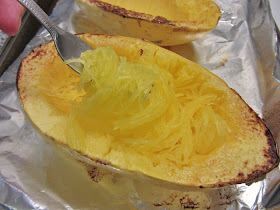
If you've never tried spaghetti squash before, it's a lot like other winter squashes except that when the flesh is cooked, it scrapes off like strands of spaghetti! This makes it a great healthy and low-carb substitute for pasta - I've seen it in lots of recipes from basic tomato sauce with spaghetti squash to baked dishes with lots of other add-ins.

spaghetti squash
I used the cooked spaghetti squash "noodles" as the base for my latest version of this sesame soy tahini dish. I kept in the steamed broccoli but this time I added cooked edamame for protein. This combination turned out to be my favourite version of all, and was also the healthiest!

I think I've now found the dish I'm going to stick with, but if I experiment more in the future, I may try pairing the sesame soy sauce with salmon or chicken, I think that would go really well!
sesame soy spaghetti squash with broccoli and edamame
Sesame Soy Spaghetti Squash with Broccoli and Edamame

Makes 2 servings

Ingredients:

Sesame Soy Tahini Sauce:
3 tablespoons tahini (sesame seed paste)
2 tablespoons low-sodium soy sauce
1 tablespoon rice vinegar
1 teaspoon sesame oil
2 teaspoons honey
1 teaspoon minced fresh ginger
1 clove garlic, minced
Dash of cayenne pepper
1-2 tablespoons water

Half of a spaghetti squash
Half a head of broccoli, chopped into florets
1 cup frozen shelled edamame
Sesame seeds for topping
Salt and pepper

Directions:

Preheat oven to 400°F. Cut spaghetti squash in half and scoop out the seeds and pulp from the center. Place one half with the cut side facing down on a greased or lined baking sheet (keep other half wrapped in the fridge for another use). Roast for 30-40 minutes, or until tender - it may take longer, depending on the size of your squash. When done, use a fork to scrape the flesh off the skin and into a bowl (it will scrape off in strands, like spaghetti).

While the squash is cooking, prepare the remaining components:

Whisk together all ingredients for the sauce. Taste and adjust any seasonings to taste. If the sauce is too thick, add a bit more water to thin it out.

Place chopped broccoli in a steamer basket and steam over boiling water for 3-5 minutes, until crisp-tender and bright green. Set aside. Cook edamame according to package directions.

When all components are ready, divide spaghetti squash into two bowls, top with broccoli and edamame, and drizzle sesame soy tahini sauce overtop. Top with sesame seeds and season with salt and pepper, if desired.

This is best eaten on the day that it's made.

February 20, 2012

Caramel Latte Pancakes

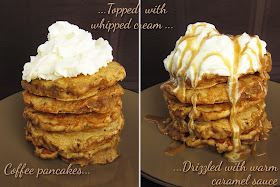
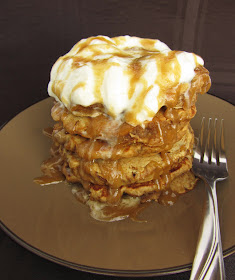
caramel latte pancakes before and after adding sauceTomorrow is one of my favourite holidays of the year: Pancake Tuesday!

I don't know if other people celebrate the day (also known as Shrove Tuesday) the same way that my family does, but for my whole life, Pancake Tuesday has meant that we get to eat a giant stack of pancakes for dinner! The pancake selection in our family has grown over the years so that we now have a selection of four types of pancakes on Pancake Tuesday (plain, blueberry, chocolate chip, and either apple or banana). But because I love to experiment, I usually end up making something a little fancier and different for myself around this time of year.

This year, I decided to try something I've never tried or even heard of before: caramel latte pancakes. The idea came from these amazing looking cappuccino pancakes with mocha syrup that I recently saw on The Pastry Affair. I loved the idea of cappuccino pancakes, but since my favourite Starbucks drink is a caramel macchiato (or, in the summer time, a caramel frappuccino), I decided to try to copy the flavour of that drink with these pancakes.

I adapted the pancake recipe from The Pastry Affair by adding in some vanilla and cinnamon and increasing the sugar a bit to balance out the bitterness of the coffee. Then I decided to top the pancakes with whipped cream and an easy caramel sauce.

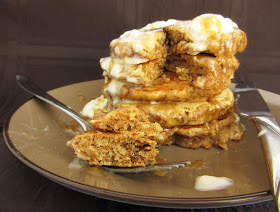
caramel latte pancakesI was really hoping that these would turn out as good as I imagined they'd be in my head, and as you can probably tell from the pictures, they certainly did not disappoint! The pancakes had a nice coffee flavour that wasn't overwhelming, but was definitely noticeable. When the warm caramel sauce was drizzled over the whipped cream, it all melted down the sides of the pancakes so that every bite ended up with some whipped cream foam and sweet caramel sauce. It was heavenly!

These definitely reminded me of a warm caramel macchiato from Starbucks. They were so good that I made them twice over this past long weekend, though they definitely aren't the type of breakfast I would eat on a regular basis as they're not exactly a healthy way to start the day. But if you're a coffee lover and want to make something extra special to celebrate Pancake Tuesday or any other day, you've got to try these!

Update: If you're looking for more pancake recipes, I've pinned over 60 pancakes from other blogs on Pinterest, so check out my board for lots of ideas!

caramel latte pancakes slice

Caramel Latte Pancakes

Inspired by Starbucks’ caramel macchiato; Coffee pancakes adapted from The Pastry Affair; Caramel syrup adapted from Po’ Man Meals

Makes about 10 pancakes

Ingredients:

For the Pancakes:

1 1/2 cups all-purpose flour
1/2 tablespoon baking powder
1-1/2 to 2 tablespoons instant espresso or coffee (depending on how strong of a coffee flavour you’d like)
1/2 teaspoon cinnamon
1/2 teaspoon salt
1/4 cup sugar
1 egg
1 cup milk
2 tablespoons melted butter, cooled slightly
1 teaspoon vanilla

For the Caramel Sauce:

2 tablespoons butter
1/2 cup brown sugar
2 tablespoons milk
1/2 teaspoon vanilla

For Topping:

Light whipped cream

Directions:

Make the Caramel Sauce:
Add the butter and brown sugar to a small saucepan. Bring to a boil over medium-high heat and cook 1 to 2 minutes, until slightly thickened. Slowly stir in the milk and continue to simmer until thickened slightly. Remove from heat and stir in the vanilla extract.

Make the Pancakes:
Mix the dry ingredients (flour, baking powder, coffee, cinnamon, salt, sugar) in a large bowl. Mix the wet ingredients (egg, milk, butter, vanilla) in a separate bowl. Add the wet ingredients to the dry ingredients and stir just until incorporated.
Heat a large non-stick skillet over medium-high heat. Lightly butter the pan, and once hot, add pancake batter by the 1/4 cup full (use a small spatula or spoon to spread the batter into a circle if it's too thick). Cook for a couple of minutes until bubbles start to form on the top, then flip and cook for another minute or so, until golden brown on both sides.

Assemble the Dish:
Quickly reheat caramel sauce until it is warm and pourable. Stack pancakes on a plate. Top with whipped cream and drizzle a spoonful of caramel sauce on top. Serve immediately.

February 16, 2012

Sweet Potato & Chickpea Hash with Fried Eggs

sweet potato chickpea hash with fried eggBreakfast for dinner (or 'brinner', though I've never once used that word in real life) is one of my very favourite meals. When I used to stay at school really late during my undergrad days, I liked to treat myself to the all-day breakfast for dinner in the cafeteria. It was cheap and filling and I would savour every single bite of those deliciously greasy hashbrowns. These days I'm usually at home for dinner, but on the nights that I don't feel like cooking anything, my standby is always a scrambled egg and cheese sandwich. It takes about three minutes to make and seems to taste better every time I make it!

I made this sweet potato and chickpea hash for a late weekend breakfast recently, but it's one of those dishes that would work equally well for dinner. Any time of day you choose to eat it, it makes for a really tasty and satisfying meal that's full of veggies and protein, so it's pretty healthy too.

I topped mine with a fried egg but next time I'd probably use a poached egg because I prefer their texture (plus they're healthier!) - either way, you'll end up with a delicious runny yolk that blends in with the potatoes to make each bite taste rich and savoury. Of course, you could leave out the egg and serve the hash as a side dish to a different protein if you prefer, but I thought the egg paired well with the dish and turned it into more of a complete vegetarian meal.

The original recipe called for baking the sweet potatoes in the oven before frying them in the skillet, but I was too hungry to wait that long so I searched online for other methods. There appear to be lots of ways of cooking sweet potatoes for a hash - some boil the sweet potato for up to 15 minutes, others for just a few minutes; some bake the sweet potato first, others bake the whole hash in the oven together; and some just throw the raw potatoes right into the skillet. I decided to boil the sweet potatoes just long enough to make them tender, then finish them in the skillet so they could get crispy and golden but still be cooked through. I thought that method worked well, but feel free to experiment!

I made a big batch of this sweet potato chickpea hash on the weekend, then divided the leftovers into single portions to keep in the fridge. That way I could take out a portion of the potato mixture during the week, and heat it in the microwave while I cooked a fresh egg to serve on top, making for quick and easy breakfasts (and dinner!)

sweet potato chickpea hash with fried egg
Sweet Potato & Chickpea Hash with Fried Eggs

Adapted from LCBO’s Food & Drink Magazine, Winter 2012 Issue

Serves 4

Ingredients:

2 medium or 1 large sweet potato (500g total), diced
1-2 tablespoons olive oil
1/2 a medium yellow onion, peeled and diced (about 1/2 cup)
3 cloves garlic, minced
1 small zucchini, chopped (about 1 cup)
1 medium red bell pepper, chopped (about 1 cup)
1 cup chickpeas (from a can, drained and rinsed)
1/4 cup chopped fresh parsley
Large pinch each of smoked paprika, salt, and pepper (and other seasonings if desired)
4 large eggs

Directions:

Add diced sweet potato to a large pot and cover with cold water. Bring to a boil and cook until tender, about 5-7 minutes. Drain and leave aside.

Meanwhile, heat olive oil over medium-high heat in a large non-stick skillet. Add the chopped onion, garlic, zucchini, red pepper, and chickpeas (I didn’t have a pan quite big enough to fit everything, so I split everything into two pans). Cook 5-10 minutes until starting to brown, stirring often.

Transfer vegetables to a bowl, wipe out the pan and add a bit more oil. Add the sweet potatoes to the pan and spread out in a single layer. Let cook without stirring for about 5 minutes, or until browned on one side. Flip and cook another 3-5 minutes. Repeat a couple more times until all sides are lightly browned.

Add the vegetables back to the pan and toss with the sweet potatoes. Add the parsley and season with paprika, salt, and pepper to taste. Toss everything together, then remove from pan and divide among four plates.

Wipe the pan, spray with non-stick cooking spray (or use butter if that’s your preferred method for frying eggs) and set over medium-low heat. Crack 4 eggs into the pan, cover, and let cook about 3 minutes, until whites are set. Top each serving of sweet potato hash with a fried egg, and serve warm with additional salt and pepper if desired.

February 13, 2012

Heart-Shaped Personal Pizzas (with heart-shaped toppings!)

Four heart shaped personal pizzasHappy Valentine's Day!

If you're still looking for last minute meal ideas to make for your loved one(s) tomorrow, I've got the perfect idea for you: heart-shaped personal pizzas with heart-shaped toppings!

I say "idea" because I'm not actually providing a recipe here - pizza's one of those things that you don't really need measurements in a recipe to make (unless you're making your own dough, in which case, I can't help you there because I just bought a refrigerated storebought pizza dough for these).

All you have to do for these adorable little guys is divide a regular-sized pizza dough (storebought or homemade) into four, then shape each portion into a heart. This part was a lot easier than I expected; my hearts weren't perfect, but you can definitely tell they're hearts! If you're having difficulty shaping the dough, just let it rest a while longer until it's easier to work with. For a few of the hearts, I had to cut off some of the dough from the top part in order to get the heart right, but they all held their shape pretty well.

Once you have your dough shaped into four personal-sized hearts, then you can top each one according to individual tastes and bake them (I baked two at a time). In order to make my pizzas extra special, I topped each one with different heart-shaped toppings! Check out my topping ideas below:

1) Pepperoni Hearts:

heart shaped pepperoni personal pizzaThis one was one of the easiest - I just bought sliced pepperoni and cut each slice into a heart using a knife. You can even stack the pepperoni slices on top of each other to cut multiple hearts at a time, so this pizza takes no time at all to prepare. I paired the pepperoni with simple tomato sauce and mozzarella cheese.

2) Tomato Hearts:

heart shaped tomato personal pizzaTomato is my favourite pizza topping, and combined with mozzarella and basil, it makes for my very favourite pizza! The tomatoes were the hardest of all the toppings to cut into hearts, and they probably made the least obvious looking hearts, but I think they still turned out cute! I placed each heart on top of a slice of mozzarella instead of shredding the cheese first, but either works!

3) Red Bell Pepper Hearts:

heart shaped red pepper personal pizzaI thought these were the most fun because the red pepper was the least obvious ingredient to turn into a heart. All you have to do is slice a red bell pepper and line up two slices together to form a heart shape (you'll have to trim the ends off to get the right angle for your heart). I combined my red pepper slices with spinach and goat cheese, and while I'm not usually a fan of peppers on pizza, this was one of my favourites!

4) Roasted Red Pepper Hearts:

heart shaped roasted red pepper personal pizzaThis was one of those last minute ideas I had that I wasn't very sure about, but it ended up being one of the best looking pizzas! I bought a jar of roasted red peppers, then just pulled out a big slice and cut it into small hearts using a paring knife. You could also roast your own red pepper if you have the time; I was just lazy. You could pair roasted red peppers with any other toppings you want but I kept it simple with just mozzarella cheese and tomato sauce.

If you don't like any of the above ideas, here are a few more ideas for toppings you could shape into hearts, which I didn't have enough dough to try with:

- Roasted red beets
- Roasted sweet potatoes
- Plain cheese with hearts drawn on in bbq or tomato sauce (for picky kids)
- Strawberries or apples (for the more adventurous types!)

I was so happy with how these turned out - not only did they look adorable, but they tasted amazing (what's not to like about pizza?!) and were the perfect size for one person.

And don't think that these can only be made on Valentine's Day! Save this idea and make heart-shaped pizzas any time you want to show your family, friends, or partner (or just yourself!) some love - they're guaranteed to put a smile on anyone's face :)

February 11, 2012

Beet & Goat Cheese Risotto

beet and goat cheese risottoWhen I posted my pretty pink cranberry bars on Wednesday, I promised to share another naturally pink dish that would be perfect for a special Valentine's dinner, and here it is: gorgeous beet risotto. I only recently discovered how easy risotto is to make at home after years of thinking it was one of those things that only professional chefs can pull off. Really, the hardest part about making risotto is having to stir the rice for 20 minutes straight, but even that is something that anybody with a bit of patience can do!

I knew I wanted to make a beet risotto for Valentine's Day because it would be fancy enough for a nice dinner and festive enough for the holiday because of its beautiful colour. I had a hard time choosing a recipe because there seem to be so many different ways of making beet risotto: boiling the beets and using their cooking water, roasting them and just adding the chopped beets at the end, pureeing them and mixing that into the rice as it cooks, etc.. Fortunately, my sister had recently tried a recipe from All Seasons Cuisine that she said was amazing, and after checking it out and discovering that it had goat cheese in it, I was immediately sold!

This recipe combined a couple of the methods I had seen in others - beets are roasted before cooking the rice, then some of the beets are pureed and mixed into the cooked rice, while the rest of them are diced and tossed in at the end. I loved the way the pureed beets thickened and coloured the rice, and I especially loved the textural contrast that the diced beets added. The original recipe also called for the addition of beet greens (which is why theirs looks darker than mine). Unfortunately my beets didn't come with their greens attached so I had to leave them out, but I think they would have added another nice layer of texture.

This post is already getting too long and I haven't even told you how this tasted yet, so let me make it clear right now that this tastes amazing! Because a lot of goat cheese is added, I found it to be the predominant flavour over the beets. I was fine with that because I absolutely love goat cheese and it added a nice richness to the risotto, but if you really want the beets to be the star of this dish, you could simply omit the cheese. I tasted the risotto before adding any cheese and it was still delicious! Either way, this is sure to be the star of your Valentine's dinner, or any other day's meal! And served with my beet hummus as an appetizer and cranberry bars for dessert, you could have a complete pink meal (without any food colouring!) for your loved one(s), or show yourself some love and save it all for yourself :)


Beet & Goat Cheese Risotto

Adapted from All Seasons Cuisine

Serves about 4-5 as a side dish, or 2-3 as a main

Ingredients:

1 pound red beets (about 3 medium beets)
Greens from the beets (optional – I omitted)
1/4 cup olive oil, divided
4 cups vegetable stock (I used one 900mL container)
1/2 large yellow onion, peeled and diced
1 cup Arborio rice
1/2 cup dry white wine (I used Sauvignon Blanc)
1/4 to 1/3 cup goat cheese
1/4 cup grated parmesan cheese (optional for a cheesier flavour)
Handful of chopped parsley
Salt and pepper

Directions:

Preheat oven to 400°F. If beets still have greens attached, trim them off and set them aside. Wrap beets in foil, like a packet, and set on a baking sheet. Roast in the oven for 1 hour, or until beets are tender. Remove and let cool slightly.

Trim the ends off the beets and peel off the skin. Dice about two-thirds of the beets and set aside. Roughly chop the remaining third of the beets and place in the small bowl of a food processor. Add 2 tablespoons of olive oil and a dash each of salt and pepper, then puree until smooth. Set aside.

If using the beet greens, wash and dry them, thinly slice them, and set aside.

Add vegetable broth to a medium pot and bring to a gentle simmer. Keep it gently simmering as you make the risotto.

Heat 2 tablespoons olive oil in a large deep skillet or pot over medium-high heat. Add the onion and sauté until softened but not browned, about 4-5 minutes. Add the rice and continuously stir to toast, about 2 minutes. Add the wine and stir until all the liquid has been absorbed.

Begin adding vegetable broth to the rice, a small ladle at a time, stirring rice constantly. When each addition of liquid is absorbed by the rice, add another small ladleful. Continue adding broth and stirring for about 20 minutes total, until rice is creamy and al dente. Have a kettle of boiled water nearby so that if you run out of vegetable stock, you can add water from the kettle instead.

Add beet purée, diced beets, beet greens (if using), and goat cheese to the rice. Stir until goat cheese is melted. Remove from heat. Taste, and if you would like a stronger cheese flavour, add the parmesan cheese and stir. Season with salt and pepper if desired.

Serve warm, garnished with parsley.

February 08, 2012

(Heart Shaped) Cranberry Bars

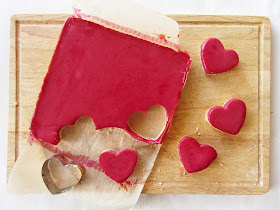
cranberry bars
Yesterday I realized that Valentine’s Day was only a week away, and so far I’ve only posted one Valentine’s recipe on my blog. As I’ve mentioned before, I’m not super into the holiday and don’t even have any plans for Valentine’s night, but I do love any excuse to make cute, themed baked goods!

I decided I needed to make some sort of festive treat last night, but didn’t know what. I’ve been seeing a lot of red velvet recipes lately, which all look incredibly gorgeous and dramatic. However, red velvet has never really appealed to me, either because of the colour, my hesitations about consuming food colouring, my dislike of chocolate cake, the fact that I’ve never even tried red velvet cake in my life, or all of the above. I do like the idea of having pretty red or pink treats for Valentine’s Day though, so I started to think of natural food sources that could create a beautifully coloured dessert.

For some reason, I then remembered a recipe for cranberry bars that I had seen in Vegetarian Times a few months ago. After retrieving the recipe and seeing the gorgeous colour of the bars in the photo, I knew I had to make them! And it just so happened that I had the exact amount of cranberries needed for the recipe in my freezer, so it was meant to be. In fact, the only thing that I needed to buy to make these was a can of sweetened condensed milk, so they didn’t cost me much either!

cranberry bars
I changed a few things with the recipe, most notably, cutting them into heart shapes instead of squares, because that just seemed like the obvious thing to do for a cute Valentine’s dessert! I also changed the graham flour crust to my favourite shortbread crust because I knew it would pair well with the cranberry filling. And I noticed that a lot of reviews said the bars were too sour, so I eliminated the lemon juice from the filling all together. I didn’t think it was needed because cranberries are already quite tart on their own, and I wanted their flavour to come through rather than the whole thing tasting like a lemon bar.

The result was so much better than I had expected, both in colour and flavour! The bars were a gorgeous shade of dark pink, which looked so pretty contrasted against the light coloured crust. The filling was smooth and creamy, and the taste had just the right balance of sweetness and tartness, which paired wonderfully with the buttery crust. I’m not sure if you would be able to tell when eating them that they’re made with cranberries - I actually thought they tasted more like raspberries, but in my opinion, that’s a good thing! My friend said they tasted like a cranberry creamsicle, and while I’ve never had a cranberry creamsicle, I can see what she means!

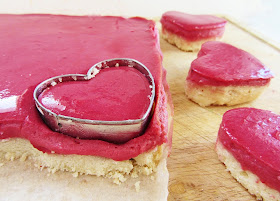
cutting the cranberry bars

The only slight difficulty I had with these was cutting them into heart shapes; they’re quite thick so they were a bit tricky to remove from the cookie cutter. It is possible though, you just have to push the bar up out of the cookie cutter very gently, slowly, and patiently from the bottom. I only had one heart break (not heartbreak, though it was a little sad) while I was trying to remove it, but I happily ate that one myself! Sometimes I pushed too hard and the bar went flying out of the cookie cutter and landed upside down, but even those ones still managed to survive! I ended up with 13 hearts and a bit of leftover scraps, but if you want to get a bit more out of the pan, you could easily just cut them into bars and save yourself the hassle (but they are super cute as hearts!)

I’ll be back in a few days with another beautiful naturally pink Valentine's dish, but this time for dinner! Stay tuned :)

UPDATE: I made these again with different cranberries and they turned out slightly darker, so don't worry if yours don't turn out the exact same colour as these!

cranberry bars

Cranberry Bars

Adapted from Vegetarian Times

Makes one 8x8 pan

Ingredients:

For the Crust:
1/2 cup unsalted butter, softened
1/4 cup sugar
1 cup all-purpose flour
1/4 teaspoon salt

For the Filling:
1 lb. fresh or frozen cranberries
1/2 cup water
3/4 cup fat-free or low-fat sweetened condensed milk
3 large egg yolks

Directions:

Preheat oven to 350°F. Line an 8x8 pan with aluminum foil or parchment paper (this will help with removing the bars later).

In a medium bowl, mix together the softened butter, flour, sugar, and salt until combined (mixture will be crumbly). Press into the bottom of the prepared pan.

Bake for 15-20 minutes at 350°F, until crust is firm and starting to turn golden brown around the edges. Let cool on a wire rack.

Reduce oven temperature to 300°F.

Meanwhile, bring cranberries and water to a simmer in a medium saucepan. Reduce heat to medium and cook 10 minutes, or until berries have burst and are tender. Let cool, then blend in a blender until smooth. Strain mixture through a sieve. You should end up with about 1 cup of smooth cranberry purée.

Transfer purée to bowl, and whisk in condensed milk and egg yolks until smooth.

Pour mixture over cooked crust, and bake in 300°F oven for 25-28 minutes, until filling is set. Cool at room temperature, then chill in refrigerator for at least one hour before cutting into bars or hearts, if desired.