 I'm not usually one to celebrate St. Patrick's Day (as in I don't start drinking green beer at 9am wearing an oversized green hat and a 'Kiss me I'm Irish' button), but I like the fun spirit of the holiday and love any reason to experiment with holiday-themed food - in this case, food that either contains booze or green colouring!
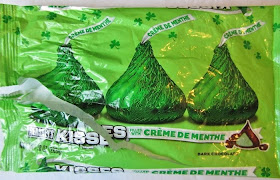
On a recent trip to Target (in the US - we won't have Target in Canada until next year), I noticed a bag of Hershey's Kisses on a St. Patrick's Day display and threw it in my basket thinking it was a new product released specifically for St. Paddy's. It wasn't until a few days ago that I looked at it again and realized that the clover-adorned bag of Dark Chocolate Hershey's Kisses with Creme de Menthe Filling was apparently just a remarketing of the snowflake-adorned bag of Dark Chocolate Kisses with Mint Truffle Center that are popular around the holidays. I didn't mind being fooled though, as I think the green center makes these Kisses more appropriate for St. Patrick's Day than Christmas anyway.

I went through a lot of different ideas for what to make with the Kisses, but most of them had already been done before. I thought I had a brilliant idea when I envisioned mini brownie bites with a Hershey's Kiss in the center and a cool whipped cream topping, but a quick Google search quickly put me in my place as a very similar recipe has already been created by Lauren's Latest (and her version looks way better than anything I could have pulled off!)
Then I started to think in a totally different direction with the idea of melting the Kisses to show off their green colour swirled in with chocolate. I remembered a recipe I'd seen on Recipe Girl for chocolate peppermint bark cookies from Bon Appetit. I decided to use the same idea of a cookie base with chocolate bark on top, but using the melted mint chocolate Kisses instead of regular chocolate.
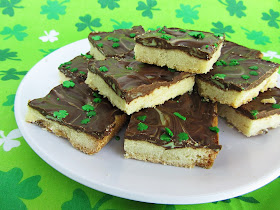
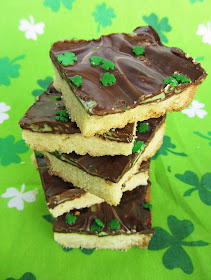
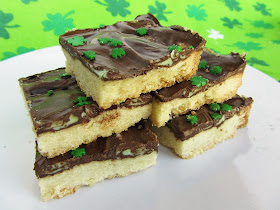
 I'd envisioned the bars to have a beautiful green swirl effect through the chocolate bark topping, but unfortunately the green seemed to disappear when I made them. There were still small green swirls visible, but brown was definitely the dominant colour.
To make up for the lack of green, I sprinkled the chocolate with some clover quins I had on hand, but I couldn't help thinking of a million better ways to top these bars (none of which I had the ingredients to pull off, of course). Fortunately, you can learn from my experience and be more prepared than I was! I'd suggest either leaving a few Hershey's Kisses aside and chopping them up to sprinkle on top, or using some other kind of green chocolate such as Andes mint chocolate chips or baking pieces (which I don't believe are available in Canada, but I've seen them used on lots of blogs). Swirling in some green melting wafers would also add more colour, or even some drizzled white chocolate could be nice - be creative and let me know what you try!
I still liked the way mine turned out with the clovers sprinkled on top, and the taste was amazing! The thin layer of mint chocolate is the perfect amount to give you a big dose of cool minty flavour that's balanced out by the crisp shortbread layer underneath. The recipe suggested to cut them into irregular shapes like bark, but I found it much easier to just cut them into regular bars. I loved them straight out of the fridge, but my sister preferred them once they'd softened up to room temperature, and Ryan loved them in between - either way, these are a really tasty cookie that's sure to please on St. Patrick's Day or any day!
And if mint chocolate isn't your thing, make sure to check out my St. Patrick's Day board on Pinterest for tons of other festive recipe ideas from other blogs!

Mint Chocolate Bark Cookies
Makes one 13”x9” pan of bar cookies, about 25 pieces
Adapted from Bon Appetit
Ingredients:
2 cups all-purpose flour
1/4 teaspoon salt
1 cup unsalted butter, at room temperature
1 cup sugar
1 teaspoon vanilla extract
1 large egg yolk
1 ten-ounce bag of dark chocolate Hershey’s Kisses filled with crème de menthe, Kisses unwrapped
Desired topping, such as clover quins, green sprinkles, chopped Hershey’s Kisses or Andes mint chocolates, chopped mint wafer cookies, etc.
Directions:
Preheat oven to 350°F. Line a 13x9x2-inch metal baking pan with a long strip of 9-inch wide parchment paper, leaving overhang on both the short sides of the pan (this will help you remove the bars later).
In a large bowl, whisk together the flour and salt.
In a separate bowl, beat the butter with an electric mixer until creamy, about 2 minutes. Gradually beat in sugar and continue beating until mixture is light and fluffy, about 3 minutes. Beat in the vanilla and the egg yolk. Slowly add the flour mixture, mixing on low until just blended.
Pour the dough mixture (it will be crumbly) into the prepared baking pan and press it into an even layer over the bottom of the pan. Pierce the dough all over with a fork, then place in the preheated oven and bake until dough turns a light golden brown, is slightly puffed, and edges are beginning to pull away from pan, about 25-30 minutes.
Transfer to a wire rack and immediately scatter the unwrapped Hershey’s Kisses over the dough (*Note: I didn't do this, but you might be able to get a stronger green swirl if you chop the Kisses first). Let stand a few minutes until the Kisses are mostly melted, then use a knife to gently swirl the chocolate around, making sure the chocolate covers the whole surface of the dough. Try to ensure there are visible swirls of the green centers of the Kisses.
While chocolate is still warm, sprinkle with desired toppings (I used clover quins, but see other ideas in the ingredients list).
Let chill in the refrigerator until chocolate is hardened, about one hour. Use parchment paper to lift the bars out of the pan, then cut into squares. Keep covered in the refrigerator.

I think these look wonderful :) And incredibly delicious!!!
ReplyDeleteThanks Courtney! I still loved the way they tasted, just wished there was a little something extra on top, but that's just the perfectionist in me!
ReplyDelete