Showing posts with label cheese - goat. Show all posts

April 24, 2014

Sweet Potatoes with Ricotta & Kale

Baked Sweet Potatoes Topped with Ricotta, Goat Cheese, Kale, and Garlic Chips

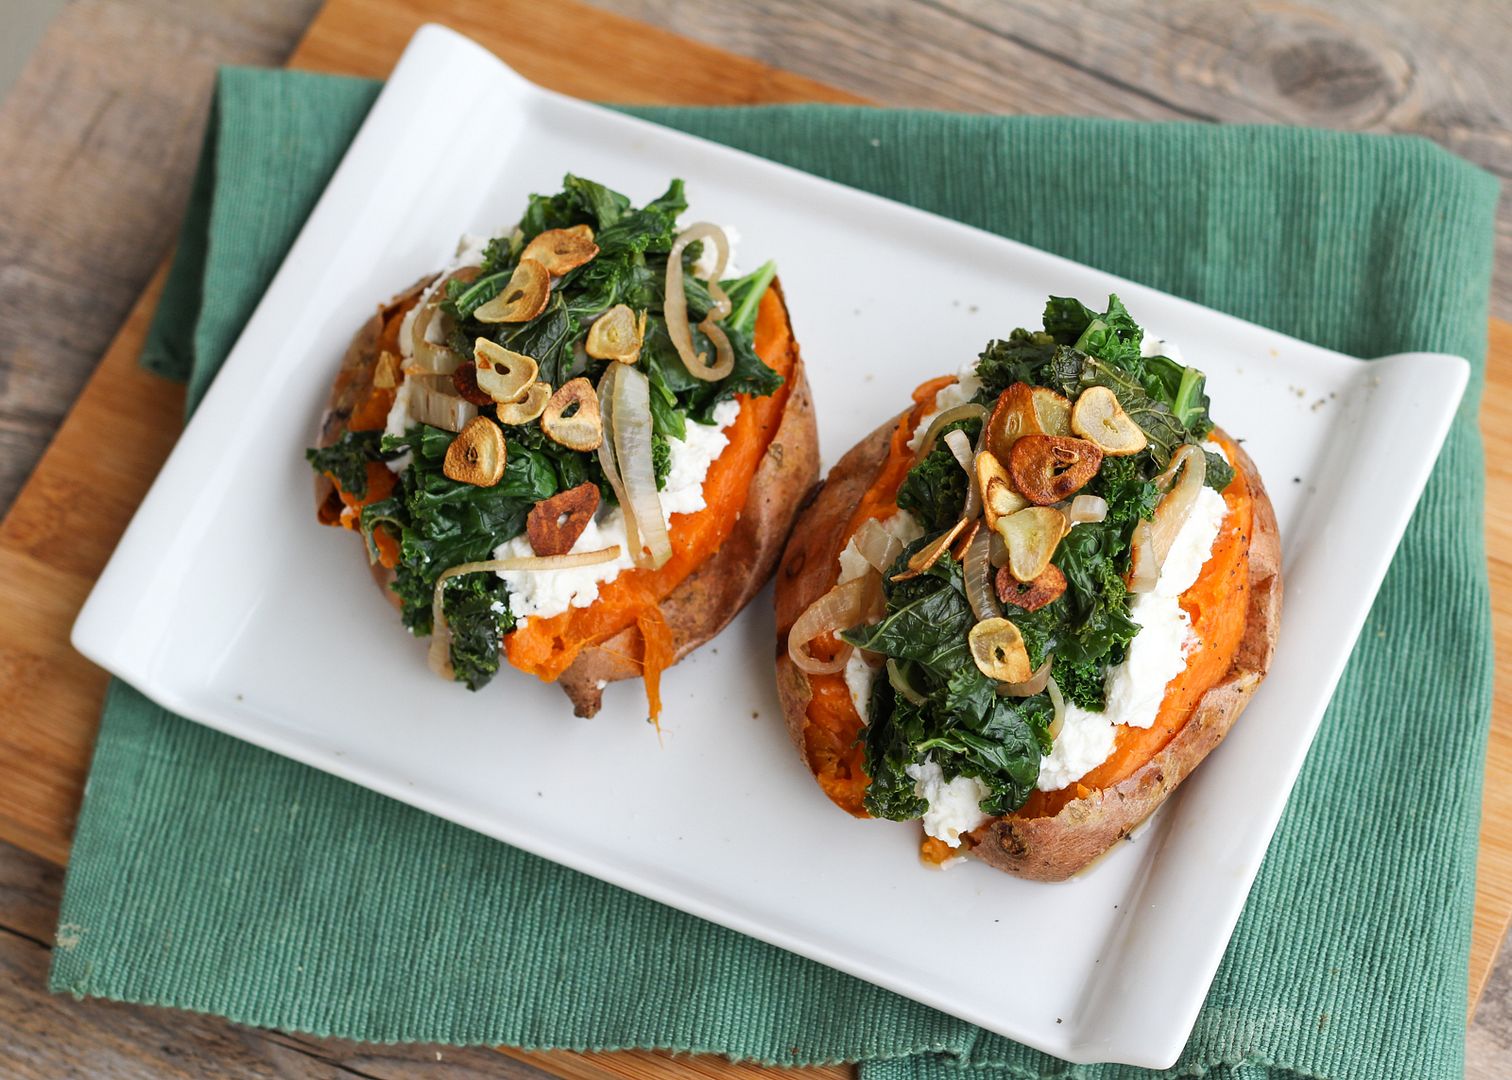
Today's my birthday and while I should be posting a picture of a decadent layer cake, instead I'm sharing sweet potatoes and kale.  And while some may think this is blasphemous, I would probably take a baked sweet potato smothered in goat cheese over a piece of frosted cake any day!  Which is mostly because I'm not a huge cake person (though I will still make one this weekend!), but also because this meal was so delicious!

Baked Sweet Potatoes Topped with Ricotta, Goat Cheese, Kale, and Garlic Chips

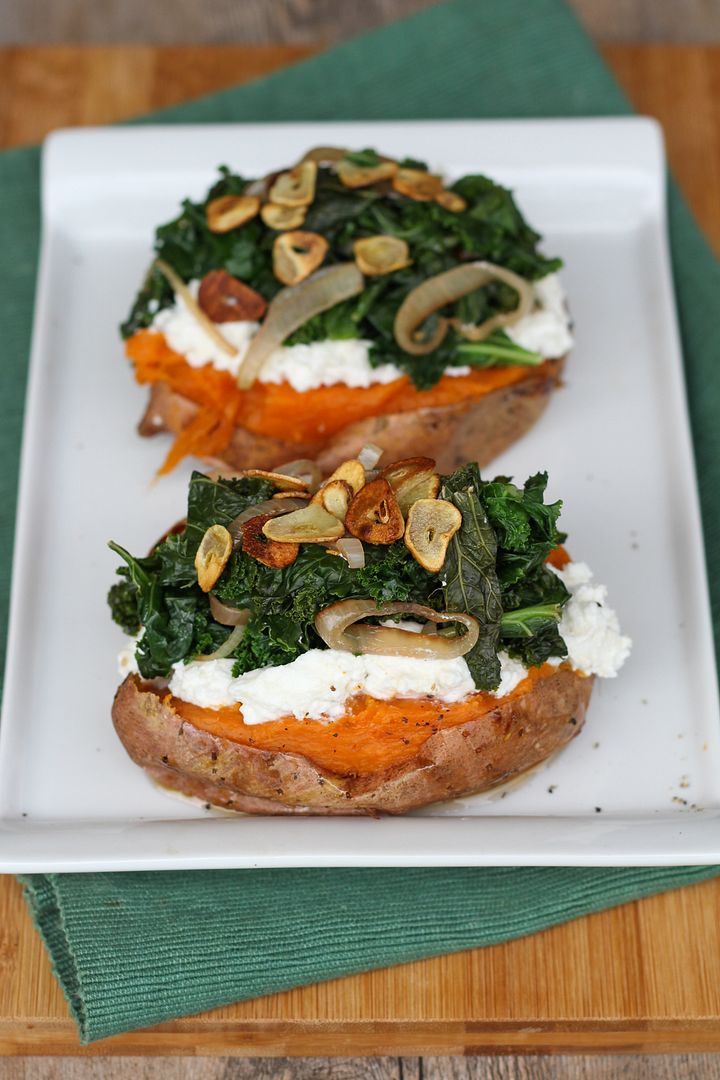
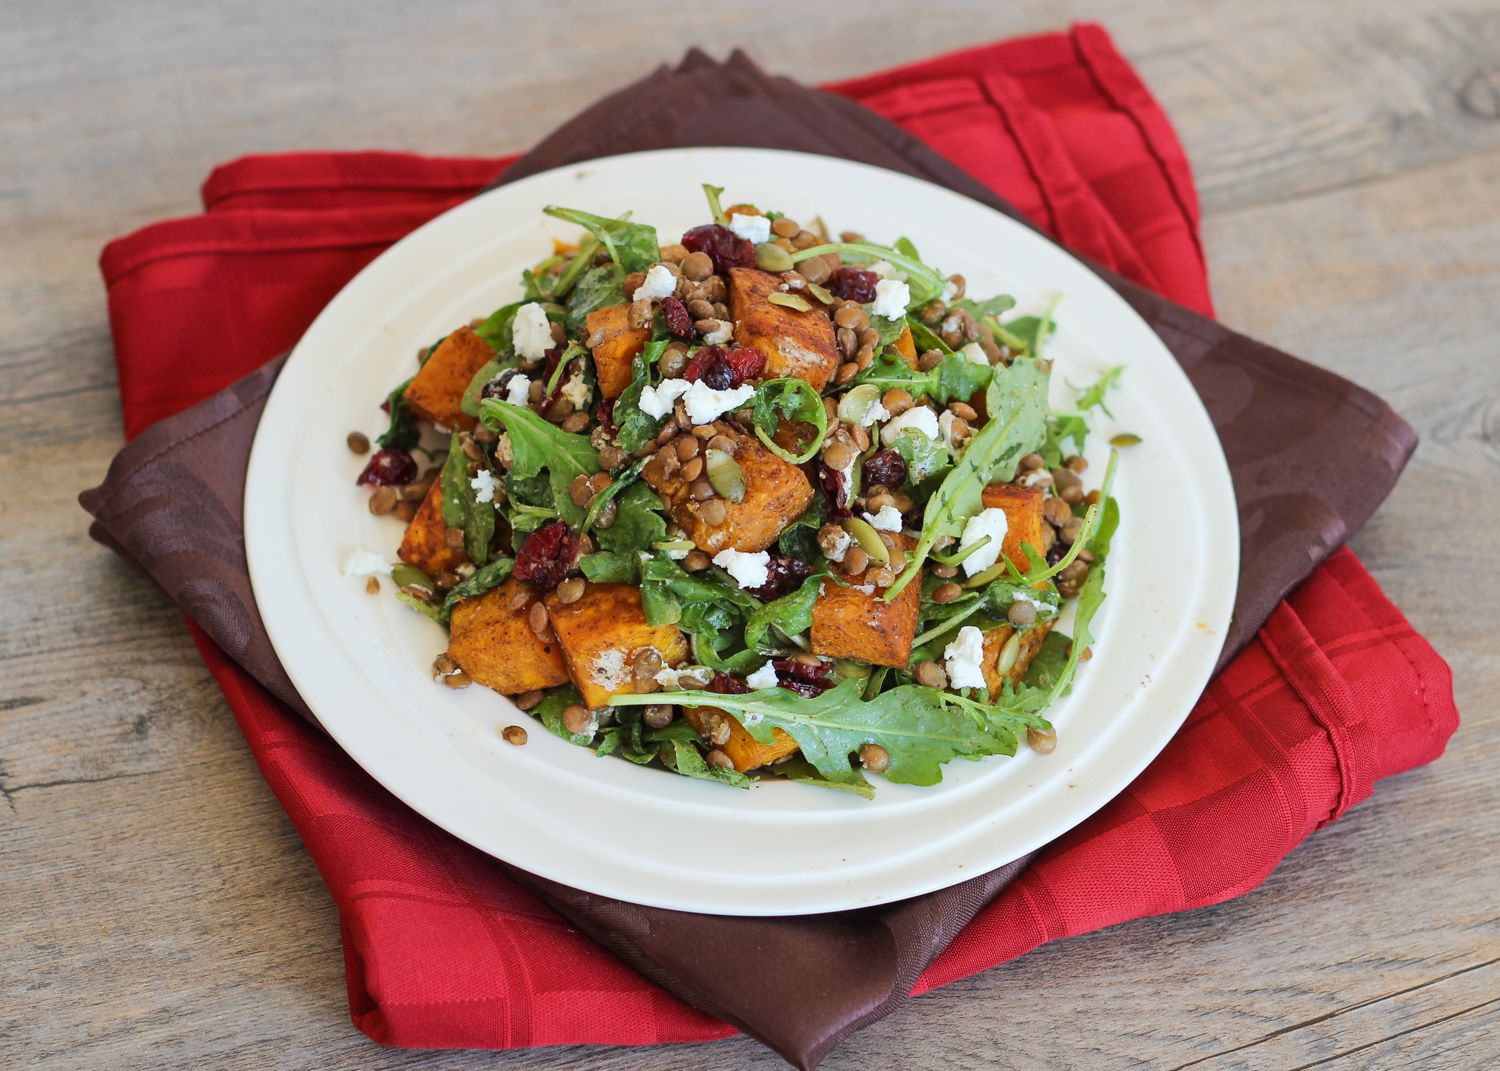
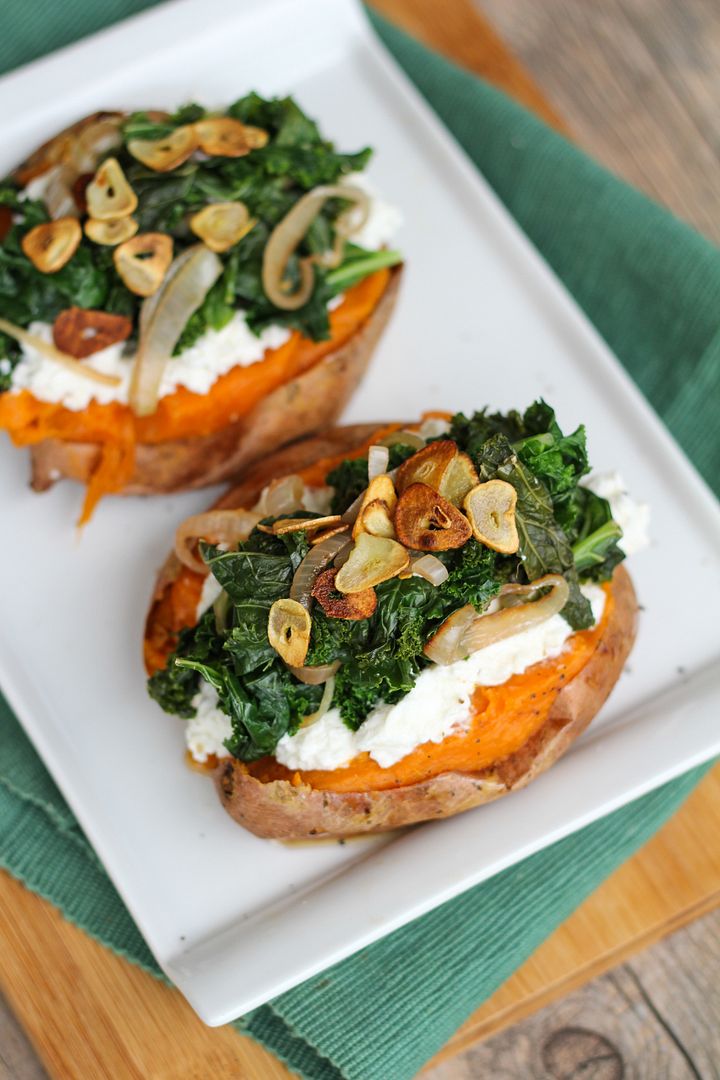
It's also simple to make - roast some sweet potatoes, top them with a mixture of light ricotta and goat cheese, some sauteed kale and shallots, and finally some crispy garlic chips on top.  The original recipe only called for ricotta, but I added in some goat cheese because I find ricotta too plain on its own and because goat cheese goes well with sweet potatoes.  It added more fat to the otherwise fairly light cheese mixture, but because there's not much fat elsewhere in the meal I thought it was perfectly acceptable!  I also added shallots to the kale mixture for more flavour, but you can easily leave them out if you prefer.  Just don't skip the garlic chips on top - they're so good and super easy to make!

Baked Sweet Potatoes Topped with Ricotta, Goat Cheese, Kale, and Garlic Chips

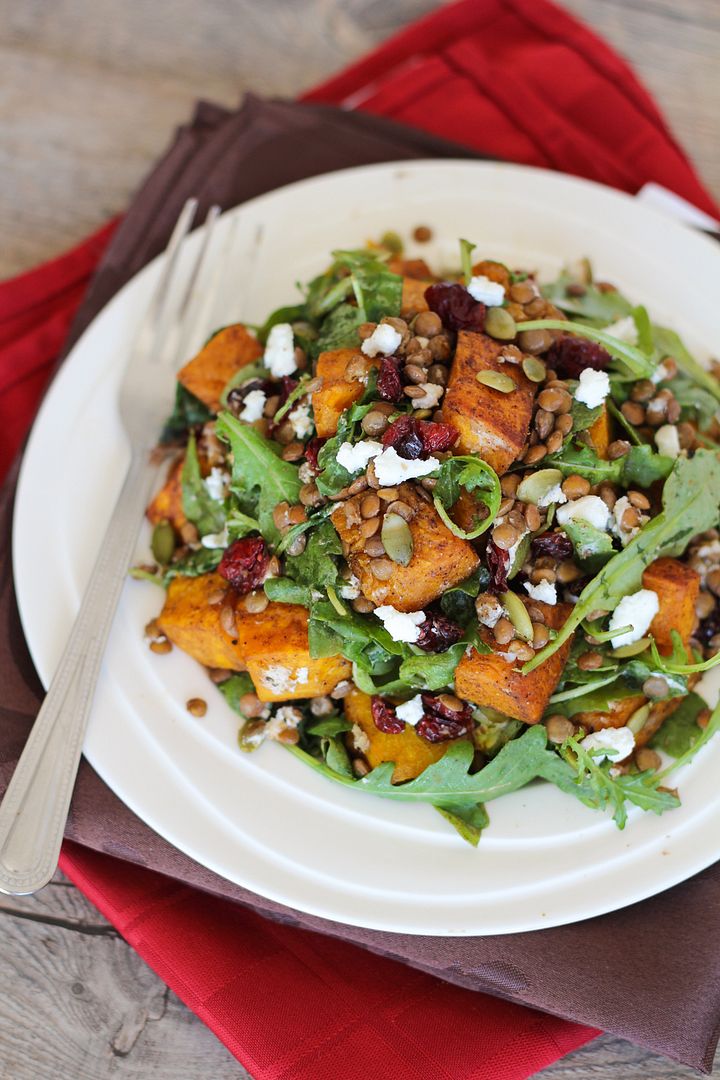
I loved how the sweetness of the potatoes was balanced out by the creamy cheese and slightly bitter kale, and because of the protein in the ricotta I considered this to be a complete meal in its own, and was actually pretty full afterwards!

I'm thinking of making a cheesecake this weekend to celebrate my birthday with my family so if it turns out I'll be sure to share it soon to balance out the kale from today :)  While I may not be a huge fan of regular cake, I always welcome a slice of cheesecake, probably because cheese makes everything better!  

Hope you all have a great weekend!

Baked Sweet Potatoes Topped with Ricotta, Goat Cheese, Kale, and Garlic Chips

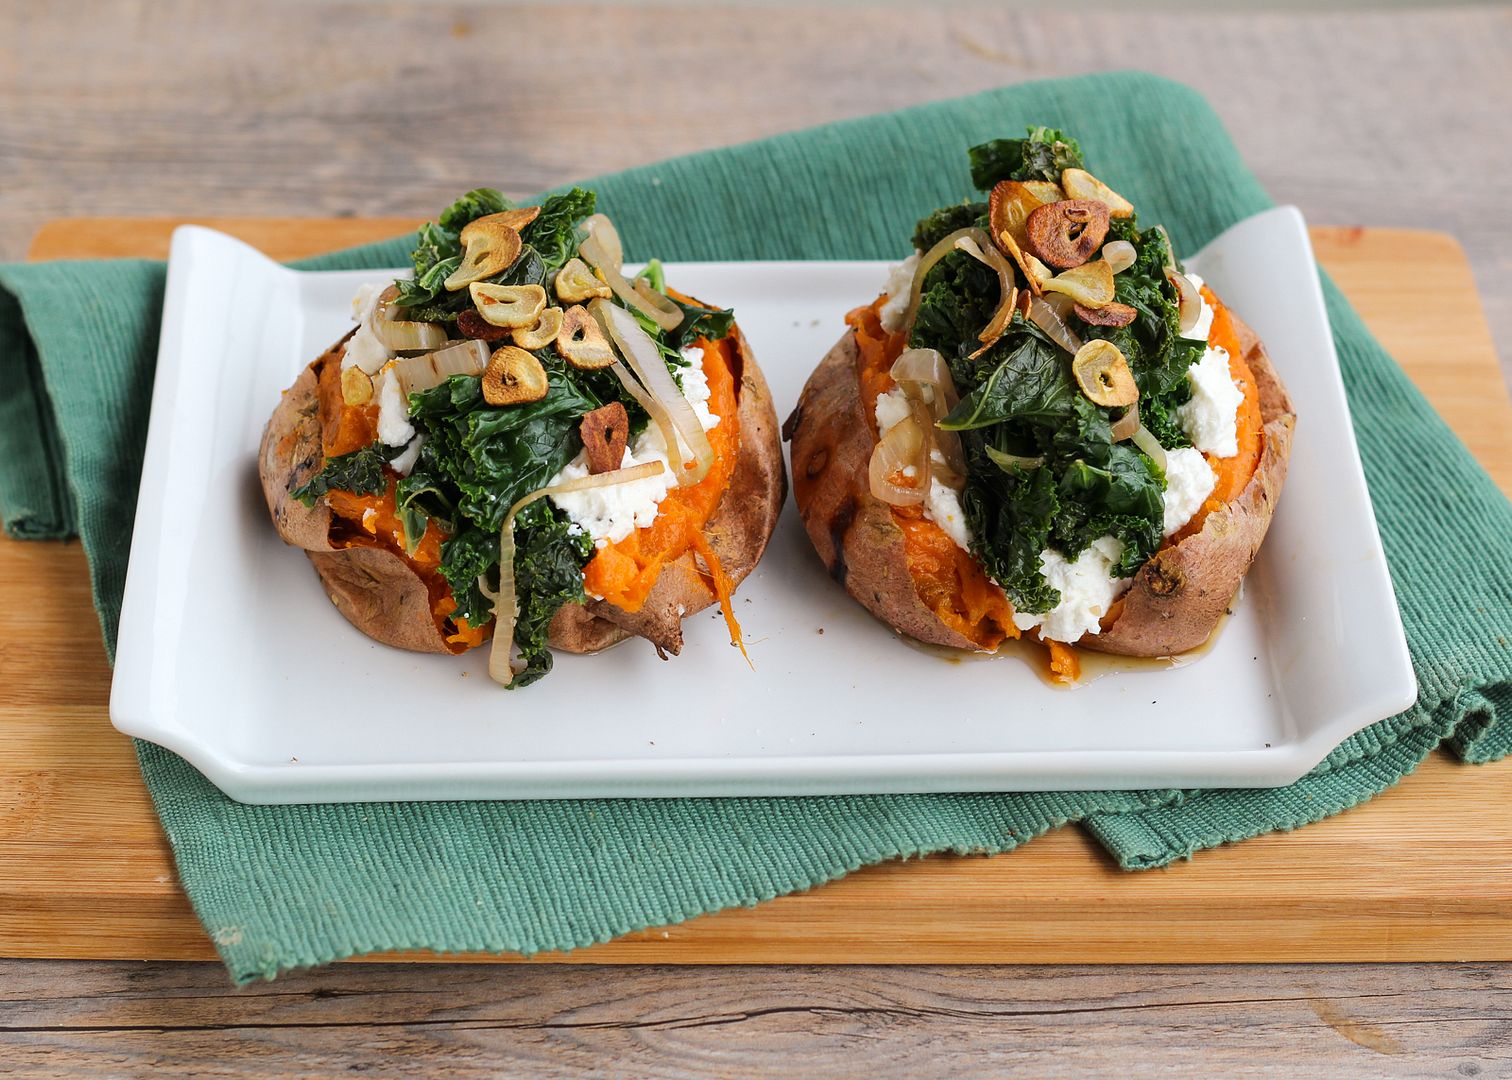
Baked Sweet Potatoes with Ricotta & Kale

Adapted from Body + Soul

Serves 4

Ingredients:

4 medium sweet potatoes, about 8-10 oz each
2 tablespoons olive oil
4 cloves garlic, thinly sliced crosswise
1 large shallot, thinly sliced
1 bunch kale, thick stems removed, leaves torn into large pieces
Salt and pepper
1 tablespoon balsamic vinegar
Pinch red pepper flakes (optional)
3/4 cup low-fat ricotta cheese
1/4 cup (about 2.5 oz) plain goat cheese

Directions:

Preheat oven to 450°F.  Scrub sweet potatoes, pierce all over with a fork, and rub skins with 1 tablespoon olive oil (total for all sweet potatoes).  Place on a foil-lined baking sheet and bake in preheated oven until easily pierced with a knife, 45 minutes to 1 hour.

Meanwhile, heat 1 tablespoon oil in a large skillet over medium-high heat.  Add garlic and cook  until golden, stirring often, about 1 to 2 minutes.  Remove with a slotted spoon and set on a paper towel to drain.  They should be crispy like garlic chips.

Add shallot to the pan and sautee for a couple of minutes until softened.  Add kale, cover with a lid, and let cook for 1-2 minutes.  Remove lid, stir, and cook for another minute or two until just wilted and tender.  Season generously with salt and pepper, stir in vinegar and red pepper flakes, and remove from heat.

Mix goat cheese and ricotta in a small bowl until smooth.  Season lightly with salt and pepper.

Cut each potato in half lengthwise, and top with the cheese mixture, kale mixture, and garlic chips (evenly divided across the 4 potatoes).  Serve warm.

October 30, 2013

Pumpkin, Chicken, & Goat Cheese Quesadillas (for Halloween!)

Pumpkin, Chicken, & Goat Cheese Quesadillas (for Halloween!)

I cannot believe that Halloween is already tomorrow!  October has flown by (like every other month this year) and I barely even thought about Halloween costumes or food ideas until this week.  I have a party to go to tonight and I didn't even decide on a costume until yesterday when I went to the drugstore and chose a few devil accessories from the 40% off Halloween section, so I'm probably going to be the most unoriginal one there.  I haven't had time to come up with Halloween food or dessert ideas either, which is disappointing because Halloween is the perfect excuse to get creative with your food!

I couldn't let the holiday pass without at least one Halloween recipe on my blog though, so I threw these pumpkin quesadillas together the other day - and I loved them!

Pumpkin, Chicken, & Goat Cheese Quesadillas(for Halloween!)

These quesadillas are filled with a creamy mixture of spiced pumpkin and goat cheese, along with some chicken for protein.  That's it!  Very few ingredients but they surprised me in how good they tasted, plus they were really easy to make.  Carving a pumpkin face in a tortilla is WAY easier than carving an actual pumpkin, and you can throw multiple quesadillas under the broiler to quickly cook them and avoid having all the filling fall out through the holes like they would if you tried to cook them on a skillet.

These are perfect for Halloween night because you can easily prepare them for an early dinner before the kids head out trick or treating.  You could also change up the filling to include whatever you want - I imagine kids would be much happier with a simple cheese-only version!

And if you're looking for more Halloween food ideas (since clearly I am not full of costume ideas), check out my Pinterest board.  Hope everyone has a safe and happy Halloween tomorrow!

Pumpkin, Chicken, & Goat Cheese Quesadillas(for Halloween!)

Pumpkin, Chicken, & Goat Cheese Quesadillas

Adapted from recipes seen on Rachel Ray and Recipe Runner

Makes about 5 small quesadillas

Ingredients:

2 large (or 3 smaller) boneless skinless chicken breasts
A pinch each of chili powder, salt, and pepper for seasoning the chicken
1 cup canned pumpkin puree
1/4 cup + 1 tablespoon goat cheese
1 teaspoon cumin
1/2 teaspoon chili powder
Salt and pepper
10 small (6-inch) whole grain tortillas
Non-stick cooking spray

Directions:

Preheat broiler.

Trim chicken breasts of any fat and season on both sides with chili powder, salt, and pepper.  Heat a large skillet over medium-high heat and cook chicken breasts for about 5-6 minutes per side, or until cooked through completely.  Set aside.

Mix pumpkin, goat cheese, cumin, chili powder, and a pinch each of salt and pepper in a medium bowl.  Taste mixture and adjust any amounts to your liking.  Slice or shred chicken thinly. 

Use a small knife to carve pumpkin faces into 5 of the tortillas - these will be the tops of the quesadillas.  Save the triangles you cut out from the eyes to be the pumpkin stems.  Spread about 1/4 cup of the pumpkin mixture onto each of the 5 bottom tortillas.  Top pumpkin mixture with shredded chicken, followed by the carved tortilla to form 5 complete pumpkin quesadillas. Insert the triangle in between the tortillas near the top, pressing it into the pumpkin mixture, to be the stem.  Press the top tortilla gently onto the bottom tortilla to help them stick together.

Spray baking sheets with non-stick baking spray, carefully transfer quesadillas to baking sheets with carved face up, spray tops lightly with cooking spray, and broil on top rack of oven until warmed through and toasted spots begin to appear on top.  This should only take a few minutes – watch closely.

Transfer quesadillas carefully to plates as they won't stick together as much as regular quesadillas because of the goat cheese.  Serve warm.

October 23, 2013

Spiced Squash, Lentil, & Goat Cheese Salad

Spiced Squash, Lentil, & Goat Cheese Salad

Sorry for the lack of posts lately – two Saturdays ago I travelled up to Northern Ontario to visit family for Thanksgiving and stayed just over a week.   I had fully intended to go about my regular routine while I was up there, getting lots of work done, staying caught up with my Feedly reader, and writing a couple blog posts, but before I knew it I was boarding a plane back home and I’d done almost none of the above.  I really have no idea where the time went, though I do know I enjoyed it!

Spiced Squash, Lentil, & Goat Cheese Salad

As usual, I was spoiled on my trip and almost never had to make any food for myself.  The one dish I made the whole week was this squash and lentil salad, which we enjoyed with some butternut squash soup as a nice lighter meal after our big Thanksgiving feast. I offered to make it because I’d been eating it for my lunches the whole week before I left and I loved it so much that it was still on my mind!

Somehow, whenever I’m under pressure to make something for guests, it never turns out as well as when I make it the exact same way for myself at home (or maybe I'm extra critical when I know it's being judged), but everyone still enjoyed it!

Spiced Squash, Lentil, & Goat Cheese Salad

This salad is bursting with fall flavour and is hearty and filling thanks to the lentils and squash, while still feeling light and healthful.  It takes a bit of time to roast the squash and cook the lentils, but other than that everything comes together pretty easily.  I didn’t change much from the original Bon Appetit recipe except to add pumpkin seeds and cranberries, which add some crunch, sweetness, and even more of a festive feel to the salad.  

I can't believe that now that I'm back, it's already time (or past time) to start thinking of Halloween recipes!  It's crazy how fast October is flying by - hope you're all enjoying it as much as I am!

Spiced Squash, Lentil, & Goat Cheese Salad

Spiced Squash, Lentil, & Goat Cheese Salad

Adapted from Bon Appetit

Makes about 4 large (main) or 8 small (side) servings

Ingredients:

1 large (around 2 pound) butternut squash
3 tablespoons olive oil, divided
1 teaspoon ground cumin
1 teaspoon smoked paprika (or paprika plus a dash of cayenne if you don’t have smoked paprika)
1/2 teaspoon salt
3/4 cup green or brown lentils
4 cups baby arugula
3/4 to 1 cup crumbled goat cheese
1/2 cup pepitas (pumpkin seeds)
1/2 cup dried cranberries
1 tablesoon balsamic vinegar

Directions:

Preheat oven to 375°F.  Peel butternut squash, remove seeds, and cut into about 1” cubes.  I find it easier to cut squash after microwaving it first – just prick it all over with a fork or small knife and microwave on high for about a minute.  Toss cubes of squash with 2 tablespoons oil, the cumin, paprika, and salt.  Spread squash in an even layer on a foil-lined baking sheet and roast for 20 minutes.  Toss, return to oven, and roast for another 10-15 minutes.  Let cool.

Meanwhile, bring around 3 cups of water to a boil in a medium saucepan.  Add lentils, cover, reduce heat to simmer, and let cook for about 30 minutes, until tender but firm.  Drain and rinse lentils under cold water.

Combine lentils, squash, arugula, about half the goat cheese, pepitas, cranberries, balsamic vinegar, and remaining 1 tablespoon of oil in a large bowl.  Season with salt and pepper.  Divide into servings and top each with remaining goat cheese.

September 27, 2013

Chicken, Pear, & Goat Cheese Salad with Wheat Beer Vinaigrette

Chicken, Pear, and Goat Cheese Salad with Wheat Beer Vinaigrette

Now that fall has officially begun, I’m craving all things autumn: apples, pears, cranberries, squash, sweet potatoes, apple cider, warm drinks, and pumpkin everything, though I’ve had particular cravings for pumpkin baked goods and pumpkin pie. It’s crazy to think that (Canadian) Thanksgiving is only a couple weeks away and I haven’t made anything with pumpkin yet – I think that needs to change this weekend!

But before I start baking, my first venture into comforting fall dishes began a little healthier with this salad!

Chicken, Pear, and Goat Cheese Salad with Wheat Beer Vinaigrette

I’ve been wanting to try using beer in a vinaigrette for a while now - the house salad at a popular restaurant chain around here includes a beer dressing, and though you can’t taste it, the idea of including beer in your dressing makes the idea of salad for dinner so much more exciting!  So I found a recipe for a pear and walnut salad with wheat beer vinaigrette from Vegetarian Times and used that as a base for the salad that I had in mind.

Wheat beer is pretty mild, but when you reduce it, it intensifies in flavour (which is why you don’t want to start with a strong or bitter beer).  Once you add all the other ingredients for the dressing though, you’d have no idea there’s beer in there, it just subtly enhances the flavour in a nice way that complements the other fall ingredients in the salad – including pears, goat cheese, pecans, cranberries, and chicken.

Chicken, Pear, and Goat Cheese Salad with Wheat Beer Vinaigrette

I loved this salad as is (and think it would be great for Thanksgiving!), but you could also make tons of substitutions to it to make it your own. Blue cheese instead of goat cheese would be delicious, or apples instead of pears, walnuts instead of pecans, spinach or arugula instead of mixed greens, or even leave out the chicken for a vegetarian side salad. You could also of course use any dressing you like if you don't keep beer in the house - a maple balsamic vinaigrette would probably taste great!

Hope you all enjoy the first official full weekend of fall!

Chicken, Pear, and Goat Cheese Salad with Wheat Beer Vinaigrette

Chicken, Pear, & Goat Cheese Salad with Wheat Beer Vinaigrette

Adapted from Vegetarian Times

Serves 4 as a main dish

Ingredients:

For the Dressing:
1/4 cup + 2 tablespoons wheat beer
1 tablespoon minced shallot
1/2 tablespoon honey
1/2 tablespoon Dijon mustard
2 tablespoons balsamic vinegar
1/4 cup extra virgin olive oil
1/4 teaspoon dried thyme (optional)
1/8 teaspoon each salt and pepper

For the Salad:
~4 cups mixed salad greens
2 chicken breasts, cooked and sliced
2 ripe bosc or red-skinned pears, halved, cored and thinly sliced
3 oz goat cheese, crumbled (or as an alternative you could use blue cheese)
1/4 cup toasted pecans or walnuts
1/4 cup dried cranberries

Directions:

Prepare the vinaigrette: Add wheat beer to a small saucepan, bring to a boil, and let simmer until reduced to 2 tablespoons (about 5-7 minutes).  Remove from heat and whisk in the remaining dressing ingredients (shallot through to pepper).  Set aside.

Prepare the salad: Divide greens among 4 plates or bowls.  Top each salad with sliced chicken and pears, and sprinkle pecans, cranberries, and goat cheese on top.  Drizzle each salad with the vinaigrette and serve immediately.

Note: All amounts are approximations - adjust based on your own tastes if desired.

September 17, 2013

Turkey, Avocado, & Goat Cheese Panini

Turkey, Avocado, & Goat Cheese Panini

Back in the good ol’ days when my mom used to make my lunch for me to bring to school, turkey sandwiches were a staple. They usually consisted of oven roasted deli turkey meat, a little mayo, lettuce, cucumber, and cheese on a bun, and I loved them so much that they continued to be a lunch staple when I first moved out and had to start making lunch for myself.

Turkey, Avocado, & Goat Cheese Panini

(Side note: I have the best mom who made lunches for her daughters far longer than we deserved to have them made for us – thanks mom!)

Turkey, Avocado, & Goat Cheese Panini

Nowadays, I like to leave myself the minimum amount of time necessary to get ready in the morning (thus maximizing sleep-time), which means there is not a lot of time to prepare a lunch.  Leftovers are key for me – I usually make big batches of dinner so I can put it in containers in the fridge and then all I have to do in the morning is grab-and-go.  And if I have no leftovers, peanut butter and jam is usually the default.

Turkey, Avocado, & Goat Cheese Panini

(Side note: How will I ever be able to prepare lunches for children in the future if I can’t even make lunch for myself, not to mention getting them ready for school – I have a lot of admiration for parents/caregivers!)

Turkey, Avocado, & Goat Cheese Panini

This means that I’d forgotten how much I love turkey sandwiches until recently, when I bought a delicious turkey, avocado, and goat cheese sandwich from a bakery for lunch. At about $7 though, I knew I could make a much cheaper version at home, so I got right to it!

Turkey, Avocado, & Goat Cheese Panini

Pressed between those warm slices of whole grain bread is a combination of sliced oven-roasted turkey meat, creamy ripe avocado, a handful of peppery arugula, and a spread of tangy goat cheese. The combination of ingredients makes for a memorable sandwich that’s slightly more refined than my school days version, but is still super simple to make.  

After all this talk about making lunch in the mornings, I admit that I made this particular sandwich on a weekend (so I could have time to photograph it in the light), so I was able to make it into a panini and eat it warm.  But if you're making this in the morning (unless you have a panini maker or stove at work, in which case I'm very jealous of you), you can use the same ingredients on regular bread and it will still be delicious.  I recommend trying it as a panini too though - there's no competing with a warm pressed sandwich!

Turkey, Avocado, & Goat Cheese Panini

Turkey, Avocado, Goat Cheese, & Arugula Panini

Makes 1 sandwich

Ingredients:

2 slices of whole grain bread (I like Country Harvest flax & quinoa bread)
1 handful arugula
Half a ripe avocado, sliced
Salt & pepper
3 slices of oven-roasted deli turkey meat (more or less depending on preferences)
1-2 tablespoons goat cheese

Directions:

Layer arugula and avocado on one slice of bread and season generously with salt and pepper.  Spread goat cheese on other slice of bread and top with turkey meat.  Use desired amounts of all ingredients according to your own tastes and the size of your bread – the amounts listed in the ingredients are all suggestions.  Close your sandwich and heat in a Panini press.  If you don’t have a Panini press, you can do what I do: heat the sandwich on a griddle pan (or skillet) with a heavy pot on top of the sandwich to press it into the skillet (I put a can inside the pot to weigh it down), then flip and repeat on the other side.  Serve warm.

September 05, 2013

Cauliflower Crust Pizza with Corn, Zucchini, & Goat Cheese

Cauliflower Crust Pizza with Corn, Zucchini, & Goat Cheese

If you read blogs regularly or look at food on Pinterest, you've probably noticed at least a few recipes for cauliflower crust pizza before.  I've been seeing it all over the place for a while now and keep adding it to my list of things I need to try, but for some reason it took me until now to finally make it.  I admit I was skeptical that this was another fad that people go crazy for because it sounds good but in reality tastes disgusting (*cough*egg baked in an avocado*cough*), but I'm happy to report that this tastes as good as it sounds! (unless you think it sounds gross, like a certain boyfriend who shall remain unnamed, in which case you are wrong!)

If you have no idea what I'm even talking about when I refer to cauliflower crust pizza, I'll give a quick explanation of what it is.  Basically it's a breadless pizza crust that's made by mixing pulverized cauliflower with cheese, egg, and spices (if you like) to form a "crust" that is then baked and topped with any pizza toppings you like.  So it's healthier than pizza in the sense that there is actually some nutrition in the crust instead of empty carbs, but I should be clear that it's also not some sort of miracle calorie-free pizza because there is a lot of cheese in the crust, if that's what you're concerned about!

Cauliflower Crust Pizza with Corn, Zucchini, & Goat Cheese

There are lots of different recipes for cauliflower crust floating around, but I used one from The Lucky Penny Blog (with a few small changes), which Jessica from How Sweet It Is recently affirmed is the best cauliflower crust pizza recipe around, and though I haven't tried any other versions, this one worked so well that I know I won't need to (though she does have a cheese-free version if you're interested in trying it)!

Making the crust is pretty simple.  You start by pulsing your cauliflower florets in a food processor until you get a bowl of fluffy snow-like "crumbs":

Making cauliflower crust pizza

You then cook the "crumbs" in the microwave, let them cool, then transfer them to a towel to wring out all the water.  This is probably the most important step, as it will help make sure your crust stays together later.  You'll be surprised at how much water comes out - and you'll get a bit of an arm workout during the process!

Making cauliflower crust pizza

After you wring out all the moisture, the cauliflower will look completely different and if you smoosh it together with your hands it should actually stay together in clumps:

Making cauliflower crust pizza

You then mix in your cheese, egg, and seasonings (if you like - I added dried basil, oregano, salt, pepper, and nutritional yeast for added cheesy flavour).  Then you pat the mixture into a pizza crust shape:

Making cauliflower crust pizza

You'll need to prebake your crust, during which time you can get all your toppings ready, then return the pizza to the oven with the toppings, wait very impatiently for it to be ready, and eat!

Cauliflower Crust Pizza with Corn, Zucchini, & Goat Cheese

I decided to keep my toppings light and summery with corn, zucchini, and basil.  Even though the air is definitely getting chillier around here, it's still summer and there's still lots of corn and zucchini available!

I didn't use a sauce or cheese except for the goat cheese on top, as there's already cheese in the crust and I didn't want this to be too heavy.  Everything worked so well together and tasted fresh, which I loved!

Cauliflower Crust Pizza with Corn, Zucchini, & Goat Cheese

The crust was also way better than I expected!  It definitely doesn't taste anything like traditional pizza crust, so if that's what you're expecting then you'll be sadly disappointed.  Instead, it's chewy and flavourful and cheesy, and I think I actually might like it even better than regular crust!

Not that this will be replacing regular pizza for me as there's definitely still a time and place for that, but it's nice to have an alternative!

Cauliflower Crust Pizza with Corn, Zucchini, & Goat Cheese

The only problem some people have noted is that the crust isn't super sturdy, so it can be hard to pick it up and eat it with your hands like regular pizza.  I found that I could still pick up the slices of pizza (see picture below for an idea - sorry it's so dark, I didn't think to take a picture until I'd already started eating), but because I chose corn as a topping, it was a bit hard to keep everything in place!  But as long as you don't mind getting a bit messy, it's worth it!  (and you can always eat with a knife and fork if you prefer!)

Cauliflower Crust Pizza with Corn, Zucchini, & Goat Cheese

Cauliflower Crust Pizza with Corn, Zucchini, & Goat Cheese

Crust recipe adapted from The Lucky Penny

Serves 2-3

Ingredients:

For the Crust:
1 medium head of cauliflower
1 cup grated part-skim mozzarella cheese
1/2 teaspoon dried basil
1/2 teaspoon dried oregano
1/2 teaspoon salt
1/4 teaspoon pepper
1 teaspoon nutritional yeast (optional)
1 large egg

For the Toppings:
1 small zucchini, sliced into thin rounds
1 ear of corn, kernels removed
2 oz herbed goat cheese (or plain goat cheese)
A few leaves of fresh basil, sliced thinly

Directions:

Preheat oven to 450°F and line a baking sheet with parchment paper.

Chop the cauliflower into florets (try to remove the stems).  Place in the large bowl of a food processor and pulse for about 30 seconds, just until all of the florets have been pulsed into very fine crumbs.  You should have about 3 cups of crumbs.  Transfer to a microwave safe bowl, cover, and microwave on high for 4 minutes.  Remove and let cool slightly.  Transfer to a clean tea towel (don’t use paper towels - they will shred), wrap up tightly in the towel, and wring all the water out of the cauliflower over the sink.  You will be surprised at how much water comes out!  Keep wringing to get as much water out of the cauliflower as you can – this will prevent the crust from crumbling.  Combine dried cauliflower with the cheese, basil, oregano, salt, pepper, nutritional yeast, and egg.  Mix to combine (I just used my hands).  Transfer to prepared baking sheet and form into a 10” thin circle.  Bake in preheated oven for 10-11 minutes.

Once crust has precooked, remove from oven and top with zucchini, corn, and goat cheese (you might not be able to fit all of the zucchini or corn kernels, depending on how big the zucchini and ear of corn were).  Top with crumbled goat cheese.  Return to oven and bake for another 15-20 minutes.  Remove from oven, top with sliced basil, season with additional pepper if desired, and serve!

Note that this is best eaten fresh - it doesn't keep very well.

July 30, 2013

White Bean Dip with Roasted Jalapenos & Goat Cheese

White Bean Dip with Roasted Jalapenos & Goat Cheese

I feel like I’ve been spending a lot of long hours in my windowless cave office lately (as I struggle to learn a data analysis software program that makes absolutely no sense – why are you so confusing, SAS, why??), so I’ve been needing a lot of snacks to get me through the day. One of my go-to healthy snacks that I eat all the time is carrots with hummus – it’s so easy (and cheap!) to whip up a batch of hummus that I then throw in a container and bring to school along with a bag of baby carrots through the week.

I’ve tried a lot of different hummus recipes in the past and have loved them all, but this time I decided to do something a little different and use regular white beans instead of chickpeas and omit the tahini. So it’s just a regular bean dip instead of hummus, but it’s still just as smooth and creamy!

White Bean Dip with Roasted Jalapenos & Goat Cheese

Because white beans are pretty flavourless, I kicked things up by adding roasted jalapenos and cumin for spice, goat cheese for a bit of richness and tang, and some lime juice, cilantro, and honey for added flavour and balance. The first time I made this, I used two jalapenos and the dip was pretty spicy (but still good!), so the next time I only used one and then I could barely detect the spice at all. So I think one and a half would be the perfect amount for me, but you can definitely adjust the amount to your liking! I’d recommend roasting two jalapenos (they’re super cheap anyway), then start by adding one chopped pepper to the dip and keep throwing more in as you taste if it’s not spicy enough.

This goes great with pita chips (or ranch popped rice chips, shown here) or veggies, and while it may not make the jumble of numbers and words on your screen make any more sense, it will at least give you the energy to stay in your office and keep staring at them so it looks like you know what you’re doing!

White Bean Dip with Roasted Jalapenos & Goat Cheese

Before I go, I just wanted to thank everyone for their kind comments on my blogiversary post and for entering the Starbucks gift card giveaway!  A winner has been randomly selected and contacted - thanks again!

White Bean Dip with Roasted Jalapenos & Goat Cheese

White Bean Dip with Roasted Jalapenos & Goat Cheese

Ingredients:

1 (540mL) can white kidney beans
1-2 jalapenos (1 will make the dip quite mild and 2 might be fairly spicy, but it can depend on the pepper)
2 oz plain goat cheese
1.5 tablespoons fresh lime juice
1/4 cup chopped cilantro
1/2 teaspoon honey
1/2 teaspoon cumin
1/2 teaspoon salt
1/4 teaspoon pepper
2 tablespoons extra virgin olive oil

Directions:

Preheat oven to broil (500°F) and move oven rack to top third of oven, a few inches away from the top. Spray jalapeno(s) with cooking spray or rub with a bit of olive oil, and place on a baking sheet. Roast under the broiler until all sides begin to get black patches – time will vary but mine took around 5-10 minutes total. Keep an eye on them and turn a few times to brown them evenly. Remove from oven (use tongs or mitts) and place in a bowl covered in saran wrap to let them steam and loosen the skin for 10 minutes. Remove skins (they should peel off), slice lengthwise, remove seeds, and roughly chop.

Add all ingredients except the olive oil to the large bowl of a food processor. Cover with the lid and add the olive oil to the feed tube so it will slowly drain into the dip. Process until dip is smooth and oil is mixed in. Taste and adjust any amounts to your liking, if necessary. Store in the refrigerator but let warm up to room temperature before eating. Serve with carrots, other veggies, or pita chips.

June 03, 2013

Arugula Pasta Salad with Chickpeas, Veggies, and Goat Cheese

Arugula Pasta Salad with Goat Cheese, Olives, Chickpeas, and Roasted Veggies

As I mentioned in my last post for this mandarin quinoa salad (which is already my most popular recipe this year – note to self: keep posting quinoa recipes!), I’ve been trying out lots of different exercise classes this term in an effort to stay active.  Last Wednesday I tried my first AquaZumba class, which was the first time I’ve taken a class in the water since my swimming lessons days as a kid.  It was kind of what I expected in that our beautiful instructor looked unfairly cool doing all her dance moves at the side of the pool while I likely looked like a floundering sea monster attempting to keep up in the water, but it was also better than I expected in that I actually had a lot of fun (and loved the fact that I could exercise without sweating)!

The success of AquaZumba has now given me the courage to try out Aqua Fit, which I’m guessing won’t be nearly as much fun.  I’m slightly dreading the idea that it might involve treading water, which I haven’t done since swimming lessons because I hated it so much.  I could never seem to keep my head above water, and the swimming instructor would always tell us our homework while we were treading water at the end of class and I would panic because my ears would be underwater so I couldn’t hear what they were saying.  But now that I'm older (and already have failing joints), I'm hoping my body will be a little more appreciative that I'm letting it work out in the water and won't fail me when it comes to the treading water part!

Arugula Pasta Salad with Goat Cheese, Olives, Chickpeas, and Roasted Veggies

One of the nice things about water classes is that they make you super tired at the end of the night, giving you a good night’s sleep.  They also make you super hungry, which is where having a big batch of this pasta salad in the fridge comes in handy!

This is just an easy vegetarian dish that’s kind of like a salad, kind of like pasta, kind of like pasta salad, and kind of like pasta with salad.  With whole wheat pasta for fibre, lots of veggies for nutrients, chickpeas for protein, and some goat cheese for richness, it’s a well-balanced dish that makes for great lunches (or post water workout meals) throughout the week! 

Arugula Pasta Salad with Goat Cheese, Olives, Chickpeas, and Roasted Veggies

Arugula Pasta Salad with Chickpeas, Veggies, Olives, and Goat Cheese

Loosely based on a recipe from Cooking Light

Serves 4-6

Ingredients:

375g box of whole wheat penne
8 oz green beans, ends trimmed
1 pound halved cherry tomatoes, divided
4 tablespoon extra-virgin olive oil, divided
Salt & pepper
2 tablespoons minced shallots
2 tablespoons fresh lemon juice
1 tablespoon Dijon mustard
1 teaspoon dried basil
1 tablespoon honey
1/2 cup pitted sliced kalamata olives
1/2 cup (2 ounces) crumbled goat cheese
1 (540mL) can chickpeas, drained and rinsed
3 cups packed arugula

Directions:

Preheat oven to 400°F. 

Cook pasta according to package directions.  Drain and set aside.

Meanwhile, toss green beans and half the cherry tomatoes with 1 tablespoon oil and season with salt and pepper.  Spread in an even layer on a foil-lined baking sheet and roast in preheated oven for 15-20 minutes.

Prepare the dressing by whisking the remaining 3 tablespoons oil with the shallots, lemon juice, Dijon mustard, basil, and honey in a small bowl.  Add salt and pepper to taste.

Combine cooked pasta, roasted vegetables, remaining fresh cherry tomatoes, olives, goat cheese, and chickpeas in a large bowl.  Mix in the arugula.  Add dressing and toss to coat.  Serve warm or chill for a cold pasta salad (though I preferred it warm).  Season with additional salt and pepper and top with additional goat cheese if desired.

*Note – the pictures are missing the additional fresh cherry tomatoes; I forgot to add them until after

March 18, 2013

Roasted Beet, Arugula, & Honeyed Goat Cheese Panini

Roasted Beet, Arugula, & Honeyed Goat Cheese Panini

This will be a quick (or quickly written) post as I'll soon be jumping on a flight back home from Boston!  I attended a conference here this past week (which is the reason for the lack of posts lately, sorry!) and also had a day to explore the city for the first time, which I absolutely loved.  So many beautiful streets and neighbourhoods, lots of history and amazing buildings, friendly people, and great food!  I was lucky to be here on St. Patrick's Day too, and though I didn't participate in the festivities myself (except for a delicious Harpoon IPA or two in my room), it was fun to see all the people covered in green out celebrating!

Roasted Beet, Arugula, & Honeyed Goat Cheese Panini

In the interest of keeping this short, there's not much I need to tell you about this sandwich except that it's one of my favourite things!  Beets and goat cheese together are always a winning combination, but combine them with arugula (or greens if you can't find arugula, like myself) in a warm pressed sandwich and they're even better.

You've probably seen a few of these sandwiches around the web before, but what makes this one different is the addition of honey to the goat cheese and dressing the greens with balsamic dressing before putting them in the sandwich - both very small changes that improve the flavour of the sandwich significantly.  

Roasted Beet, Arugula, & Honeyed Goat Cheese Panini

Oh and one more thing I wanted to share!  If you don't have a panini press, you can still make paninis!  I don't have a press either, but you can replicate its effects by pressing your sandwich on a skillet using a heavy pot.  If you don't have a heavy pot, stack several pots together to increase the weight, as in the picture below (please ignore my filthy pots, that's what happens when you live in a hard water city).  Just be sure to flip your sandwich halfway through so it gets heated on both sides.  I used a griddle pan which added lovely smokey grill marks, but a regular pan would work just fine too.

Hope you all had a safe and happy St. Patrick's Day and have a great week ahead!


Roasted Beet, Arugula, and Honeyed Goat Cheese Panini

Makes 2 sandwiches

Ingredients:

2 medium beets
2 teaspoons olive oil
Salt and pepper
4 slices hearty bread – I used Bavarian rye
2 tablespoons goat cheese (or more, depending on size of bread)
1/2-1 teaspoon honey or agave
2 handfuls arugula or field greens
1 teaspoon balsamic vinegar
1/2 teaspoon extra virgin olive oil
Salt and pepper

Directions:

Preheat oven to 400°F.  Drizzle beets with olive oil and wrap in aluminum foil.  Roast on a baking sheet for about 1 hour, until tender.  When cool enough to handle, peel off the skins and slice into thin rounds, about ¼” thick.  Season with salt and pepper.

If you don’t have time to roast the beets that long, you can take a shortcut method:  Peel and slice the beets before roasting, drizzle slices with oil and season with salt and pepper, lay in a single layer on a foil-lined baking sheet, and roast in a 375°F oven for 20-30 minutes until tender.  However, I find that the beets do not turn out as well using this method.

Mix goat cheese and honey to taste.  Dress greens with 1 teaspoon balsamic vinegar and 1/2 teaspoon olive oil, and season with salt and pepper.  You can adjust the amount of dressing depending on the quantity of greens you’re using – use your best judgment.  Dressing the greens will give them more flavour in the sandwich.

Spread goat cheese evenly on two slices of bread.  Top with sliced roasted beets, followed by greens, and another slice of bread to form two sandwiches. 

Cook sandwiches in a panini press.  If you don’t have one, you can cook them on a grill pan or skillet over medium-high heat.  Place a heavy pot (you can place a can or smaller pots inside to make it heavier) on top of the sandwiches to press them into the hot pan.  Cook for 1-2 minutes, then flip and repeat with the remaining side.  Serve warm.

February 09, 2013

Heart Shaped Beet & Goat Cheese Ravioli

Heart Shaped Beet & Goat Cheese Ravioli

As I mentioned on Facebook yesterday, much of Ontario had a snow day yesterday, including Waterloo region, where we got an estimated 30cm (1 foot) of snow.  Not nearly as bad as what areas like Connecticut are currently facing, but still one of the biggest snowfalls we’ve seen here in a while!  I was happy to stay home and make myself a warm lunch and decided to use the time I saved not going into school to put a little time and effort into something extra special – these heart shaped ravioli!

I had wanted to make heart shaped ravioli for Valentine’s Day anyway but I knew I would want it to have beets in the filling for their gorgeous colour, and since my boyfriend isn’t particularly fond of beets, I decided to just go ahead and make them for myself.  We don’t give each other Valentine’s gifts anyway, so I thought it was perfectly acceptable to give myself an early gift!

 Heart Shaped Beet & Goat Cheese Ravioli

Now I won’t lie and say that these are super easy and you should all make them for Valentine’s Day dinner because they’ll take no time at all.  Maybe that would be the case if you’re an expert ravioli maker, but this was only my second time making ravioli and it was definitely frustrating at times and took more time to prepare than an average dinner.  But I will honestly say that in the end it was totally worth it!

I did make a few mistakes that you can learn from so you won’t run into as many issues as me:
1)      Keep your pasta sheets damp so they don’t dry up and harden – that will make it very difficult to form the ravioli!
2)      Figure out how much filling you can comfortably fit in a ravioli by doing a practice one before you go and spoon all the filling out only to realize you used too much and have to go back and redo it.
3)      Make sure you completely seal the edges of the ravioli so that the filling doesn’t seep out while boiling!

 Heart Shaped Beet & Goat Cheese Ravioli

I used storebought fresh pasta sheets to save time, but if you are really ambitious you could make your own pasta - Reclaiming Provincial even makes a beet pasta dough, which makes the end product so gorgeous! 

The filling is a simple mixture of roasted beets and herbed goat cheese with a splash of lemon juice, and while it takes some time to wait for the beets to roast, the filling is super easy to make and is delicious even on its own!  So if you don’t feel like making ravioli but love beets and goat cheese (two of my favourite ingredients!), you could just make the filling and use it as a sandwich or pizza spread, on crostini, or even as a dip!

 Heart Shaped Beet & Goat Cheese Ravioli

If you do go ahead and make the ravioli, I highly recommend serving it with a side salad.  I kept the ravioli ‘sauce’ very simple (just olive oil and parmesan cheese) to let the filling shine, but without a lot of sauce, I find that ravioli on its own can be a bit boring, especially when you get the edge parts without the filling.  I still loved the ravioli, but when I ate it overtop a salad it was so much better – the vinegar in the dressing really brightened things up and the salad added flavour and texture so you don’t get bored eating the parts that are just plain pasta!

And of course, these don’t have to be for just Valentine’s Day (this goes to those of you who don’t care much for the “holiday”) – they are a great way to show your appreciation to someone (or yourself) on any special occasion, snow days included!

 Heart Shaped Beet & Goat Cheese Ravioli

Oh and if any of you pros out there have other tips for making the ravioli process easier, feel free to share them! 

Heart Shaped Beet & Goat Cheese Ravioli


Makes 20-25 ravioli

Ingredients:

1/2 lb red beets (1-2 medium beets)
2 oz herbed goat cheese
1/2 tablespoon fresh lemon juice
Salt and pepper
8 fresh lasagne sheets (9x6”) or equivalent homemade pasta sheets

For serving:
Olive oil
Parmesan cheese
Field greens
Red wine vinegar
Salt & pepper

Directions:

First prepare the ravioli filling.  Preheat oven to 400°F.  Scrub beets and pierce all over with the tines of a fork.  Wrap in aluminum foil and roast in preheated oven for 45 minutes to 1 hour, until tender.  Let cool slightly, peel and roughly chop, then add to a food processor.  Add the goat cheese and lemon juice and process mixture until smooth. Season with salt and pepper to taste. 

Next prepare the pasta.  I used fresh lasagne sheets from an Italian market, which saved me lots of time, but if you want to make your own pasta, follow either the recipe from Annie’s Eats for plain pasta or Reclaiming Provincial for a beet pasta dough.  While you’re working with the pasta, it’s important to keep the sheets you’re not using covered with a damp cloth so they don’t dry out and harden.  I let that happen with some of mine and it cracked when I tried to work with it later.  Use a heart shaped cookie cutter (mine was about 3” wide) to cut out heart shapes from pasta dough.

 cutting out the hearts for ravioli

Spoon a small amount of filling into the center of half the hearts.  The amount you need will depend on the size of your cookie cutter.  I started with about 2 teaspoons (pictured) but realized that was too much when I started to try to form the ravioli, so I removed some (after the picture) and was left with about 1 teaspoon of filling for each heart.  I highly recommend only filling one to start and proceeding with the next step of shaping the ravioli to get an idea of how much filling is needed before you fill the rest.

 filling heart shaped ravioli with beet & goat cheese filling

Use a pastry brush or your finger to wet the edges of each heart and place a plain heart on top of the filling.  Press the edges together with your fingers to seal, then go over the edges pressing with the tines of a fork, on both sides of the ravioli, to ensure the filling is really sealed in there.  You don’t want it to leak out when you’re boiling them!  This happened to a few of mine that weren’t properly sealed.

 sealing ravioli

Bring a large pot of salted water to a boil.  Cook the ravioli in the boiling water until al dente, about 3-5 minutes.  I did this in batches of about 5 ravioli as I filled them so they didn’t sit out too long.

To serve, toss desired amount of field greens with a bit of red wine vinegar, olive oil, and salt and pepper.  Toss desired amount of ravioli (4-5 per person should be a good amount) with a drizzle of olive oil.  Serve ravioli overtop of salad and sprinkle with parmesan cheese.

Ingredient Index

Related Posts Plugin for WordPress, Blogger...