Showing posts with label chocolate - semisweet chips. Show all posts

February 11, 2014

Valentine's Mug Hugger Espresso Shortbread Cookies

Valentine's Mug Hugger Espresso & Chocolate Shortbread Cookies

I just returned from a trip to Seattle (which I hope to share some details of soon, as there was so much amazing food and beer there!), which means I didn't have much time to think about Valentine's Day until I returned yesterday and got straight to work making a heart-shaped recipe!

I know a lot of people aren't fans of the holiday and are sick of seeing heart-shaped things, but I think they're adorable, and whether you share heart cookies with your significant other, your family, friends, coworkers, or even just treat yourself, I think that making time for love, sharing, and cookies is a good thing!

Valentine's Mug Hugger Espresso & Chocolate Shortbread Cookies

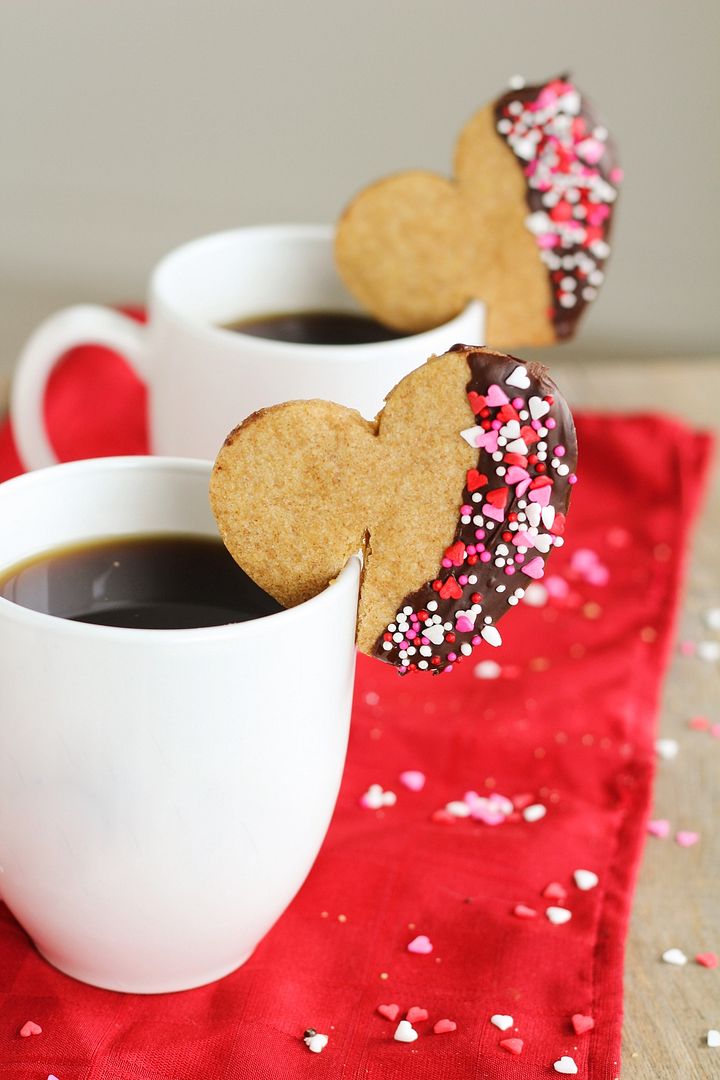
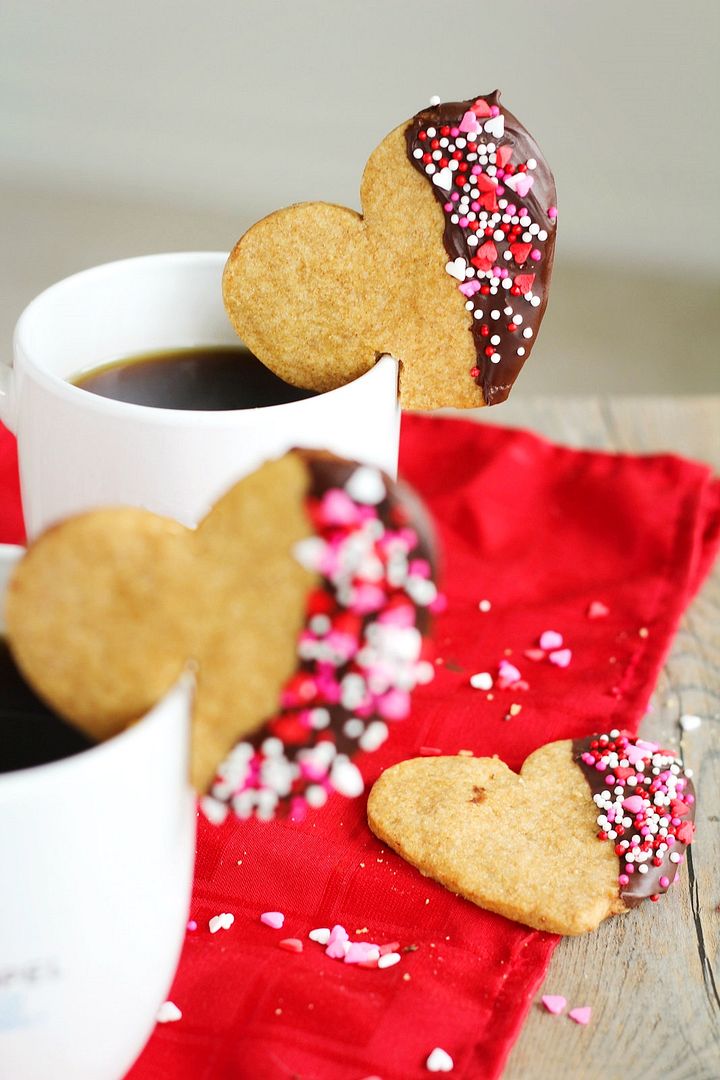
I originally got the idea for "mug hugger" cookies from Red Path Sugar, and loved that you can hang a cookie on your mug!  And because my mug is usually full of (strong, black) coffee, I decided to make espresso shortbread cookies instead of sugar cookies (also because I love shortbread).  And because it's almost Valentine's Day, I had to dip them in chocolate and cover them in red and pink sprinkles, of course!  The chocolate actually helps add some sweetness to an otherwise not-so-sweet cookie, so don't skip that step!  You can skip the sprinkles if you really want, but why would you want to?!

Valentine's Mug Hugger Espresso & Chocolate Shortbread Cookies

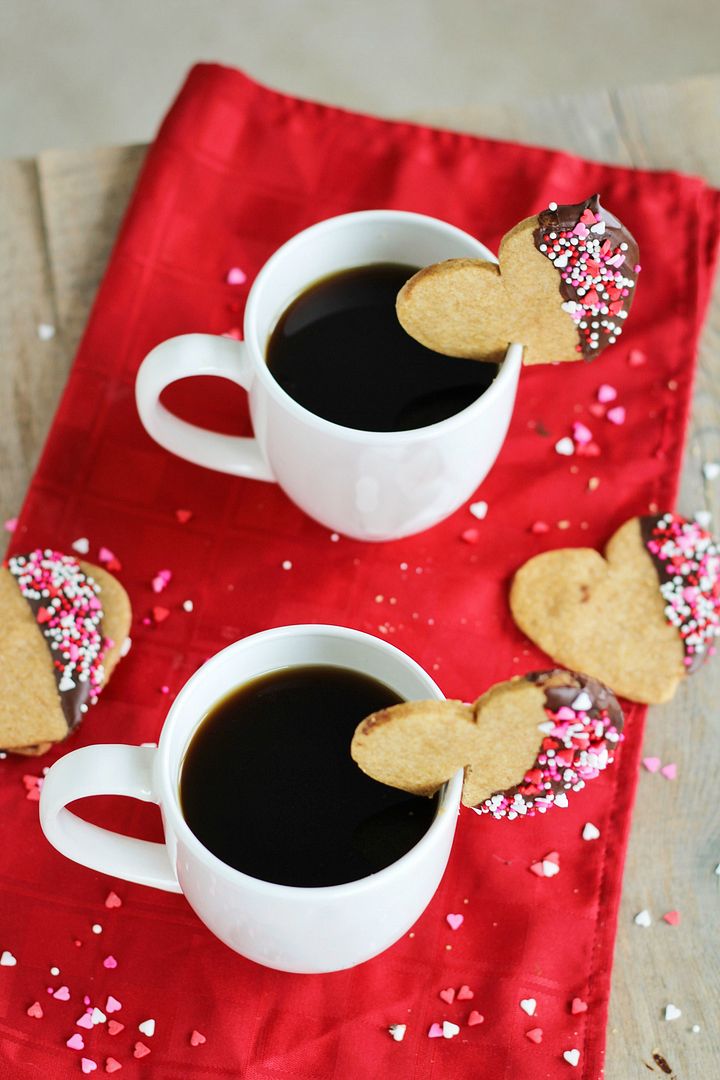
In order to make these "mug huggers", you just have to cut a little slot in the cookie, preferably as soon as it comes out of the oven while it's still soft, then hook it onto your mug!  To be perfectly honest, these cookies might not stay on your mug too long; mine tended to fall off every few minutes as I was taking photos, which often resulted in broken cookies.  You can easily forget the mug hugger part and just make these as regular cookies if you want, which will be just as good, but if you serve someone their morning (or afternoon) coffee with one of these guys attached, you're sure to brighten their day!

Valentine's Mug Hugger Espresso & Chocolate Shortbread Cookies


Heart-Shaped Espresso Shortbread Cookies

Shortbread recipe adapted from Fine Cooking

I got around 1 dozen cookies with a 3” heart-shaped cookie cutter; I’d recommend using a 2” cutter instead, which would result in around 2 dozen cookies

Ingredients:

1/2 cup unsalted butter, at room temperature
1/4 cup sugar
1 cup all-purpose flour
1 tablespoon instant espresso powder
1/4 teaspoon salt
1/2 teaspoon vanilla extract

~1/3 cup semisweet chocolate chips
Red/pink sprinkles, if desired

Directions:

Cream butter and sugar in the bowl of a stand mixer (using paddle attachment) on medium speed until combined, about 1-2 minutes.  In a separate bowl, whisk together the flour, espresso powder, and salt.  With the mixer on low, add the dry ingredients on low speed, scraping the bowl frequently, until just incorporated.  Add the vanilla and mix until just incorporated again, and the dough has just started to come together.  Don’t overmix.

On a lightly floured surface, roll the dough to about 1/4 inch thick.  Use a heart shaped cookie cutter to cut out shapes, rerolling the dough until it is all used up.  I used about a 3” cookie cutter which is a bit big for a mug; I’d recommend using a smaller cookie cutter if possible.  Arrange the cookies carefully on a parchment paper lined baking sheet and refrigerate the baking sheet until dough is chilled, at least 30 minutes.  Meanwhile, preheat the oven to 325°F.

Bake the cookies in preheated oven for about 18-20 minutes, until golden on bottom.  Remove from oven, and if you want to make these "mug hugger" cookies, now is the point where you would cut little slits into the cookies so they can hang on a mug.  If you do this before the cookies bake, they will puff up over the cut-out, and if you wait until they have cooled, the cookies will break when you try to cut them.  While they are still soft from the oven, use a sharp knife to cut a slit in the edge of a cookie just long and wide enough for it to fit over a mug (see pictures for an idea).  Let cool on baking sheet for about 5 minutes, then transfer to a wire rack to cool completely.

Melt chocolate chips in a double boiler or a small heatproof bowl set over a pan of simmering water.  Transfer to a small container and dip the edges of each cookie in the chocolate.  Try to only dip the top half of the cookies and keep the chocolate layer thin so it won't end up overpowering the cookie.  Immediately sprinkle the chocolate covered portion with sprinkles, if using.  Set cookies back on parchment paper until chocolate is set, about 2 hours.  Then keep covered in a container.

*Note: I did try to cut some cookies into mug huggers after they had cooled; many broke, but if I cut only a tiny bit at a time and was very gentle, I could cut out a slot just big enough so the cookie could fit on a mug.  In the pictures, the cookie in front was cut out right from the oven and the cookie in behind was cut after it had cooled.

December 24, 2013

Gingerbread Chocolate Chip Cookies

Gingerbread Chocolate Chip Cookies

I'll have to make this post short as I'm not feeling well but still have to do all my Christmas wrapping and last minute preparations before the big day tomorrow (which hopefully I'll be feeling better for)!  I just wanted to squeeze in one last Christmas recipe though as these cookies were probably my favourite thing I've made this season!

Gingerbread Chocolate Chip Cookies

These cookies are inspired by a recipe I saw on Baked By Rachel, which I then went and changed almost everything about so I'm sure they're nothing like the original, but I absolutely loved my own version!  They're puffy but chewy, with a nice strong gingerbread flavour and just the right amount of sweetness from the chocolate chips.  I think these will be a new holiday favourite of mine!

Gingerbread Chocolate Chip Cookies

I'd also like to take this time to wish everyone the very best of the holiday season, with lots of rest and relaxation, cheer and good times spent with family and friends, and of course, delicious food!

Gingerbread Chocolate Chip Cookies

Gingerbread Chocolate Chip Cookies

Inspired by Baked By Rachel

Makes about 2 dozen cookies

Ingredients:

1/2 cup + 2 tablespoons unsalted butter, softened
1/4 cup sugar
1/4 cup dark brown sugar
1 large egg
1/4 cup molasses
1 teaspoon vanilla extract
2 cups all-purpose flour
1/2 teaspoon salt
1 teaspoon cinnamon
1/2 teaspoon nutmeg
1-1/2 teaspoons ground ginger
1/2 teaspoon cloves
1 tablespoon cocoa powder
3/4 teaspoon baking powder
1/2 teaspoon baking soda
3/4 cup semi-sweet chocolate chips

Directions:

In a large bowl, use a hand mixer or electric mixer to cream the butter and sugars until light and fluffy, about 2-3 minutes.  Add the egg and mix until combined.  Add molasses and vanilla and mix until combined.

In a separate bowl, whisk together the flour, salt, cinnamon, nutmeg, ginger, cloves, cocoa powder, baking powder, and baking soda.  Add the dry ingredients to the wet ingredients in 3-4 additions, mixing on low speed until each addition is just combined.  Stir in chocolate chips.  Cover dough and refrigerate for several hours until chilled through – this is important if you want the cookies to stay thick and puffy.  I chilled mine for about 3 hours.

Preheat oven to 350°F.  Scoop dough by about 1.5 tablespoons full and drop onto a parchment-lined baking sheet about 1 inch apart.  Because the dough will still be quite firm, I pressed the cookies slightly at the top to flatten them slightly.  Bake for 11-12 minutes.  Allow to rest on cookie sheet for 1-3 minutes, then transfer to a wire cooling rack to cool completely.  Store covered in a container.

October 30, 2012

Halloween Cobweb Cookies

Halloween Cobweb Cookies

Today I have a short post to squeeze in one more Halloween recipe before the big day tomorrow!  This is a really easy recipe for cobweb shaped cookies, which I saw on Betty Crocker (the same place I found the idea for my mummy potatoes with meatballs - lots of great ideas on that site!).  All you have to do is whip up a quick batter, transfer it into a squeeze bottle, then pour it onto a skillet in a cobweb shape.  After that you bake the cookies so that they crisp up, dust them with a little powdered sugar to make the cobwebs white, and top them with a chocolate spider!

I made these really quickly this morning and in my rush I forgot to choose the prettiest cobwebs for photos, but I think it's better this way so that you get a realistic idea of what they look like!  You might also notice that my chocolate spiders look pretty much nothing like spiders - clearly working with chocolate is not my forte!

Still, these cookies were easy to make and tasted great!  They're the type of cookie you keep snacking on because they taste so light and then suddenly realize you've eaten the whole batch (especially  if you're a certain boy who liked to stack multiple cobwebs together to eat as one)!  I think they would be a fun project for kids to help out with for Halloween too!

It feels weird to me that Halloween hasn't actually happened yet since I already dressed up on Saturday (my sister and I went as citizens of the Capitol from the Hunger Games - it was such a fun costume!), but I still have some Halloween events to look forward to at school tomorrow.  Hope you all have a safe and happy Halloween!

Halloween Cobweb Cookies

Cobweb Cookies

Slightly adapted from Betty Crocker

Makes 15-20 cookies

Ingredients:

1/4 cup + 2 tablespoons all-purpose flour
1/4 cup sugar
2 tablespoons vegetable oil
2 tablespoons milk
1/4 teaspoon vanilla extract
1 large egg
Semisweet chocolate chips for the spiders (I used about 1/3 cup chocolate chips)
Powdered sugar for dusting on top of cobwebs

Directions:

Preheat oven to 325ºF.  Prepare chocolate spiders by melting chocolate chips in the microwave, transferring to a ziplock bag and snipping off a tiny amount from the corner, then piping chocolate into spider shapes on a wax paper-lined baking sheet.  Transfer to fridge to harden.

Whisk flour, sugar, oil, milk, vanilla, and egg together in a medium bowl until smooth.  Pour into a plastic squeeze bottle with a narrow opening.

Heat a large non-stick skillet over medium heat and lightly grease or spray with cooking spray.  Working quickly, squeeze batter onto pan in a cobweb shape, like so:


Let cook 30 to 60 seconds until bubbles form at the top and the bottom is golden brown.  Carefully flip with a spatula and cook for an additional 30 to 60 seconds.  Remove from pan and let cool on a wire rack.  They will feel like pancake texture at this point.

Transfer cookies to a non-stick baking sheet and bake in preheated oven for 5 to 7 minutes or until almost crisp.  Transfer to a wire rack to cool; cookies will continue to crisp up as they cool.  Once cool, dust tops with powdered sugar and attached hardened spiders to the cookies with a dollop of melted chocolate.


February 29, 2012

Chocolate Peanut Butter Rice Krispie Roll

chocolate peanut butter rice krispie rollI don't know if it's just me, but I feel like I've been seeing Rice Krispie treats everywhere lately. I've never really thought that I like Rice Krispie squares, probably because I'm not big on things with marshmallows in them. So I hadn't really been paying attention to all the Rice Krispie recipes I'd been seeing, until I came across this chocolate peanut butter Rice Krispie roll from Made that someone had pinned on Pinterest (can't remember who now, sorry!).

The pictures immediately brought back childhood memories of a very similar roll that my mom used to make and that I remember loving so much. Only a couple days after seeing that pin, I went out to buy the ingredients to make it myself!

This is probably the easiest dessert I've ever made - the only equipment you really need is a microwave, and the whole thing probably took me about 15 minutes to make. All you do is mix some Rice Krispies with melted marshmallows, peanut butter, and a bit of butter, then spread the mixture on a pan. Next you melt chocolate with more peanut butter (though the original recipe called for peanut butter chips) and spread that in a layer on top, then roll the whole thing up like a jelly roll, and slice! The hardest part is waiting for it to harden in the fridge before you can slice and eat it!

chocolate peanut butter rice krispie rollThese didn't turn out exactly how I remember my mom's Rice Krispie roll to be because hers had a much more visible and solid chocolate swirl in it, whereas with these, the chocolate spread out a bit so that you couldn't really see the swirl as well. However, once I took a bite I didn't really care about whether you could see the swirl or not because they tasted amazing! My whole family couldn't stop eating them - they're quite addictive!

When I ate a slice straight from the fridge, I thought the chocolate taste was a lot stronger than the peanut butter, but the peanut butter seemed to become more noticeable after they warmed up a bit to room temperature. If you're looking for a really strong peanut butter flavour, you could probably just increase the amount of peanut butter in the filling, but I thought the balance was pretty good as is.

I'd definitely make these again when I need a really easy dessert to whip up for a crowd, as these would please both kids and adults! And now that I seem to have a renewed love for Rice Krispie treats (and tons of Rice Krispies left in the Family-sized box I bought), I'm eager to go back to some of those recipes I've been seeing lately and try one out! Here's a few recent recipes that I have my eye on:

Butterfinger Rice Krispie Treats from Recipe Girl
Chubby Hubby Rice Krispie Treats from The Sweets Life
Nutter Butter Krispie Treats from Cookies and Cups
Salted Brown Butter Cocoa Nib Rice Krispie Treats from Food + Words
Chocolate Butterscotch Marshmallow Treats from Gingerbread Bagels
Nutella Rice Krispie Bars from Sugarcrafter
Cinnamon Roll Rice Krispie Treats from Cooking Classy

If you have any other good ideas for using up Rice Krispies, let me know!

Happy Leap Day :)

chocolate peanut butter rice krispie roll
Chocolate Peanut Butter Rice Krispie Roll

Adapted from Made

Makes about 25 pieces

Ingredients:

10 oz mini marshmallows
1/4 cup unsalted butter
3/4 cup peanut butter, divided
6 cups Rice Krispies
1-1/2 cups semisweet chocolate chips

Directions:

Line a large jelly-roll pan (mine was 18 by 13 inches but I didn’t quite fill the whole thing) with waxed paper, and spray the paper with non-stick spray.

Place marshmallows, butter, and 1/4 cup peanut butter in a large microwave-safe bowl. Heat on high in the microwave for 2 minutes, then stir until smooth. Add the Rice Krispies and stir until coated.

Spread mixture onto the greased wax paper. Coat hands in non-stick spray and pat down the Rice Krispie mixture until even and smooth (I left about a 1-inch border on one long edge of the pan because my mixture didn’t quite cover the whole pan).

Add chocolate chips and 1/2 cup peanut butter to a separate microwave-safe bowl. Heat on high in the microwave in 30 second intervals, for about 1 minute and 30 seconds total, until melted. Stir until smooth.  

Pour chocolate mixture over the Rice Krispies and smooth to cover the surface. Don’t spread it quite to the edge on the long edges.

Roll the mixture jelly-roll style into a log, starting with one of the longer edges and rolling towards the opposite long edge. Pull the wax paper from under the log as you roll towards the opposite side to help it along.

Place log in refrigerator for at least 30 minutes, then slice into pieces about 1/2" thick.

For helpful pictures on how to roll the log, see the original post here.

Ingredient Index

Related Posts Plugin for WordPress, Blogger...