Showing posts with label cumin. Show all posts

October 28, 2014

Southwestern Quinoa Stuffed Pepper Jack O' Lanterns

Southwestern Quinoa Stuffed Pepper Jack O' Lanterns - easy and fun dinner idea for Halloween!

I love making cute Halloween themed treats, and dinner ideas are even better since there are already so many sweets around this time of year.  I've seen the idea of carving stuffed peppers like jack o' lanterns on several blogs before and wanted to try it for myself this year.  Even though I'm certainly not the first to try these, they turned out so cute and tasty that I had to share them with you guys!

Southwestern Quinoa Stuffed Pepper Jack O' Lanterns - easy and fun dinner idea for Halloween!

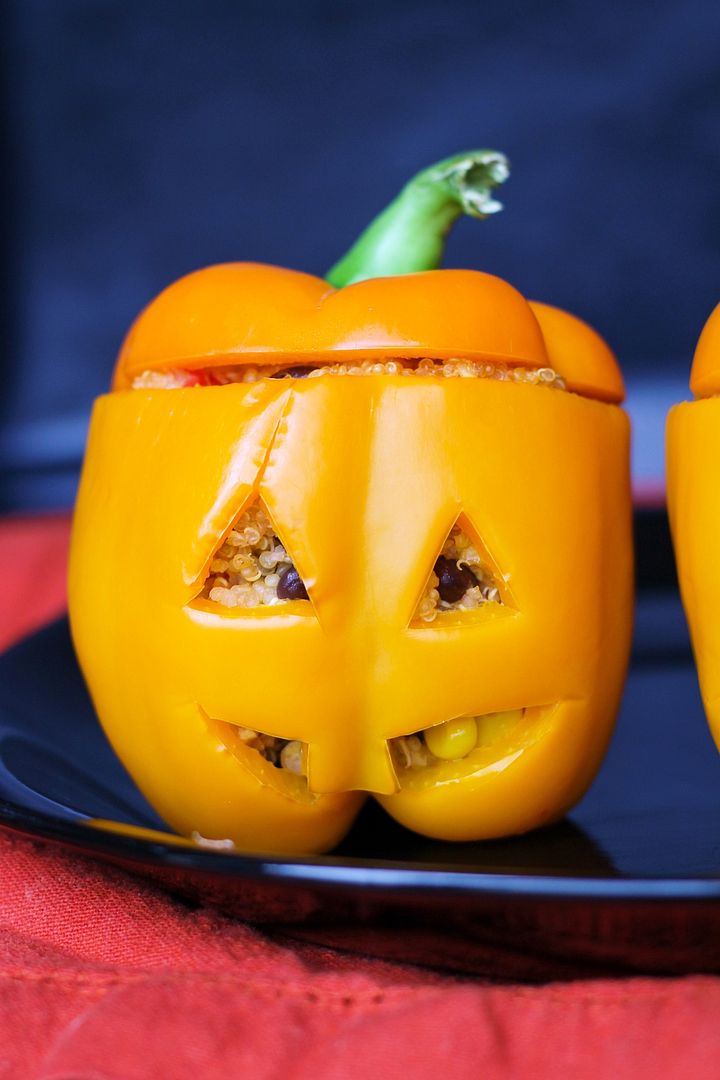
These are also really easy to make and completely customizable!  Just find some orange peppers, cut the tops off and scrape out any seeds or ribs inside, then carve your jack o lantern face with a small knife.  You don't want to cut out too big of holes so that the filling could escape, but even though these are a lot smaller to work with than pumpkins, I found them much easier to "carve"!

After prepping your little pumpkin lookalikes, you make your filling, stuff the insides of the peppers, and bake them to soften the peppers.  I also like to parboil the peppers first to reduce the amount of time needed to soften the peppers in the oven later, which will also help save time if you're trying to make these on Halloween evening before trick or treating starts!

southwestern quinoa

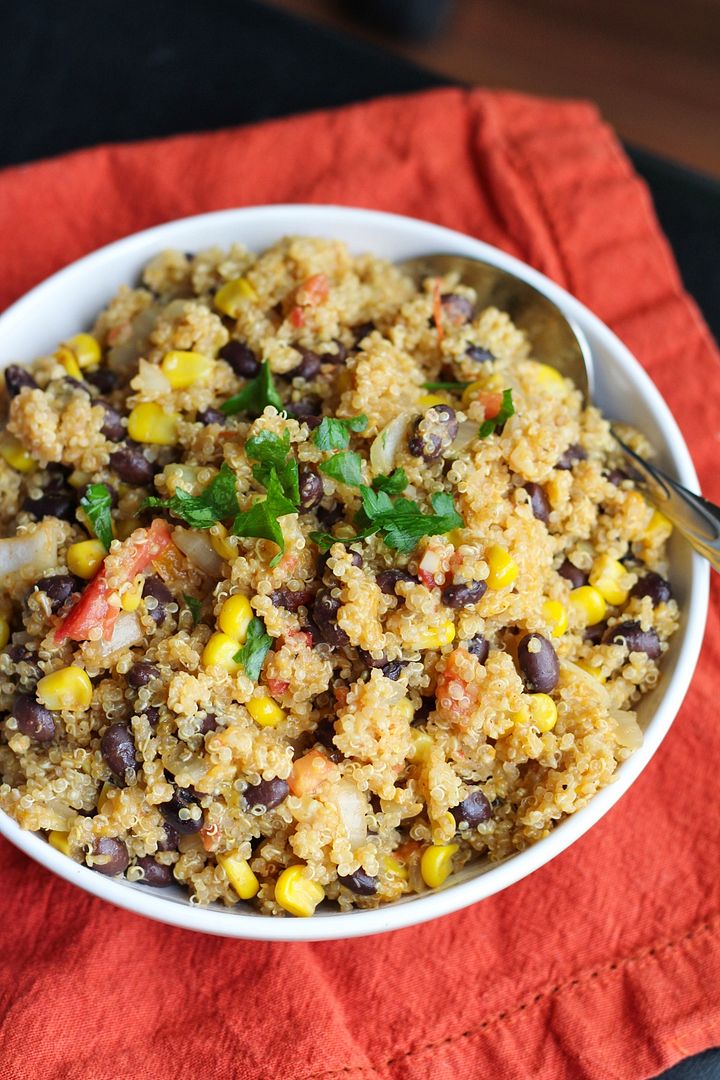
I filled mine with one of my favourite southwestern-flavoured quinoa mixtures, which is vegetarian and pretty healthy too.  I cook the quinoa in vegetable broth which is important for giving it more flavour, then mix in some sauteed onion and garlic, tomatoes, black beans, corn, spices, and cheese.  You could add in more vegetables like spinach or mushrooms if you like, or leave out the spices if your kids won't like them.

I'm going to a Halloween potluck tomorrow and plan on making some scary cookies so if those turn out well I'll have another treat to share later this week!  Happy week of Halloween!

Southwestern Quinoa Stuffed Pepper Jack O' Lanterns - easy and fun dinner idea for Halloween!

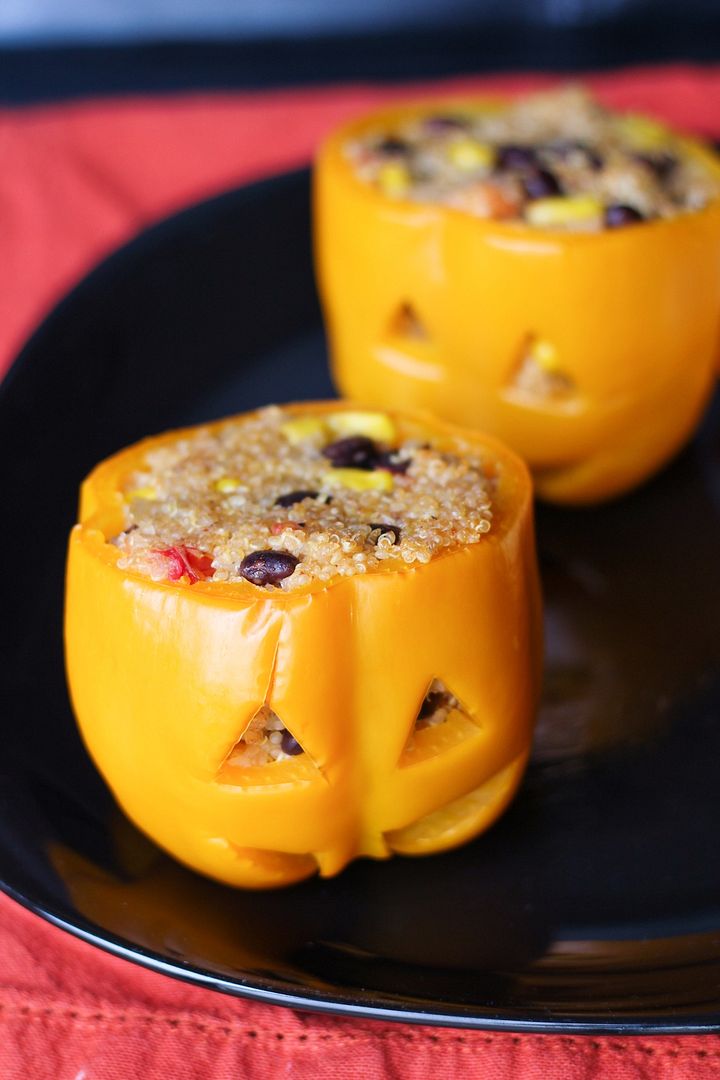
Southwestern Quinoa Stuffed Pepper Jack O’ Lanterns

Serves 4-6

Ingredients:

2 cups vegetable broth
1 cup dry quinoa
4-6 orange bell peppers
1 teaspoon olive oil
1 yellow onion, diced
1 clove garlic, minced
2 small tomatoes, diced
1 (540mL) can black beans, drained and rinsed
1 cup corn kernels (thawed if frozen)
1 teaspoon cumin
1/2 teaspoon chili powder
Salt and pepper
1 cup shredded cheddar cheese (or Mexican or taco blend)

Directions:

Bring 2 cups of vegetable broth to a boil in a medium saucepan.  Add quinoa, cover, reduce heat to simmer and let simmer for 15 minutes.  Remove from heat and let sit, covered, for 5 minutes.  Remove lid and fluff with a fork.

Meanwhile, cut the tops off the bell peppers and use a knife to scrape out the remaining seeds and ribs of the pepper, leaving the pepper in tact (as seen in pictures).  Leave the tops aside if you wish to include them for presentation later.  Bring a large pot of water to a boil, with enough water to cover the peppers.  Add peppers and let simmer for about 4 minutes, until slightly softened.  Carefully remove and set aside.

Preheat oven to 350°F.

In a medium pan, heat oil over medium-high heat.  Add onion and saute for about 5 minutes, stirring often, until softened.  Add garlic and saute for 30 seconds, stirring. Add tomatoes, black beans, corn, cumin, and chili powder, and season with salt and pepper.  Stir and saute for a few minutes.  Remove from heat, stir in quinoa and cheddar cheese and mix until incorporated.

Spoon quinoa mixture into the peppers.  There should be enough to fill 6 peppers or you can really fill 4 peppers quite full, and might still have some quinoa leftover.  You could also just stop now and eat the quinoa on its own!  Leave tops off the peppers, spray a 9x13 glass baking dish with non-stick cooking spray, and place filled peppers standing up in the dish.  Cover with aluminum foil and bake in preheated oven for 25-35 minutes, until peppers are softened to your liking (I did 25 minutes as I was impatient but would have preferred 30).  Remove and serve with tops on the peppers if desired.  Eat by slicing everything up with a knife and fork and eating the quinoa and pepper together.


--------------------------------------------------------------------------------------------------
For more Halloween dinner ideas, try these:

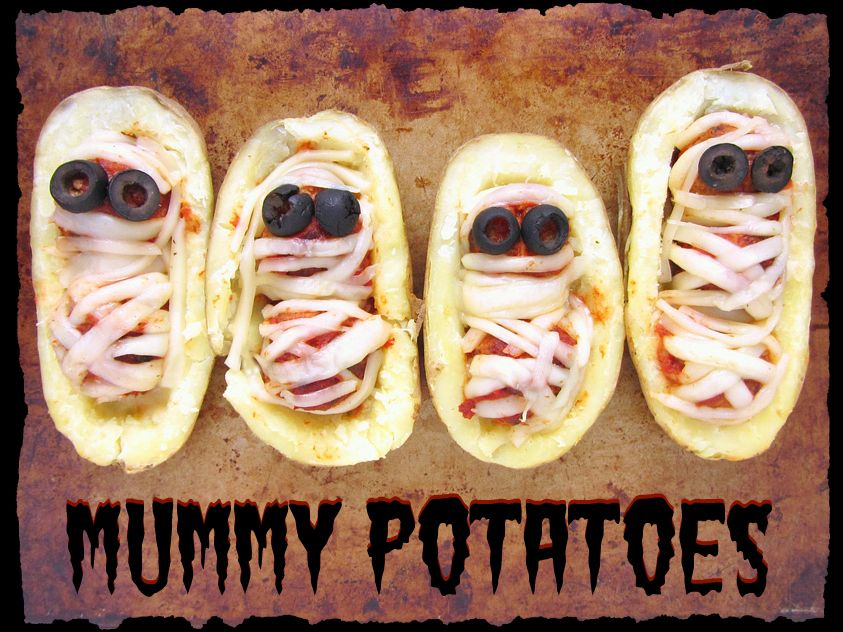
Halloween mummy potatoes with turkey meatballs

Halloween Mummy Potatoes with Meatballs

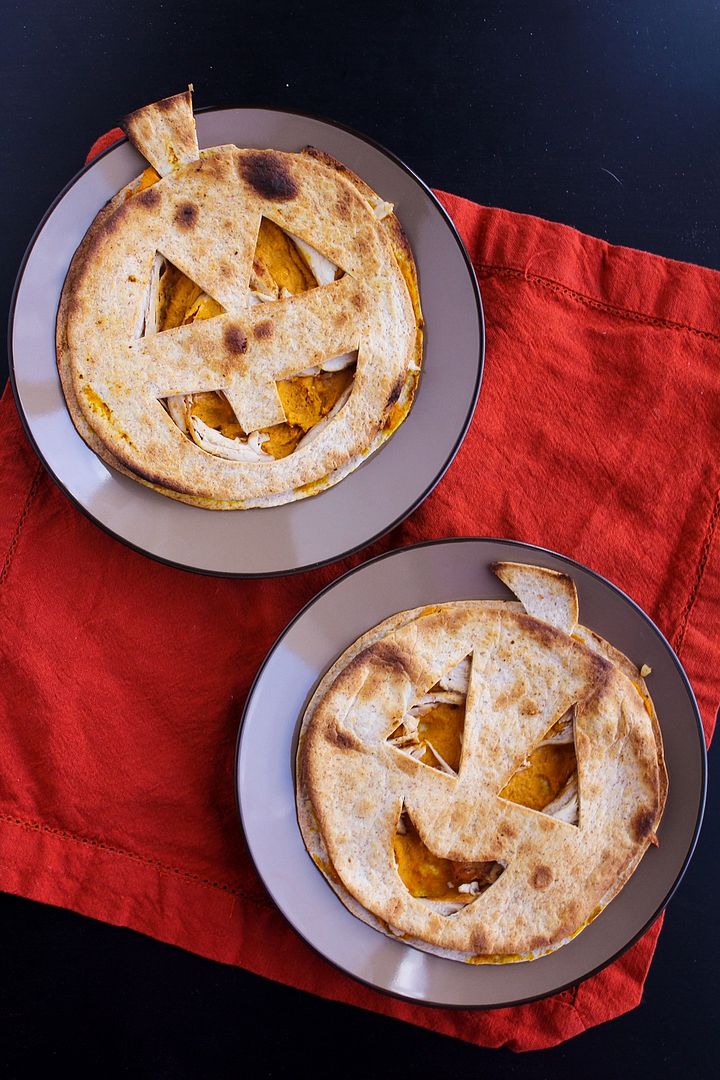
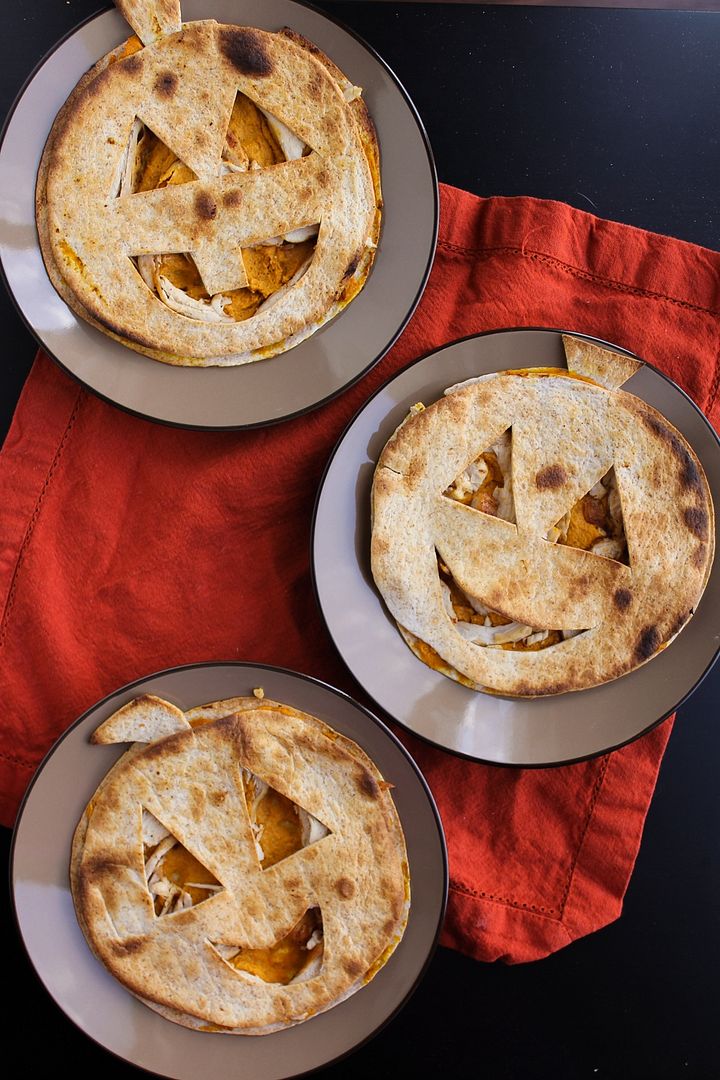
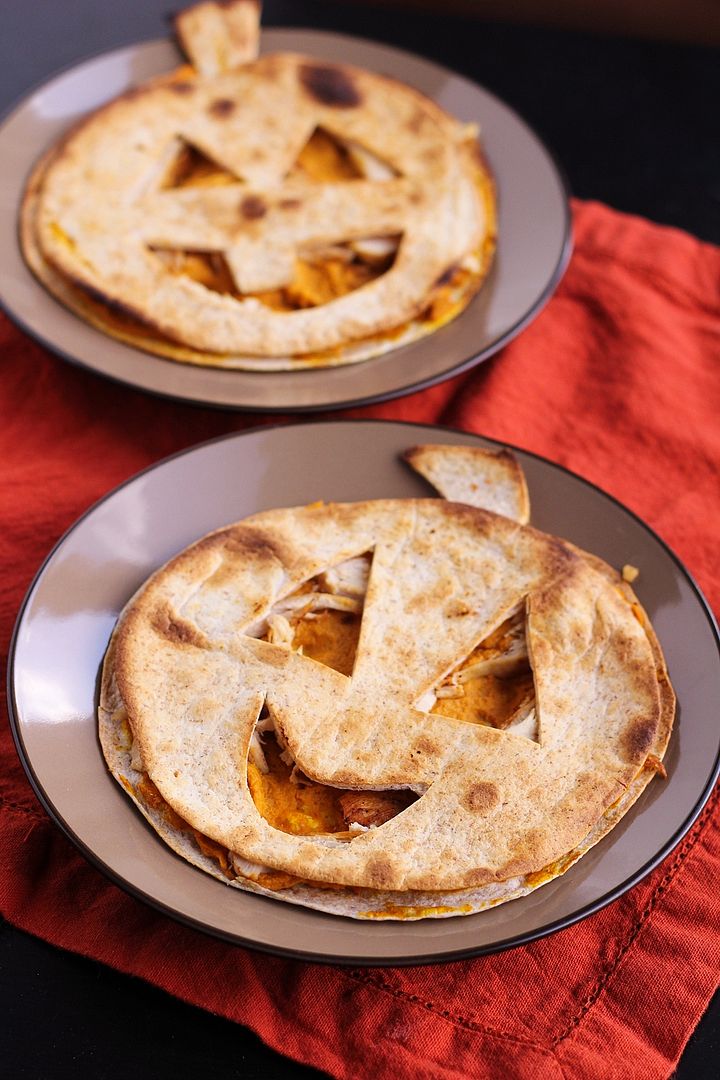
Pumpkin, chicken, & goat cheese quesadillas

Pumpkin, Chicken, & Goat Cheese Quesadillas(for Halloween!)

June 12, 2014

Chicken (or Turkey) Fajita Burgers

Chicken (or Turkey) Fajita Burgers

We love turkey and chicken burgers around here, and have been eating them a lot more often now that it’s summertime and I seem to crave burgers all the time.  Not only are they inexpensive (around 5 dollars of meat gives us meals for two days), but they’re so easy to make, they provide a healthy lean source of protein, they fill me up, and there are infinite flavour combinations to experiment with!

It’s hard to persuade Ryan away from our favourite buffalo chicken burgers, but I like trying new things, so recently I decided to make chicken fajita burgers.  I actually intended to use turkey but didn’t realize I’d grabbed chicken until I got home – either works though!

Chicken (or Turkey) Fajita Burgers

These basically taste like chicken fajitas but in burger format, thanks to the combination of fajita spices in both the burger and the veggies, the sautéed peppers and onions on top, and optional (but delicious) extras like mashed avocado, tomatilla salsa, and cheese!

The way I wrote out the recipe makes this look like a lot of ingredients and work, but it’s really not.  Most of the ingredient list is dedicated to the spices you’ll use to create your own fajita seasoning, but if you like, you can make this even easier with a premixed fajita spice!

Chicken (or Turkey) Fajita Burgers

I loved the flavour in these and all the added veggies to make them a complete meal for me!  When we ate our leftovers the next day, Ryan opted to leave off the veggies and instead top the patties with buffalo sauce, so I don’t think they’ve replaced buffalo burgers as his new favourite, but I’ll definitely keep making these as a fun alternative!

I’m off to vote (it’s Election Day in Ontario) and then join my lovely older sister for lunch for her birthday (Happy Birthday if you’re reading this!).  Hope you all have a great day and weekend!

Chicken (or Turkey) Fajita Burgers

Chicken (or Turkey) Fajita Burgers

Recipe inspired by Cooking Light with many adaptations

Makes 4 burgers

Ingredients:

Fajita Seasoning:
1 teaspoon chili powder
1 teaspoon cumin
1/2 teaspoon paprika
1/2 teaspoon garlic powder
1/4 teaspoon onion powder
1/8 teaspoon cayenne
1/4 teaspoon salt

Burgers:
1 lb lean or extra-lean ground chicken or turkey
1/4 cup tomatillo salsa
1/4 cup breadcrumbs (I used panko)
2 teaspoons fajita seasoning (above)

Veggies:
2 teaspoons olive oil
1 sweet onion, sliced
1 red bell pepper, sliced
1 green bell pepper, sliced
2 teaspoons fajita seasoning (above)

Topping:
4 whole wheat hamburger buns
1 ripe avocado, mashed with some salt and pepper
Additional tomatillo salsa
Lettuce
Cheese such as Monterey jack or pepper jack, optional

Directions:

Combine spices for fajita mixture in a small bowl.  Mix well and set aside.

To prepare burgers, transfer ground chicken or turkey to a large bowl and add salsa, breadcrumbs, and 2 teaspoons fajita seasoning.  Stir with a fork until combined.  Use your hands to shape into 4 even patties, being very gentle and not pressing the meat so you don't make tough burgers. 

Depending on how big your skillets are, heat 2 or 3 skillets over medium-high heat.  I used one skillet for the veggies and 2 for the burgers because I could only fit 2 patties per pan.  Add a little olive oil to each pan.  Add the peppers and onion to one large pan and stir.  You will let these cook until slightly softened, about 10 minutes or until the burgers are done, stirring often.  In the last 3-5 minutes of cooking, season with remaining fajita seasoning (around 2 teaspoons) and stir to coat.  Transfer to a bowl when done.

Meanwhile, add burger patties to other skillets and let cook about 4-5 minutes, flip, then cook another 4-5 minutes on the other side or until done.  If you want to add cheese, add a few slices a couple  minutes before they’re done cooking so the cheese melts slightly.

To prepare burgers, I spread the bottom bun with the mashed avocado, topped with a burger patty, which I then topped with a spoonful of tomatillo salsa.  On the top bun I added lettuce and a big pile of the sautéed veggies, then put them together.  You might end up with leftover veggies, depending on how much you put on each burger.

June 03, 2014

Gluten-Free Moroccan Macaroni Bowl (+ a giveaway!)

Gluten-Free Moroccon Macaroni Bowl with Roasted Cauliflower & Chickpeas

I don't follow a gluten-free diet or think of gluten as an evil thing to avoid, but I know there are a lot of people out there who have to avoid it for health reasons, and for their sake I'm happy that there now seem to be so many gluten-free alternatives out there.  People should not have to go without food like pasta!

Catelli pasta is one of my favourite brands here in Canada because they offer so many alternatives to regular white pasta.  I love their line with vegetables in the pasta, but I usually buy the whole grain pasta.  Last year they launched a line of gluten-free pasta including penne, fusilli, and spaghetti, and recently they added macaroni to the line-up and asked if I wanted to give it a try. 

Turns out it tastes just like regular pasta, even though it's made from white and brown rice, corn, and quinoa.  I still prefer using whole grain pasta whenever I can, but it's nice to know there's a tasty alternative out there for those with gluten sensitivities or intolerance, or for me to use in dishes where whole wheat doesn't really work as well, like in this pasta bowl.

Gluten-Free Moroccon Macaroni Bowl with Roasted Cauliflower & Chickpeas

Catelli has lots of awesome pasta recipes on their site, and I decided to go with a Moroccan version to test out this pasta, and I'm so glad I did!  Everything about this pasta is so different from your typical tomato sauce pasta, and even though it looks like there are a lot of strange ingredients in this, they all work together so well!

Instead of a sauce, this pasta is tossed with a light dressing full of fresh lemon flavour and lots of spices.  You also use some of this dressing to roast some cauliflower and chickpeas, giving them awesome flavour and texture.  I never roast chickpeas for pasta, usually tossing them in raw, but now I always want to eat them this way - I love that they get a little crispy!  Also mixed in there are some green olives, sliced dried apricot, feta cheese, and mint leaves.  I know it sounds a little weird, but trust me that it all the ingredients are balanced and together make an amazing flavour, so don't leave anything out!  I couldn't stop eating this right after I made it and already look forward to making it again.

Gluten-Free Moroccon Macaroni Bowl with Roasted Cauliflower & Chickpeas

If you want to try out this gluten-free pasta yourself, you can get a coupon for $1.00 off here.  And if you're lucky (and live in Canada), you have a chance to win a whole year's supply of Catelli's gluten-free macaroni!

To enter to win this awesome prize (with a retail value of approximately $180), please follow the instructions in the Rafflecopter widget below - there are three ways to enter: leaving a comment on this blog, following me on Facebook, or on Twitter - pick one or all three for more entries!

Catelli Gluten Free Macaroni

Please be sure to enter with a valid e-mail address or Facebook account so I can contact you if you're randomly selected as the winner.  The contest will close at midnight EST on Sunday, June 8th, 2014.  Please note that as this is a Canadian product, this contest is open to Canadians only (sorry, American friends!)

a Rafflecopter giveaway

And don't forget to check out the recipe below!

Disclosure: This is not a sponsored post.  I received one box of pasta to make this recipe but was not compensated in any other way for my time, ingredients, or thoughts, which are all my own :) I just thought this was a great giveaway opportunity for my readers!

Gluten-Free Moroccon Macaroni Bowl with Roasted Cauliflower & Chickpeas

Gluten-Free Moroccan Macaroni Bowl with Roasted Cauliflower & Chickpeas

Slightly adapted from Catelli Pasta

Makes 4-6 servings

Ingredients:

1 (540mL) can of no-salt added chickpeas, drained and rinsed
4 cups cauliflower florets (about 1 small head or 3/4 of a larger head)
1/3 cup fresh lemon juice
1/4 cup olive oil
2 tablespoons honey
1 tablespoon minced or grated fresh ginger
2 cloves garlic, minced
1 tablespoon ground cumin
1 teaspoon cinnamon
1/2 teaspoon each salt and pepper
1 box (340g) Catelli® Gluten Free Macaroni
3/4 cup slivered dried apricots
1/3 cup sliced green olives
1 cup crumbled feta
3/4 cup loosely packed chopped fresh mint leaves

Directions:

Preheat oven to 400°F and line a large baking sheet (I used two) with parchment paper or foil.  Add cauliflower and chickpeas to a large bowl.  Whisk lemon juice, oil, honey, ginger, garlic, cumin, cinnamon, salt, and pepper in a small bowl until combined.  Drizzle 3 tablespoons of the dressing over the cauliflower and chickpeas and toss to combine.  Spread cauliflower and chickpeas onto prepared baking sheets in an even layer.  Roast in preheated oven for 30 minutes or until browned, tossing halfway through.

Meanwhile, cook pasta according to package directions.  Reserve 1/2 cup of the cooking water before draining.  Toss cooked pasta with roasted cauliflower and chickpeas, apricots, olives, feta, mint, reserved pasta water, and reserved lemon dressing.  Stir until combined and serve warm.

May 29, 2014

Buffalo Lentil Loaf

Buffalo Lentil Loaf - a healthy & tasty vegetarian meatloaf alternative!

I always hated meatloaf as a kid, and I still do.  I can’t even say the word meatloaf without adding ‘shmeatloaf’ after it.  It’s funny that when I was young, it was more the vegetables, onions and little crunchy bits in the meatloaf that I hated, and now it’s the idea of a tray full of packed meat that turns me off.  A lentil loaf full of vegetables though?  Much more up my alley!

I know some people will have the same reaction I have to meatloaf when they hear the word ‘lentil loaf’.  Indeed, my fiancé in particular was extremely skeptical at the idea.  But even he ended up admitting that this was really good, so if you’re hesitant, I encourage you to give it a chance!

Buffalo Lentil Loaf - a healthy & tasty vegetarian meatloaf alternative!

Why should you give this a chance over regular meatloaf?  Because lentils are full of fiber and protein to fill you up and give you energy, along with other important minerals like potassium, folate, and iron.  There’s also oats and a little egg for even more fiber and protein in this, along with vegetables like onions, carrots, and peppers for added nutrition.  Of course, I had to add a little extra appeal to convince the fiancé to try this, so I included buffalo sauce to give it extra flavour and kick, which I loved!  You could substitute bbq sauce though if you’re not into spicy food.

Buffalo Lentil Loaf - a healthy & tasty vegetarian meatloaf alternative!

Though it takes a little time to cook, the result is worth it!  I love this lentil loaf on its own with a side of vegetables (mashed potatoes would be great too!), but I ate most of it in sandwiches for lunch.  Toast some whole grain bread, add some lettuce, barbeque or buffalo sauce, tomato, and a couple slices of lentil loaf and you’ve got a hearty, filling, and tasty meal!

Buffalo Lentil Loaf - a healthy & tasty vegetarian meatloaf alternative!

Buffalo Lentil Loaf

Lentil loaf recipe adapted from In Sonnet's Kitchen and The Simple Veganista

Makes one 9x5 loaf, serves about 4-6 (or more depending on how you serve the loaf)

Ingredients:

1 cup dry brown lentils
2-1/2 cups water
1 tablespoon olive oil
1 small or medium yellow onion, diced
3 garlic cloves, minced
1/2 a large red bell pepper, diced
1 large carrot, peeled and grated
1/2 teaspoon ground cumin
1/2 teaspoon garlic powder
1/2 teaspoon onion powder
1/4 teaspoon cayenne pepper (optional)
Pinch each of salt and pepper
1 cup rolled oats, pulsed in a blender or food processor a few times to more of a coarse crumb
2 large eggs, lightly beaten
1/2 cup buffalo sauce (your favourite brand, such as Frank's Red Hot Buffalo Wing Sauce or PC Buffalo Wing Sauce)

Glaze:
2 tablespoons bbq sauce (plus more for after baking, if desired)
2 tablespoons buffalo sauce

Directions:

Add lentils and water to a medium saucepan and bring to a boil.  Cover, reduce heat, and let simmer 25-30 minutes, until lentils are soft and water is mostly evaporated.  Remove from heat, drain any excess water, and puree about three-quarters of the lentils in a blender or food processor (or with an immersion blender).  Set aside to let cool slightly.  Preheat oven to 350°F.

Meanwhile, heat oil in a large saucepan over medium-high heat.  Add onion, garlic, red pepper, and carrot and sauté, stirring often, for about 5-7 minutes or until softened.  Stir in the spices (cumin, garlic powder, onion powder, cayenne, salt, and pepper), then remove from heat. 

Fold together the lentils, sautéed vegetables and spices, oats, eggs, and buffalo sauce in a large bowl or in the saucepan until combined.  Line a 9x5 loaf pan with parchment paper, spray lightly with cooking spray, and spread lentil mixture evenly in prepared pan.  Mix the 2 tablespoons each of bbq sauce and buffalo sauce for the glaze, and brush in an even layer on top of the loaf. 

Bake loaf in preheated oven for 45-50 minutes until the top of the loaf is dry, firm, and golden brown.  Let cool in pan for at least 10 minutes, run a knife around the edges, then use parchment paper to lift out of pan.  Top with a bit of additional bbq sauce if you like. Slice into 10-12 slices and serve however you desire – either on its own, in a sandwich, on top of a salad, etc.

May 22, 2014

Southwestern Black Bean & Brown Rice Veggie Burgers

Southwestern Black Bean & Brown Rice Veggie Burgers

The (almost) return of summer means the return of burger season - one of my favourite foods!  I still make them in the winter on the stovetop (and even in the summer I use the stovetop because I'm scared of bbqs), but there's something about summer that makes me crave burgers all the time.

I've never liked beef burgers though, and a regular beef patty with the standard toppings doesn't appeal to me much.  Instead, I love experimenting with different chicken and turkey burgers - like buffalo chicken and cheddar burgers or apple turkey burgers with caramelized onions and brie - and veggie burgers, which are so customizable, like lemon chickpea quinoa burgers or portabello mushroom burgers with roasted red peppers and provolone!

Southwestern Black Bean & Brown Rice Veggie Burgers

I love trying out new flavours and for my first veggie burgers of the post-winter season (it's hard to call this summer yet), I went with a Southwestern theme!

The veggie patties for these burgers are hearty and full of real veggies, just how I like them!  The base is a mixture of brown rice, oats, and black beans for plenty of protein and fiber, and mixed in are some onions, garlic, peppers, corn, and plenty of spices for added nutrition and flavour.


Southwestern Black Bean & Brown Rice Veggie Burgers

Ryan and I ate these for dinner three nights in a row (another great thing about veggie burgers is getting a lot of food for a pretty low cost!) and ate them differently each night.

The first time I topped mine with salsa and served them with chipotle sweet potato fries as pictured, which made for a pretty spicy meal though I still loved it!  The second night I added cheese on top, skipped the salsa, and used a light ranch dressing instead which was also awesome.  And the third night I crumbled my patty up and served it over a big spinach salad which was a refreshing change! 
If I had avocado I would have definitely added it to all three meals but avocados are so expensive these days I have to sadly try to limit my use of them.

You can eat these however you like and with whatever toppings you think sound good - hope you enjoy them as much as we did!

Southwestern Black Bean & Brown Rice Veggie Burgers

Southwestern Black Bean & Brown Rice Veggie Burgers

Inspired by and adapted from similar recipes seen on Simply Scratch, Veggie Belly, and Katherine Martinelli

Makes 6 burgers

Ingredients:

For the Burgers:
1/2 cup uncooked whole grain brown rice – I used pre-cooked instant rice
1/2 cup rolled oats, divided
1 (540mL) can of no-salt added black beans, rinsed and drained
1 medium yellow onion, diced
1/2 cup diced bell peppers – I used half a green pepper but you could use a mixture of green and red
3 cloves garlic, minced
3/4 cup thawed frozen corn kernels
1 teaspoon ground cumin
1 teaspoon chili powder
1/4 teaspoon salt
1 teaspoon chipotle chili powder for added spice (or substitute paprika)
1 large egg, lightly beaten

For Topping:
6 whole wheat hamburger buns
Lettuce or spinach
Sliced tomatoes
Sliced ripe avocado
Salsa (optional)
Cheddar or Monterey jack cheese (optional)

Directions:

Cook the rice according to package directions.  Let drain well.

Pulse 1/4 cup oats in a food processor to form crumbs.  Keep remaining 1/4 cup of oats whole.  Transfer all oats to a large bowl.  Reserve 1/4 cup black beans and transfer remaining beans to the food processor.  Pulse until most of the beans are mashed (but not completely mushy).  Add to the large bowl with the oats.

Heat oil in a large skillet over medium-high heat.  Add onions and peppers and sauté until softened, 7-10 minutes, stirring occasionally.  Add garlic and sauté for another minute.  Add corn and reserved 1/4 cup of black beans and stir.  Add all spices and sauté for another minute, stirring.  Remove from heat and let cool slightly.

Add vegetable mixture and rice to the bowl with the oats and black beans.  Add whisked egg and stir mixture until combined.  Form into 6 large patties or 8 smaller ones, if desired (I made 6 patties).

Heat two large skillets over medium heat.  Spray with non-stick cooking spray or use a light amount of oil.  Add 3 patties per pan and cook about 5-6 minutes per side, turning carefully in between, until browned and cooked through.  If using cheese, add slices to the tops of the patties about a minute or two before they’re done cooking to melt the cheese.  Remove from heat.

Add patties to buns and top with lettuce, tomatoes, avocado, salsa, or desired other toppings.  You could also crumble the patties and serve them on salad!

October 30, 2013

Pumpkin, Chicken, & Goat Cheese Quesadillas (for Halloween!)

Pumpkin, Chicken, & Goat Cheese Quesadillas (for Halloween!)

I cannot believe that Halloween is already tomorrow!  October has flown by (like every other month this year) and I barely even thought about Halloween costumes or food ideas until this week.  I have a party to go to tonight and I didn't even decide on a costume until yesterday when I went to the drugstore and chose a few devil accessories from the 40% off Halloween section, so I'm probably going to be the most unoriginal one there.  I haven't had time to come up with Halloween food or dessert ideas either, which is disappointing because Halloween is the perfect excuse to get creative with your food!

I couldn't let the holiday pass without at least one Halloween recipe on my blog though, so I threw these pumpkin quesadillas together the other day - and I loved them!

Pumpkin, Chicken, & Goat Cheese Quesadillas(for Halloween!)

These quesadillas are filled with a creamy mixture of spiced pumpkin and goat cheese, along with some chicken for protein.  That's it!  Very few ingredients but they surprised me in how good they tasted, plus they were really easy to make.  Carving a pumpkin face in a tortilla is WAY easier than carving an actual pumpkin, and you can throw multiple quesadillas under the broiler to quickly cook them and avoid having all the filling fall out through the holes like they would if you tried to cook them on a skillet.

These are perfect for Halloween night because you can easily prepare them for an early dinner before the kids head out trick or treating.  You could also change up the filling to include whatever you want - I imagine kids would be much happier with a simple cheese-only version!

And if you're looking for more Halloween food ideas (since clearly I am not full of costume ideas), check out my Pinterest board.  Hope everyone has a safe and happy Halloween tomorrow!

Pumpkin, Chicken, & Goat Cheese Quesadillas(for Halloween!)

Pumpkin, Chicken, & Goat Cheese Quesadillas

Adapted from recipes seen on Rachel Ray and Recipe Runner

Makes about 5 small quesadillas

Ingredients:

2 large (or 3 smaller) boneless skinless chicken breasts
A pinch each of chili powder, salt, and pepper for seasoning the chicken
1 cup canned pumpkin puree
1/4 cup + 1 tablespoon goat cheese
1 teaspoon cumin
1/2 teaspoon chili powder
Salt and pepper
10 small (6-inch) whole grain tortillas
Non-stick cooking spray

Directions:

Preheat broiler.

Trim chicken breasts of any fat and season on both sides with chili powder, salt, and pepper.  Heat a large skillet over medium-high heat and cook chicken breasts for about 5-6 minutes per side, or until cooked through completely.  Set aside.

Mix pumpkin, goat cheese, cumin, chili powder, and a pinch each of salt and pepper in a medium bowl.  Taste mixture and adjust any amounts to your liking.  Slice or shred chicken thinly. 

Use a small knife to carve pumpkin faces into 5 of the tortillas - these will be the tops of the quesadillas.  Save the triangles you cut out from the eyes to be the pumpkin stems.  Spread about 1/4 cup of the pumpkin mixture onto each of the 5 bottom tortillas.  Top pumpkin mixture with shredded chicken, followed by the carved tortilla to form 5 complete pumpkin quesadillas. Insert the triangle in between the tortillas near the top, pressing it into the pumpkin mixture, to be the stem.  Press the top tortilla gently onto the bottom tortilla to help them stick together.

Spray baking sheets with non-stick baking spray, carefully transfer quesadillas to baking sheets with carved face up, spray tops lightly with cooking spray, and broil on top rack of oven until warmed through and toasted spots begin to appear on top.  This should only take a few minutes – watch closely.

Transfer quesadillas carefully to plates as they won't stick together as much as regular quesadillas because of the goat cheese.  Serve warm.

October 23, 2013

Spiced Squash, Lentil, & Goat Cheese Salad

Spiced Squash, Lentil, & Goat Cheese Salad

Sorry for the lack of posts lately – two Saturdays ago I travelled up to Northern Ontario to visit family for Thanksgiving and stayed just over a week.   I had fully intended to go about my regular routine while I was up there, getting lots of work done, staying caught up with my Feedly reader, and writing a couple blog posts, but before I knew it I was boarding a plane back home and I’d done almost none of the above.  I really have no idea where the time went, though I do know I enjoyed it!

Spiced Squash, Lentil, & Goat Cheese Salad

As usual, I was spoiled on my trip and almost never had to make any food for myself.  The one dish I made the whole week was this squash and lentil salad, which we enjoyed with some butternut squash soup as a nice lighter meal after our big Thanksgiving feast. I offered to make it because I’d been eating it for my lunches the whole week before I left and I loved it so much that it was still on my mind!

Somehow, whenever I’m under pressure to make something for guests, it never turns out as well as when I make it the exact same way for myself at home (or maybe I'm extra critical when I know it's being judged), but everyone still enjoyed it!

Spiced Squash, Lentil, & Goat Cheese Salad

This salad is bursting with fall flavour and is hearty and filling thanks to the lentils and squash, while still feeling light and healthful.  It takes a bit of time to roast the squash and cook the lentils, but other than that everything comes together pretty easily.  I didn’t change much from the original Bon Appetit recipe except to add pumpkin seeds and cranberries, which add some crunch, sweetness, and even more of a festive feel to the salad.  

I can't believe that now that I'm back, it's already time (or past time) to start thinking of Halloween recipes!  It's crazy how fast October is flying by - hope you're all enjoying it as much as I am!

Spiced Squash, Lentil, & Goat Cheese Salad

Spiced Squash, Lentil, & Goat Cheese Salad

Adapted from Bon Appetit

Makes about 4 large (main) or 8 small (side) servings

Ingredients:

1 large (around 2 pound) butternut squash
3 tablespoons olive oil, divided
1 teaspoon ground cumin
1 teaspoon smoked paprika (or paprika plus a dash of cayenne if you don’t have smoked paprika)
1/2 teaspoon salt
3/4 cup green or brown lentils
4 cups baby arugula
3/4 to 1 cup crumbled goat cheese
1/2 cup pepitas (pumpkin seeds)
1/2 cup dried cranberries
1 tablesoon balsamic vinegar

Directions:

Preheat oven to 375°F.  Peel butternut squash, remove seeds, and cut into about 1” cubes.  I find it easier to cut squash after microwaving it first – just prick it all over with a fork or small knife and microwave on high for about a minute.  Toss cubes of squash with 2 tablespoons oil, the cumin, paprika, and salt.  Spread squash in an even layer on a foil-lined baking sheet and roast for 20 minutes.  Toss, return to oven, and roast for another 10-15 minutes.  Let cool.

Meanwhile, bring around 3 cups of water to a boil in a medium saucepan.  Add lentils, cover, reduce heat to simmer, and let cook for about 30 minutes, until tender but firm.  Drain and rinse lentils under cold water.

Combine lentils, squash, arugula, about half the goat cheese, pepitas, cranberries, balsamic vinegar, and remaining 1 tablespoon of oil in a large bowl.  Season with salt and pepper.  Divide into servings and top each with remaining goat cheese.

July 30, 2013

White Bean Dip with Roasted Jalapenos & Goat Cheese

White Bean Dip with Roasted Jalapenos & Goat Cheese

I feel like I’ve been spending a lot of long hours in my windowless cave office lately (as I struggle to learn a data analysis software program that makes absolutely no sense – why are you so confusing, SAS, why??), so I’ve been needing a lot of snacks to get me through the day. One of my go-to healthy snacks that I eat all the time is carrots with hummus – it’s so easy (and cheap!) to whip up a batch of hummus that I then throw in a container and bring to school along with a bag of baby carrots through the week.

I’ve tried a lot of different hummus recipes in the past and have loved them all, but this time I decided to do something a little different and use regular white beans instead of chickpeas and omit the tahini. So it’s just a regular bean dip instead of hummus, but it’s still just as smooth and creamy!

White Bean Dip with Roasted Jalapenos & Goat Cheese

Because white beans are pretty flavourless, I kicked things up by adding roasted jalapenos and cumin for spice, goat cheese for a bit of richness and tang, and some lime juice, cilantro, and honey for added flavour and balance. The first time I made this, I used two jalapenos and the dip was pretty spicy (but still good!), so the next time I only used one and then I could barely detect the spice at all. So I think one and a half would be the perfect amount for me, but you can definitely adjust the amount to your liking! I’d recommend roasting two jalapenos (they’re super cheap anyway), then start by adding one chopped pepper to the dip and keep throwing more in as you taste if it’s not spicy enough.

This goes great with pita chips (or ranch popped rice chips, shown here) or veggies, and while it may not make the jumble of numbers and words on your screen make any more sense, it will at least give you the energy to stay in your office and keep staring at them so it looks like you know what you’re doing!

White Bean Dip with Roasted Jalapenos & Goat Cheese

Before I go, I just wanted to thank everyone for their kind comments on my blogiversary post and for entering the Starbucks gift card giveaway!  A winner has been randomly selected and contacted - thanks again!

White Bean Dip with Roasted Jalapenos & Goat Cheese

White Bean Dip with Roasted Jalapenos & Goat Cheese

Ingredients:

1 (540mL) can white kidney beans
1-2 jalapenos (1 will make the dip quite mild and 2 might be fairly spicy, but it can depend on the pepper)
2 oz plain goat cheese
1.5 tablespoons fresh lime juice
1/4 cup chopped cilantro
1/2 teaspoon honey
1/2 teaspoon cumin
1/2 teaspoon salt
1/4 teaspoon pepper
2 tablespoons extra virgin olive oil

Directions:

Preheat oven to broil (500°F) and move oven rack to top third of oven, a few inches away from the top. Spray jalapeno(s) with cooking spray or rub with a bit of olive oil, and place on a baking sheet. Roast under the broiler until all sides begin to get black patches – time will vary but mine took around 5-10 minutes total. Keep an eye on them and turn a few times to brown them evenly. Remove from oven (use tongs or mitts) and place in a bowl covered in saran wrap to let them steam and loosen the skin for 10 minutes. Remove skins (they should peel off), slice lengthwise, remove seeds, and roughly chop.

Add all ingredients except the olive oil to the large bowl of a food processor. Cover with the lid and add the olive oil to the feed tube so it will slowly drain into the dip. Process until dip is smooth and oil is mixed in. Taste and adjust any amounts to your liking, if necessary. Store in the refrigerator but let warm up to room temperature before eating. Serve with carrots, other veggies, or pita chips.

June 11, 2013

Lemon Chickpea Quinoa Burgers

Lemon Chickpea Quinoa Burgers

I love those free little newspaper/magazines that grocery stores put out to advertise their new products every season, mostly because I love anything that’s free, but also because I’m always looking for new sources of inspiration for ingredients and recipes.  It’s not often that I find a recipe I actually like in there, but when I saw these lemon chickpea quinoa burgers in the latest issue of Inspired (by Sobeys), I was intrigued because I’ve never seen anything quite like it.

So, I got right to work making my own version, with shallots instead of red onion, basil instead of parsley, more oats to firm the mixture up a bit, and a lemon yogurt sauce to serve with them.  I also refrained from processing the whole mixture to keep some texture in them, and I pan-fried my burgers instead of barbequing them (because I don’t have a bbq), but I think they’d be firm enough to bbq if you want to give it a try!

Lemon Chickpea Quinoa Burgers

I loved the texture of the burgers, which held their shape and had a bit of crunch from the quinoa, and I loved the bright lemon flavour that really shone through in both the burgers and yogurt sauce.  I also think they would work really well as cute little vegetarian sliders at a bbq!

And as far as burgers go, these are pretty darn healthy!  They’re full of protein from the addition of chickpeas, quinoa, and Greek yogurt, as well as fiber from the oats and whole grain buns, and vitamins from the veggies and lemon.  

Lemon Chickpea Quinoa Burgers

After tasting them, I did think they needed a little something extra to balance out all the lemony-ness, so the next night I added feta cheese on top of the burger, and the saltiness of the feta was the perfect thing to balance out the sour lemon.  So don’t leave out the feta!

(I had to take a quick shot the next night to document the feta since it wasn’t in any of the other pictures.  I went a little heavy with the feta, but a lot of it falls out anyway!  The sauce is still there, on top of the lettuce):

Lemon Chickpea Quinoa Burgers

Of course, the boyfriend said that these were good, but that next time I should maybe make them with buffalo or chipotle sauce instead of lemon (he’s not much of a lemon person, except for lemon poppy seed bread). 

But while these may not be much of a manly burger, I think the fact that he was willing to eat them for dinner three nights in a row shows that they’re still pretty tasty!

Lemon Chickpea Quinoa Burgers

Lemon Chickpea Quinoa Burgers

Adapted from Inspired

Makes 5 burgers

Ingredients:

For the Burgers:
1/4 cup uncooked quinoa
1 (540mL) can of chickpeas, drained and rinsed
1/2 cup rolled oats
1/4 cup minced shallot
2 garlic cloves, minced
1 tablespoon lemon zest
2 tablespoons fresh lemon juice
1 large egg, lightly beaten
1 teaspoon cumin
1/2 teaspoon salt
1/2 teaspoon pepper
2-3 tablespoons packed minced basil (or parsley if you like)

For the Sauce:
1/2 cup plain Greek yogurt
1 tablespoon fresh lemon juice
1 tablespoon minced basil
Salt and pepper

For Assembly:
5 whole grain hamburger buns
Lettuce
Feta cheese (low-fat, if desired)

Directions:

Bring 1/2 cup water to a boil.  Add quinoa, cover, reduce heat and let simmer 15 minutes.  Remove from heat and keep covered for 5 minutes.  Fluff with a fork and let cool slightly.

Meanwhile, add chickpeas to the bowl of a food processor or mini chopper and pulse until they are finely ground.  Transfer to a large bowl.  Add oats to same food processor and pulse a few times to break them down into fine crumbs (but not a powder).  Add to chickpeas in large bowl.  Add to the bowl the shallots, garlic, lemon zest, lemon juice, egg, cumin, salt, pepper, and basil.  Add quinoa.  Mix everything together with a large fork until well combined.  (note: leave the egg to mix in last if you want to be able to taste the mixture first and adjust seasonings or lemon juice to your liking). Divide and shape into 5 patties.

Heat a non-stick skillet over medium-high heat and cook patties for about 4-5 minutes per side.

Meanwhile, prepare yogurt sauce by mixing yogurt, lemon juice, and basil, and seasoning with salt and pepper to taste.

Assemble burgers with yogurt sauce, lettuce, and feta on whole grain buns.

February 19, 2013

Beet & Potato Soup

Beet & Potato Soup

I hope that those of you who had the day off yesterday enjoyed your long weekend!  Yesterday was a holiday for many of us here in Ontario - we don’t celebrate President’s Day (obviously, as we don’t have presidents in Canada), but we do celebrate Family Day on the third Monday of every February. 

I love the idea of a holiday that celebrates the family and encourages families to spend time together.  This was actually the first year that every member of my family had the day off and could get together, so we took the opportunity to go for a wintery family walk along a trail around a frozen pond.  Even though I think I risked my life a thousand times because the trail was pretty much all ice and my boots do not seem to have even the slightest bit of traction, it was still a great way to get outdoors and spend some time with my wonderful family!  Here’s a little glimpse of our walk – the ducks were my favourite part :)

winter walk

After spending a day outside in the cold, nothing is more comforting than a warm bowl of thick soup and a hearty loaf of bread.  Unfortunately I didn’t have any of this beet and potato soup left to enjoy so I had to settle for an Earl Grey tea latte from Starbucks, but just looking at these photos as I prepared them for this post had me craving this soup so bad!

Beet & Potato Soup

I won't bore you with a long description of this soup except to say that it’s thick and creamy but still healthy, and is a gorgeous red colour! The first time I made this I used chicken broth but thought it didn’t quite work, so the next time I used vegetable broth, and also increased the cumin for more spice and let the soup simmer longer so the flavours would intensify, and it was so much better! If you hate beets, I’m not going to try to convince you to try this because the beet flavour is really front and center, but if you’re a beet lover like me then you will love this!

Beet & Potato Soup

Beet & Potato Soup

Adapted from Cooking Light

Serves 3-6, depending on serving size

Ingredients:

1 tablespoon olive oil
1 medium yellow onion, chopped
2 cloves garlic, minced
1/2 teaspoon salt
1/4 teaspoon pepper
1 teaspoon cumin
4 cups vegetable broth
1 pound of beets, peeled and quartered
1/2 pound yellow potatoes, peeled and cubed
1 bay leaf
1-2 sprigs of fresh thyme
2 teaspoons fresh lemon juice
1 teaspoon honey or agave
Sour cream or plain yogurt for topping

Directions:

Heat oil in a large saucepan over medium-high heat.  Add onion and sauté for about 5 minutes, stirring occasionally, until softened.  Add garlic and cook for another 30 seconds.  Add salt, pepper, and cumin, stir to coat and cook for another 30 seconds. 

Add vegetable broth, beets, potato, bay leaf, and thyme.  Bring to a boil, then reduce heat and let simmer for 30-35 minutes, until beets and potato are tender.  Remove bay leaf and thyme sprigs.  If soup has reduced considerably, add a splash of water.

Puree soup in three batches in a blender. Remove the plastic stopper in the blender lid and cover with a paper towel or tea towel to let steam escape.  After pureeing each batch, transfer to a bowl, then once all the soup has been pureed, transfer back to the saucepan to heat through, if necessary.  Add 2 teaspoons of lemon juice and taste.  Add an additional teaspoon of lemon juice and 1 teaspoon of honey or agave to sweeten, if desired.

Serve each portion with a swirl of sour cream or yogurt.  Season with salt and pepper if desired.

December 06, 2012

Curried Chickpea & Kale Soup

Curried Chickpea & Kale Soup

I’ve made three holiday cookies/dessert recipes over the last week, I’ll be making two more for our annual department cookie swap tomorrow, and I’ll be coming home from the cookie swap with an entire container full of about a million more cookies… I’m certainly not complaining, but around this time of year I always try to make sure I make my meals as healthy and nourishing as possible to help balance out the excessive cookie consumption a little!

When I saw this pretty green soup in Clean Eating magazine, I knew it was just what I needed, plus it featured a flavour combination – curry powder, kale, chickpeas, and coconut milk – that I hadn’t seen before in a soup!  And it used beans as a thickener, which I liked so much from the roasted tomato & white bean soup I tried last week.

The flavours in this soup all work together and make a thick and filling soup that you can feel good about eating!  You could probably fit a lot more kale in there too if you want to feel even better about it! The original recipe had a quick, 15 minute preparation, but I decided to sauté some onions, garlic, and ginger first to add some flavour.  This made my version slightly longer to prepare, but it’s still really easy to make on a weeknight, leaving you plenty of time left in the evening to bake some cookies :)

Curried Chickpea & Kale Soup

Curried Chickpea & Kale Soup

Adapted from Clean Eating Magazine, Quick & Easy Meals Special Issue

Serves 4

Ingredients:

1 teaspoon olive oil
1 medium yellow onion, diced
2 cloves garlic, minced
2 teaspoons minced fresh ginger
1 tablespoon curry powder
1 teaspoon cumin
2 cups vegetable stock
2 cups low fat coconut milk (canned)
2 cans (15-19 fl oz each) chickpeas, rinsed and drained
2 cups packed torn kale leaves
1 teaspoon honey or agave
Salt & Pepper

Directions:

Heat oil in a large saucepan over medium-high heat. Add onion and sauté until soft and translucent, about 4-5 minutes. Add garlic and ginger and sauté for another 30 seconds to 1 minute, stirring occasionally. Add curry powder and cumin and stir together for about 30 seconds, until fragrant. Add vegetable stock, coconut milk, chickpeas, and kale, and let simmer for about 10 minutes, stirring occasionally.

Transfer soup to a blender in two batches, remove the plastic stopper from the top of the blender and cover with a paper towel to allow steam to escape. Puree until smooth, then return to saucepan. Add honey and season with salt and pepper to taste, reheating the soup for a couple of minutes. If the soup is too thick, add more vegetable stock or water to thin it out to desired consistency.

Serve warm with naan bread.

September 28, 2012

Baked Sweet Potatoes with West African-Style Peanut Sauce

Sweet Potatoes with West African-Style Peanut Sauce

My twin sister Genevieve (from Vanilla & Spice) is in Kenya right now and I'm super jealous, so I thought I'd make myself an African-style meal to pretend that I'm also over there.  It didn't quite work (the pretending I'm in Africa part), but the meal did turn out to be delicious!

This is a simple, filling, and comforting dish made by baking a sweet potato and smothering it in a thick, creamy tomato-peanut sauce.  I know Kenya isn't in West Africa, and honestly I don't even know if this is a true West-African dish anyway, but Cooking Light says it is, so I'm going with it!

Sweet Potatoes with West African-Style Peanut Sauce

You might think it's weird to pair sweet potatoes and peanut butter together, but trust me, it works!  This actually reminded me of a lot of the African sweet potato and peanut stew that I love so much, except that the sweet potato is more the star of this dish.

If you're not convinced, the sauce pairs well with veggies too.  I served some of my extra sauce with steamed broccoli for a light lunch, and really enjoyed it!

Broccoli with West African-Style Peanut Sauce

Cooking Light suggests pairing a sweet potato with chicken, but I was really full from the sweet potato alone.  This may be because I doubled the amount of sauce called for, and the sauce is pretty filling, but I thought it was necessary to double it to make sure there was enough for every  bite of sweet potato.  I think pairing one of these smothered potatoes with a side of salad makes for a satisfying vegetarian meal, but go ahead and add a protein if you like too, I do think the sauce would work well with chicken!

This may or may not be a completely authentic African meal, but it's still something a little different than what I'm used to, and is a great autumn dish!

Sweet Potatoes with West African-Style Peanut Sauce

Baked Sweet Potatoes with West African-Style Peanut Sauce

Adapted from Cooking Light

Serves 2

Ingredients:

2 medium sweet potatoes
1 teaspoon olive oil
1/2 a small onion, finely diced
1 garlic clove, minced
2 teaspoons grated or minced fresh ginger
1 teaspoon cumin
1 teaspoon ground coriander
Dash of cayenne
1/2 cup water
1/2 cup crushed tomatoes (tomato sauce)
3 tablespoons smooth peanut butter
1/2 teaspoon lemon juice
1 teaspoon sugar
1/4 teaspoon salt
2 tablespoons chopped cilantro
2 tablespoons chopped peanuts (optional)

Directions:

Preheat oven to 400°F.  Pierce sweet potatoes with a fork all over, and bake directly on the middle oven rack for 45 minutes or until tender.

Heat oil in a medium saucepan over medium heat.  Add onion, ginger, and garlic, and cook for about 3 minutes, stirring often.  Add cumin, coriander, and cayenne, and cook for another minute.  Add water, tomato sauce, peanut butter, lemon juice, sugar, and salt.  Stir or whisk until smooth, bring to a simmer, and cook for 2-3 minutes, until slightly thickened.  Remove from heat.

Split potatoes lengthwise (not cutting all the way through), and squeeze the sides of the potato (with oven mitts on) so the filling fluffs out, if desired.  Spoon sauce over potatoes and sprinkle with peanuts and cilantro.  If you want to make sure sauce covers more of the sweet potato, cut the sweet potato up before adding the sauce.

Ingredient Index

Related Posts Plugin for WordPress, Blogger...