Showing posts with label dill. Show all posts

April 02, 2015

Roasted Carrot Crostini with Dill Pesto & Feta

Roasted Carrot Crostini with Lemon Dill Pesto and Feta - an appetizer with bright Spring flavors that's perfect for Easter or anytime!

I'm happy I decided to try to start posting recipes again just in time for Easter.  I love all food-related holidays but Easter is especially nice because after the heavier meals at Thanksgiving and Christmas, we now get to celebrate bright and fresh flavours that go along with the start of springtime.

Roasted Carrot Crostini with Lemon Dill Pesto and Feta - an appetizer with bright Spring flavors that's perfect for Easter or anytime!

Whenever I try to think of Easter recipes my mind always goes straight to carrots.  As part of our Easter dinner last year, my sister made roasted carrots and radishes with a lemon dill pesto (inspired by With Food + Love) and the flavours worked really well together.  So I decided to turn that concept into an appetizer, with the addition of feta because feta makes everything better!

Roasted Carrot Crostini with Lemon Dill Pesto and Feta - an appetizer with bright Spring flavors that's perfect for Easter or anytime!

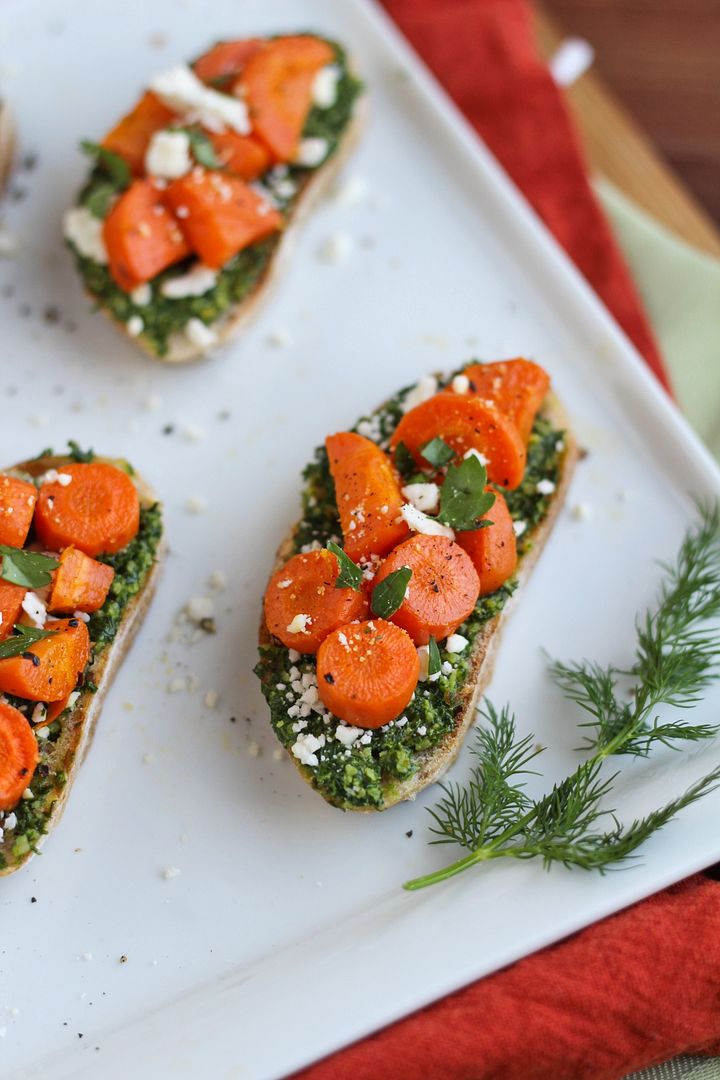
This dish looks a little fancy but is really easy to prepare. I just chopped and roasted some carrots in the oven, then whipped together a lemony dill pesto in the food processor.  I toasted some whole wheat baguette slices, spread some of the pesto on top, then topped them with the carrots and feta. I loved how the bright flavours of the pesto balanced out the earthy carrots and salty feta.

I'm in charge of apps for our family's Easter dinner this year so I think I'll be making these again!  I hope you all enjoy the long weekend and have a happy Easter if you're celebrating it!

Roasted Carrot Crostini with Lemon Dill Pesto and Feta - an appetizer with bright Spring flavors that's perfect for Easter or anytime!

Roasted Carrot Crostini with Lemon Dill Pesto & Feta

Serves 10-15

Ingredients:

For the carrots:
1-1/2 lbs carrots, peeled and chopped into small, about ¼-½” pieces
1-2 teaspoons olive oil
Salt and pepper

For the lemon dill pesto:
1-1/2 cups packed fresh dill
1/2 cup packed fresh parsley leaves
2 cloves garlic, minced
1/4 cup chopped walnuts
2 tablespoons fresh lemon juice
2 tablespoons extra virgin olive oil
1/4 teaspoon each salt and pepper

Other:
1/4 to 1/3 cup crumbled feta
1 large baguette, sliced diagonally into thin slices (I used a whole wheat ciabatta loaf)

Directions:

Preheat oven to 400°F. Toss carrots with olive oil, season with salt and pepper, and spread on a foil-lined baking sheet.  Roast in preheated oven for about 30 minutes, tossing halfway through.

Meanwhile, prepare dill pesto.  Place all ingredients (dill, parsley, garlic, walnuts, lemon juice, oil, salt, and pepper) in the bowl of a food processor (I used the smaller bowl) and process until the pesto is as smooth as you can get it.  Taste and adjust any seasoning or amounts to your liking if necessary.

When carrots are done, leave oven on, and spray baguette slices with cooking spray.  Set on baking sheet and let toast in oven for about 3-5 minutes, until toasted.

Prepare crostini by spreading pesto on baguette slices, top with crumbled feta and roasted carrots, and garnish with chopped parsley if desired.  Serve while carrots are still warm.

August 06, 2013

Lemony Lentil Salad with Dill & Feta

Lemony Lentil Salad with Dill & Feta

As I mentioned in my recap of things I made and did in July, I was recently reminded of how much I love lentil salads when I tried a recipe from My New Roots.  Not only are they easy to make and highly adaptable to different flavours and ingredients, but they usually make a lot of leftovers that are great for packing filling lunches, plus they’re super healthy – lentils are low in fat and really high in protein and fiber.

So as soon as I finished all the leftovers from the last lentil salad I tried (and there were a lot of leftovers!) I immediately made a new one, and I’m going to try to keep this up as much as possible, considering I now have three giant bags of lentils in my cupboard to use up!  

Lemony Lentil Salad with Dill & Feta

While the last lentil salad I tried was heavily spiced, this time I wanted something more bright and summery.  I knew I wanted to use lemon and dill, so when I came across a recipe for a lemony lentil salad with dill and feta from Eating Well I knew I was on the right track.  Of course, I can never seem to leave a recipe alone, so I made a few changes, starting with using dry lentils instead of canned lentils (canned are still fine, but if you’re concerned about sodium then it’s best to use dry - I use them because they're cheaper and easy to cook).  I also used shallot instead of red onion, added a clove of garlic, used more cucumber and replaced the red pepper with cherry tomatoes, and for the dressing I added a bit of honey for sweetness, reduced the lemon juice (it’s still very lemony!) and reduced the olive oil from 1/3 cup down to 2 tablespoons, which was plenty of oil for me.

I loved the balance of the lemony dressing with the salty feta, along with the bright flavour of dill and the crunch of summer veggies.  I threw a handful of fresh arugula into each serving to make it more salad-like and also cut the strong lemon flavour down to just the right amount (so I recommend this step!)

I hope you guys love lentils as much as I do, and if you think you don’t, perhaps it’s time to give them another try!

Lemony Lentil Salad with Dill & Feta

Lemony Lentil Salad with Dill & Feta

Adapted from Eating Well

Makes 4-6 servings

Ingredients:

1-1/4 cups dry brown or green lentils
1/4 cup fresh lemon juice (from about 1 lemon)
1/3 cup chopped fresh dill
2 tablespoons minced shallot
1 clove garlic, minced
2 teaspoons Dijon mustard
1/2 teaspoon honey or agave
1/4 teaspoon each salt and pepper
2 tablespoons extra virgin olive oil
1-1/2 cups chopped cucumber
1 cup chopped grape or cherry tomatoes
3/4 to 1 cup crumbled feta cheese
Arugula for serving

Directions:

Combine lentils with about 3.5 cups of water (enough to cover them by a couple of inches) in a medium or large saucepan.  Bring to a boil, cover, reduce heat to a simmer, and let simmer for 15-20 minutes until tender (but not mushy!).  Remove from heat, drain, and rinse with cold water to cool.

While lentils are cooking, prepare dressing by whisking together the lemon juice, dill, shallot, garlic, mustard, honey, salt, and pepper in a small bowl.  Slowly add the olive oil until combined. 

Toss cooled lentils with the dressing.  Mix in the cucumber, tomatoes, and desired amount of feta and toss to combine.  Season with additional salt and pepper, if desired.  Serve in bowls with a big handful of arugula added to each, if desired.

April 23, 2013

Cheezy Ranch Hummus

Cheezy Ranch Hummus

Before I get into this post, I feel the need to first clarify that I did not spell "cheesy" wrong in the title.  I'm guessing that the majority of people reading this already knew that, but for those who might not have heard the term "cheezy" before, it's used to describe something that tastes cheesy but doesn't actually use dairy cheese.  I'm not vegan and there is no way I could ever give up real cheese, but there are some dishes where cheese just doesn't really work, like in hummus.  Fortunately, there is a magical little ingredient called nutritional yeast that can blend right in to not only add cheesy flavour but also lots of nutrients.  Again, I'm sure a lot of you have heard of it before, but in case nutritional yeast is new to you (I had no idea what it was a couple of years ago), I described it more in this post for broiled pesto tomatoes, and I also used it in this pizza hummus to get the same cheesy flavour I was going for in this ranch version.

Cheezy Ranch Hummus

This hummus was inspired by Pickles & Honey's vegan cool ranch hummus I saw a while ago and loved.  I don't buy Doritos anymore because I know I'd eat the whole bag in one sitting, but Cool Ranch was always one of my favourite flavours.  I changed almost everything from the original recipe to make my own version, and I wouldn't say that mine is "cool ranch" flavoured, but rather combines elements of ranch dressing like fresh herbs and onion and garlic powder with nutritional yeast for a cheezy ranch hummus that makes a fantastic dip for veggies!

Cheezy Ranch Hummus

In other news, Spring has finally sprung in Southern Ontario and I couldn't be happier!  I love seeing flowers and robins and feeling the sun on my face again.  I hope those still stuck with the white stuff will see it all melt away soon!

Springtime

Cheezy Ranch Hummus

Inspired by Pickles & Honey

Ingredients:

1 (540mL or 19 fl oz) can chickpeas, drained and rinsed
3-4 tablespoons water
3 tablespoons tahini
2 tablespoons fresh lemon juice
3 tablespoons fresh chopped parsley
2 tablespoons chopped chives
1 tablespoon fresh chopped dill
1 teaspoon garlic powder
2 teaspoons onion powder
1/2 teaspoon salt
1/4 teaspoon pepper
2 tablespoons nutritional yeast
1/2 teaspoon dijon mustard
Dash Worcestershire sauce (optional, leave out to keep it vegetarian)
2 tablespoons extra virgin olive oil

Directions:

Add all ingredients except for the olive oil to the large bowl of a food processor.  Process until smooth.  Pour the olive oil into the feed tube of the food processor and let slowly drain into hummus as you continue to pulse.  Once everything is well combined, taste and adjust any amounts to your liking.  Store in the refrigerator and serve with veggies or as a sandwich spread.

February 01, 2013

San Francisco Inspired Green Goddess Salmon Sliders

Avocado Green Goddess Salmon Sliders

With the San Francisco 49ers in the Super Bowl this weekend, I wanted to make something San Francisco-inspired to cheer them on.  I've never been to California (though it's definitely on my list of places to visit), but I when I think of the Bay area, two things that come to mind are seafood and avocados.  After a little research into foods that represent the area, I found out that Green Goddess dressing (named for its green colour that comes from the addition of lots of herbs) was apparently created in San Francisco. 

So I decided to combine all of this together into salmon burgers with an avocado green goddess sauce.  And since I associate the Super Bowl with snacking on appetizer-sized food, I made them into mini sliders instead of full sized burgers (which also happen to be much cuter!)

I only had frozen salmon to work with, so these didn't turn out as great as they would be with fresh salmon, but they were still delicious - I loved the combination of flavours and all the green goodness going on!

Avocado Green Goddess Salmon Sliders

If you have some nice salmon and don't like the idea of pulsing it up into a burger, feel free to just broil it and serve it like these salmon sliders from How Sweet It Is.  I wanted to make burgers to infuse some of the green goddess flavours into them, but leaving the salmon as is would be a lot easier!

If you don't like salmon at all, you could just make the sauce and serve it as a dip for veggies (leave out the worcestershire or use vegetarian worcestershire for a vegetarian dip).  Or if you want something a little thicker to serve with chips, try this green goddess guacamole from The Fig Tree!

And if you want something 49ers-inspired to wash things down with, try a beer from Anchor Brewing (if it's available where you live), or check out these gorgeous Kaepernick Sparklers from Daydreamer Desserts!

Go Niners! :)

Avocado Green Goddess Salmon Sliders

Avocado Green Goddess Salmon Sliders

Adapted from Eating Well and Food & Wine

Makes 10 mini sliders

Ingredients:

For the Green Goddess Sauce:
1 ripe avocado, chopped
1/2 cup light sour cream
2 tablespoons chopped tarragon
2 tablespoons chopped parsley
2 tablespoons chopped dill
1-2 tablespoons fresh lemon juice
2 teaspoons capers, drained
Dash worcestershire sauce
1/4 teaspoons each salt and pepper

For the Burgers:
1 pound fresh salmon fillets, skin and bones removed*
2 tablespoons minced shallots
1 tablespoon chopped parsley
1 tablespoon chopped dill
1 teaspoon lemon zest
1/2 teaspoon salt
1/4 teaspoon ground pepper
1/4 cup panko breadcrumbs

For Assembling:
Mini slider buns (I used mini ciabatta buns)
Lettuce
Sliced avocado
Tomato (optional)

Directions:

First prepare the sauce.  Add all ingredients for the green goddess sauce to the bowl of a food processor and blend until smooth.  Taste and adjust any amounts to your liking if needed.  Refrigerate until ready to use.

Next prepare the salmon patties.  Cut salmon into chunks, and add to food processor along with shallots, parsley, dill, lemon zest, salt, and pepper.  Pulse just until combined.  If you prefer to have some larger chunks of salmon in your burger, then leave half to three quarters of the salmon out of the mixture, chop into ¼” pieces, and add to the mixture after processing.   Add panko breadcrumbs so that mixture will form patties.  Gently form patties 3/4-inch thick and wide enough to match the size of your slider buns.  Place on a parchment-lined baking sheet and refrigerate for at least 30 minutes.

Finally, cook the burgers.  You can either heat a large skillet over medium-high heat, lightly grease, and cook the burgers for 3-4 minutes per side, until cooked through, if you want a crispier browned exterior.  I baked mine just because it was easier.  To bake the patties, bake at 400°F for about 20 minutes, until cooked through.  Note that pan-frying them is the ideal method.

Assemble burgers by topping buns and patties with the green goddess sauce, along with lettuce, tomato, and sliced avocado.

*Note: my grocery store only had very expensive and not very fresh looking salmon, so I used frozen wild salmon fillets instead and thawed them.  I find that frozen salmon doesn’t taste as good as fresh and has a fishier smell and taste, so fresh salmon is preferable.

July 06, 2012

Smashed Pea, Dill, and Feta Crostini

Smashed Pea, Dill, and Feta Crostini

Don't you hate when a book (or cookbook) you've heard great things about and decide to shell out the money for ends up being a disappointment?  I don't often purchase books to own because I'm always worried I'll waste my money on something I don't like.  Instead, I usually borrow books or end up taking risks picking up books in clearance sections, figuring that if I don't end up loving them, it won't be such a big disappointment.  Sometimes, these books are in the clearance section for a reason, but other times the risk pays off with a big reward, as was the case when I picked up The Modern Vegetarian.  It's a vegetarian cookbook that has some of the most unique and creative recipes I've ever seen, like watermelon curry with black beans and paneer, or lemongrass, ginger, and lime leaf chocolate tart.  It's definitely a great example of how vegetarian food doesn't have to be boring!

I started off with one of the easier recipes in the book, this smashed pea, dill, and feta crostini, because fresh peas are in season in Ontario right now (June-July), and I'd been wanting to make a pea crostini for a while!

Smashed Pea, Dill, and Feta Crostini

This turned out wonderfully.  Fresh sweet green peas are combined with tangy lemon and dill and salty feta on a piece of toasted bread for a light and fresh summer appetizer that's bursting with bright flavour. 

The original recipe didn't call for cooking the peas first, but if you've ever tried to smash a fresh pea, it's not easy!  Every time I pinned a little pea under my pestle and tried to press down, it would invariably end up escaping and flying across the kitchen.  So I decided to give the peas a quick blanch followed by a dunk in ice water so they'd maintain their bright green colour, and this made them much easier to smash! (sorry little peas, you can't escape me!)   I also left out the parmesan from the recipe because I didn't want to overwhelm the peas' flavour too much, and made a few minor adjustments to some of the ingredient amounts.

Smashed Pea, Dill, and Feta Crostini

This would make a great elegant appetizer to impress guests, even though it's so easy to make.  Or you could just eat it all yourself for lunch like I did! 

With the weekend coming up, and with peas in season (at least where I live), this is a perfect snack to eat while sitting outside on the patio - if you can handle the crazy heat outside!  I'm loving the hot weather but hoping the suffocating humidity tones itself down a bit for the weekend!

 Hope you all have a great weekend :)

Smashed Pea, Dill, and Feta Crostini

Smashed Pea, Dill, and Feta Crostini

Adapted from The Modern Vegetarian cookbook

Serves 4-6 as an appetizer

Ingredients:

1 ciabatta baguette, sliced into thin (~1/2 inch) pieces (you probably won’t use the whole loaf)
5 oz fresh shelled green peas (around 3/4 cup peas, from around 40 pea pods)
1 small garlic clove
2 tablespoons fresh dill, minced
Sea salt
1-2 tablespoons olive oil
2/3 cup crumbled feta cheese
1 tablespoons fresh lemon juice
Pepper

Directions:

Preheat oven to 350°F.  Brush ciabatta slices with olive oil or spray with cooking spray, place on a baking sheet, and bake for 5-10 minutes until toasted.

Bring a medium pot of water to a boil and blanch peas for 2-3 minutes.  Drain into a colander or sieve, then place the colander/sieve in a large bowl of ice water to immediately stop the cooking.

Place garlic, dill, and a pinch of salt in a mortar and smash with a pestle until crushed.  Transfer to a small bowl.

Add peas to mortar in a few batches (depending how big your mortar is), adding a small pinch of salt and drizzle of olive oil to each batch and smashing with a pestle.

Transfer smashed peas to a medium bowl and add the dill-garlic mixture, feta, and lemon juice.  Mix with a fork and season with additional salt and pepper to taste, if desired.  Top ciabatta slices with the smashed pea mixture and serve.

August 07, 2011

Summer Vegetable Crepes with Dill Yogurt Sauce

If all has gone according to plan, then at the time this entry is automatically posted, I will be on vacation up North, sitting by the lake with a book in one hand and a beer in the other :) And while I'm enjoying the best of what summer has to offer in the form of nature, you can enjoy summer's best offerings in the form of food!

I've actually never made a savory crepe dish before so I wasn't sure what to expect with this recipe, but it surprised me with the way it really highlights the bright flavours of the summer vegetables and herbs. Fresh vegetables are cooked with some light ricotta to add some creaminess to the filling without overpowering the taste of the vegetables, then they're wrapped in a soft crepe and covered in a refreshing dill yogurt sauce. The great thing about this recipe is that it's completely customizable. If you're not a fan of dill, just substitute your favourite fresh herb (the original recipe called for chives, but I'm sure other herbs would work too), and the vegetable filling can consist of whatever looks good at the market, whatever you have too much of growing in the garden, or whatever needs to be used up from your fridge. I loved the combo of corn, peas, beans and yellow summer squash I used in mine, but feel free to mix it up!

If you've never made crepes before, now is your chance to try! I know they've kinda got a reputation for being difficult, but I promise they're not hard. The first time I ever tried making them was about a month after I first started cooking. And if you've read my story, you'll know that I had pretty much zero cooking skills at the time. But they came out perfectly then, as they have every time since, so I really don't know why poor crepes have such a bad rap. Sure you might get a couple duds that just rip to shreds when you try to flip them, but that just gives you some extra snacking material to keep you energized as you go! Seriously, if I can do it, anyone can!

In case you're still worried, the amount of batter I've called for in the recipe below should make about twice what you will actually need for the serving size, which leaves plenty of room for mistake crepes. And if you're lucky enough to have every crepe turn out perfectly, don't throw the extras out! Keep them in your fridge and use them to make quick wraps for lunch the next day. I used my extras for turkey wraps with lettuce and cheese and I thought they were so much better than a standard tortilla wrap! A crepe is much easier to wrap around the filling without tearing, and since it's so thin, the filling really takes center stage rather than the wrapper (and nobody likes a bready wrap).

I've posted my version of the recipe below. I know it looks like a lot of steps but it comes together pretty quickly, and if you're lucky enough to have someone else to clean up after you (I wish) then you'll save yourself from the worst part!


Summer Vegetable Crepes with Dill Yogurt Sauce

Adapted from Eating Well

Makes 4 crepes (2 servings)

Crepes:

1 cup milk
1/4 teaspoon salt
1/4 cup whole wheat flour
1/4 cup all purpose flour
2 eggs

Mix all ingredients together with a whisk until lumps removed. Start with slightly less flour than called for and continue adding until the proper consistency is reached – it should be thin and pourable, like a drinkable yogurt.

Heat a large non-stick skillet over medium-high heat and spray with non-stick cooking spray. Pour ¼ cup batter into the pan and quickly swirl around so the batter coats the pan. Cook for a minute or so until bubbles begin forming in the middle of the crepe and the edges start to pull away from the pan. Carefully flip the crepe over and cook for another minute or so, until cooked. Remove from pan and repeat with remaining batter. This amount should make about eight crepes.

Filling:
 
1/2 cup chopped summer squash
1/2 cup chopped green beans
1/2 cup fresh cooked corn kernels
1/2 cup fresh cooked peas
1 tablespoons extra-virgin olive oil
1/2 cup part-skim ricotta cheese
2 tablespoons chopped dill
Salt and pepper

Heat the olive oil in a large non-stick skillet over medium-high heat. Add all the vegetables and cook until brown, stirring frequently (about 5-6 minutes). Remove from heat. Stir in the ricotta and dill and season with salt and pepper.

Dill Yogurt Sauce:
 
1/4 cup low-fat plain or Greek yogurt
2 tablespoons chopped dill
2-4 tablespoons low-fat milk
1 teaspoon lemon juice
1/4 teaspoon salt

Whisk all ingredients together in a small bowl. Consistency should be somewhat thin and pourable. Adjust amounts of yogurt and milk if necessary.

Assembling the crepes:
 
Divide vegetable filling equally among the four crepes, spooning down the middle of each crepe. Gently roll each crepe around the filling. Pour the yogurt-dill sauce over the crepes and serve while crepes are somewhat warm.

Ingredient Index

Related Posts Plugin for WordPress, Blogger...