Showing posts with label lime. Show all posts

January 13, 2014

White Chickpea Chili

White Chickpea Chili - a healthy and easy vegetarian twist on white chicken chili

With the cold weather a lot of us experienced last week (except those lucky people in California!), I’m sure we’ve all been eating lots of warm comfort food lately.  When it gets that cold out all I want for dinner is soup, stew, or chili, but as these can often involve a lot of cooking time to develop enough flavour, during the week I need something that’s a little more quick and easy to prepare.  

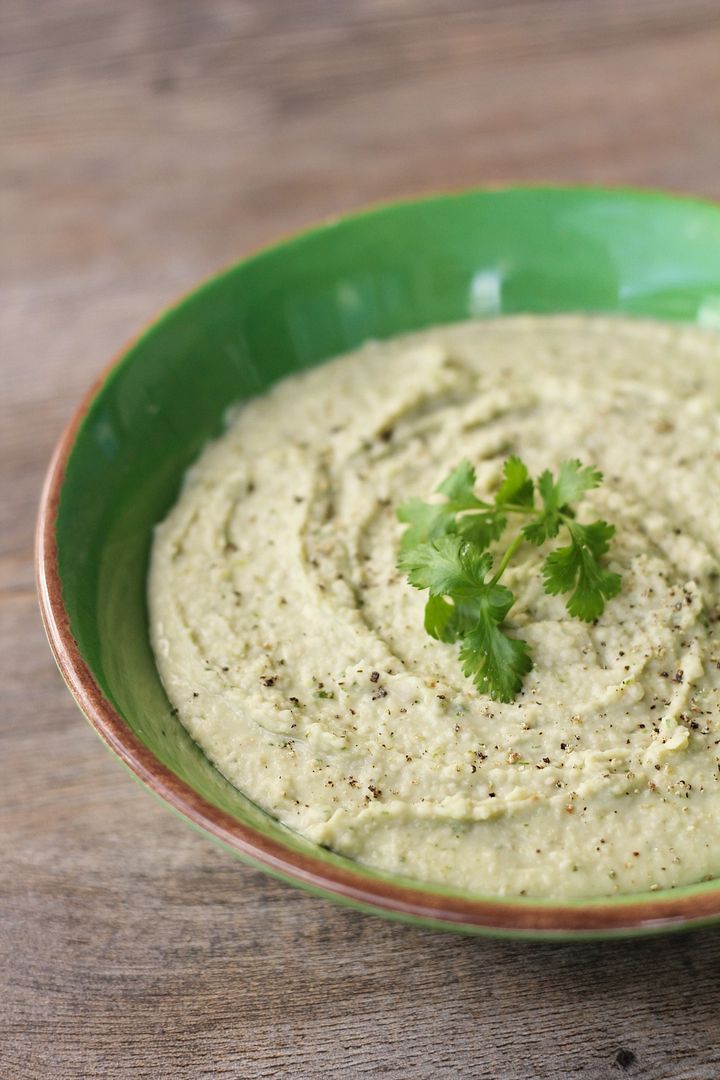
Enter white chickpea chili!

White Chickpea Chili - a healthy and easy vegetarian twist on white chicken chili

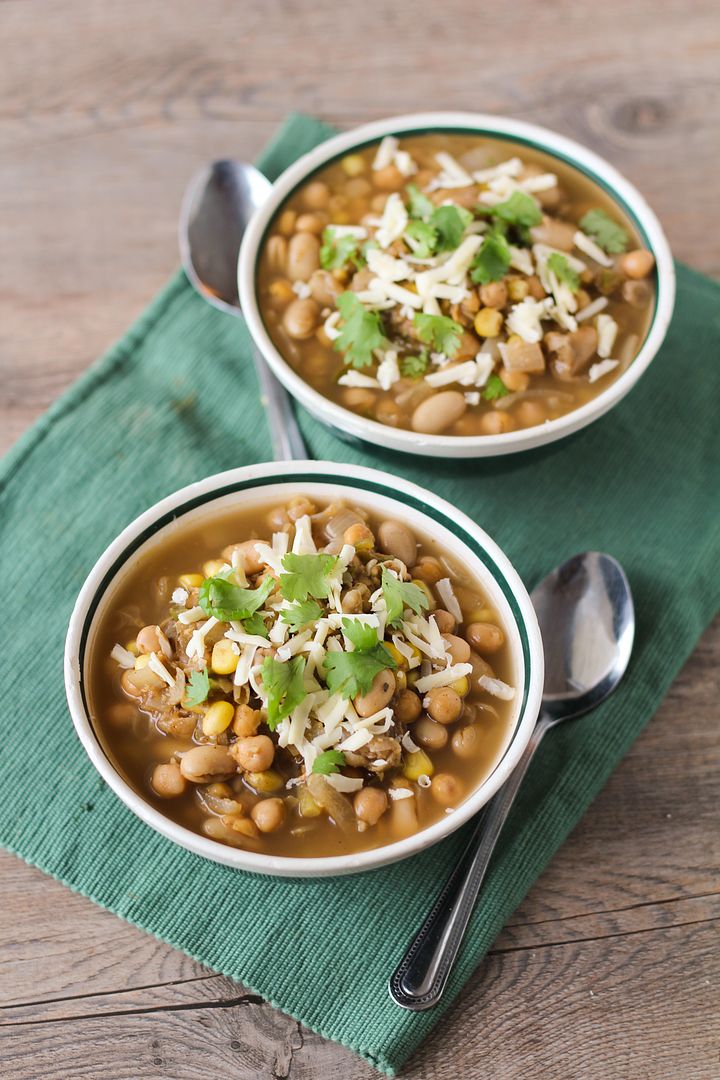
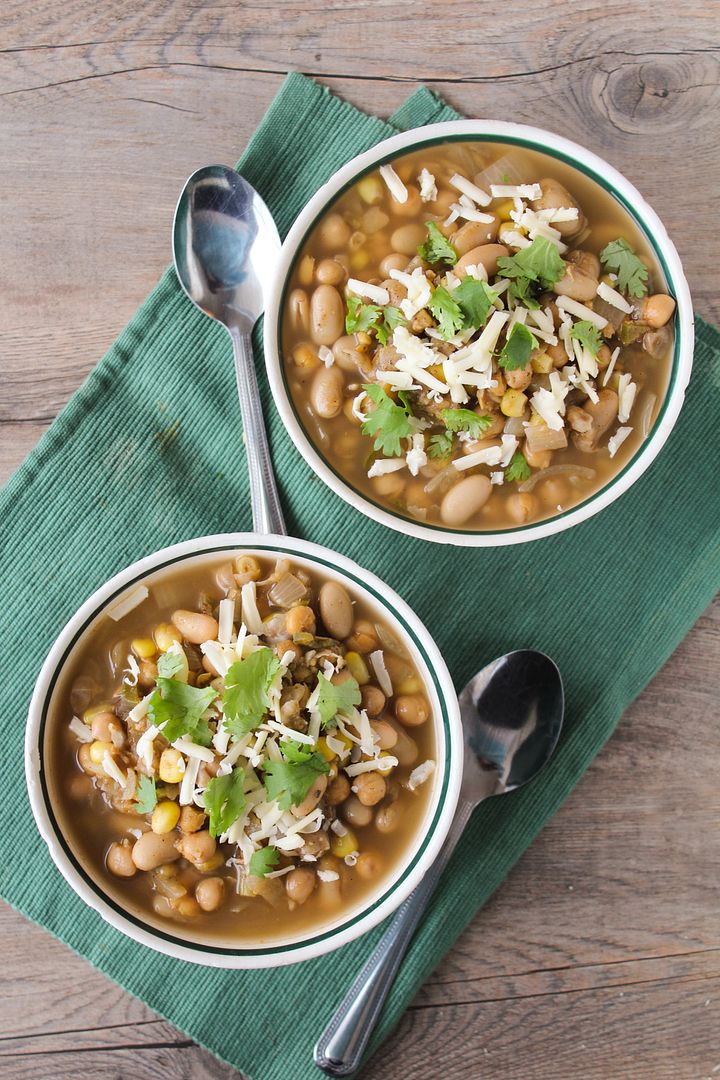
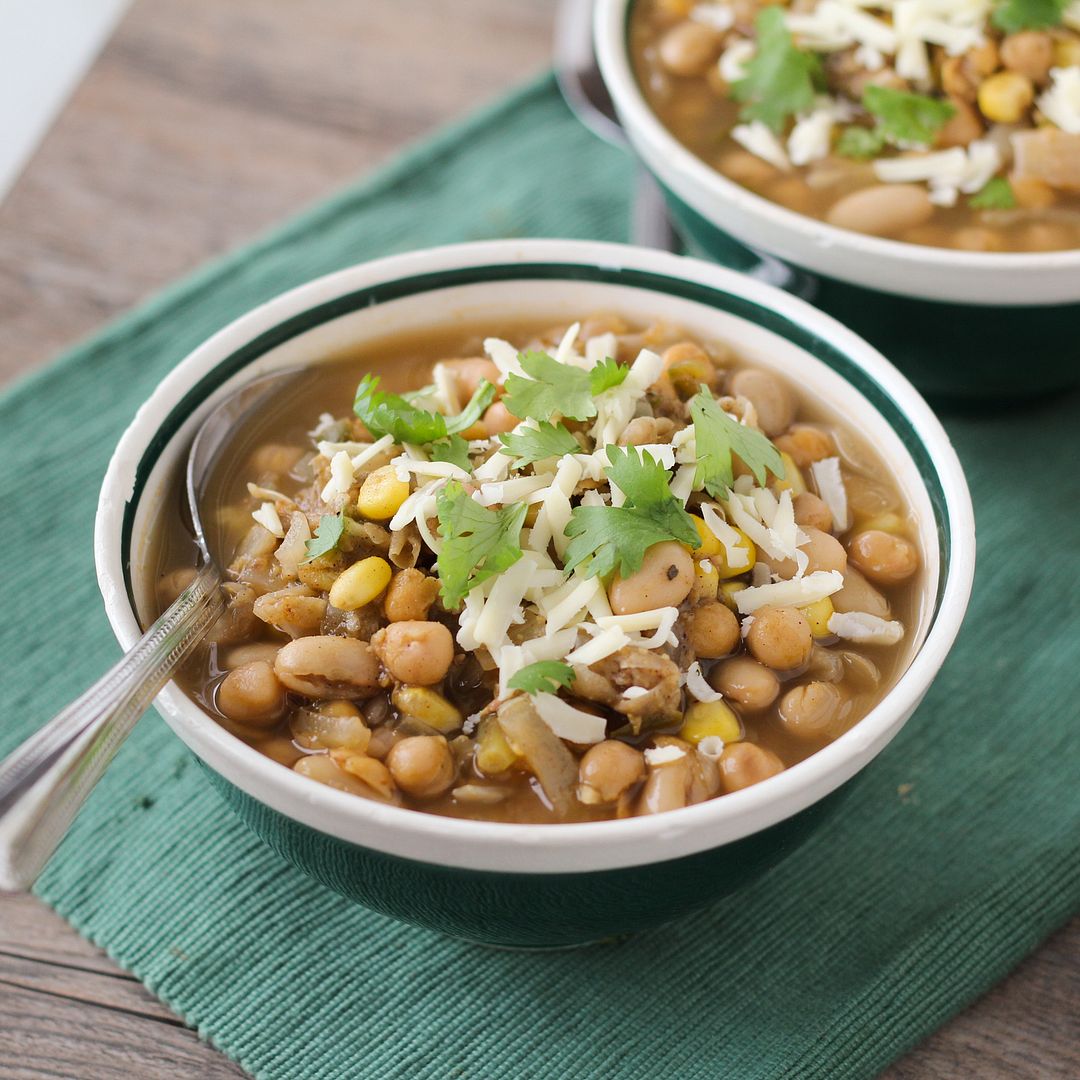
I love white chicken chili as a refreshing change from tomato-based versions, but I decided to make it a little easier and cheaper to make by using all beans and no chicken.  This vegetarian white chili includes mashed chickpeas throughout for thickness, whole chickpeas and white beans for texture (and tons of protein, so you won’t miss the meat!), some corn for a little sweetness, jalapeno for spice, and then vegetable broth, garlic, onions, and seasonings for plenty of flavour.

You end up with a healthy vegetarian chili that’s inexpensive, easy and fairly quick to make, and full of flavour.  Perfect for these cold winter nights, and also Sunday playoffs if you usually associate football with chili (and if you're still watching - my team's still in it so I'm all about the football food!)

Hope you all had a good weekend and are dethawing a bit now!

White Chickpea Chili - a healthy and easy vegetarian twist on white chicken chili

White Chickpea Chili

Adapted from The Neely’s white chicken chili recipe

Serves about 4

Ingredients:

1 teaspoon olive or canola oil
1 large or 2 small yellow onions, chopped
2 cloves garlic, minced
1 jalapeno, minced (use more if you want it to be spicier)
2 (540mL) cans chickpeas, drained and rinsed, divided
1 (540mL) can white kidney beans, drained and rinsed
2 teaspoons ground cumin
1 teaspoon chili powder
1 teaspoon dried oregano
4 cups low sodium vegetable broth
1 tablespoon fresh lime juice
1 cup frozen corn kernels
Salt and pepper to taste

Toppings:
Shredded white cheddar cheese
Chopped fresh cilantro
Light sour cream
Chopped ripe avocado (not pictured in my version but it would be a nice addition!)

Directions:

Heat oil in a large saucepan or Dutch oven over medium-high heat. Add onions, garlic, and jalapeno, stir to coat with oil, and sauté until soft and fragrant, stirring occasionally, about 5 minutes.

Meanwhile, rinse and drain your cans of beans, keeping one can of chickpeas separate. Transfer those chickpeas (1 can) to a medium bowl and mash with a potato masher until most beans have been smashed. Set aside.

Add cumin, chili powder, and oregano to the onion mixture in the pan. Stir to coat and let cook for about 1 minute. Add vegetable broth, lime juice, corn kernels, mashed beans, and remaining beans. Bring to a boil, then reduce heat to simmer and let cook about 10-15 minutes.

Season with salt and pepper to taste. Serve warm in bowls topped with shredded cheese, cilantro, a dollop of sour cream, avocado, and additional lime wedges, if desired.

September 23, 2013

Thai Coconut Red Fish Curry with Quinoa

Thai Coconut Red Fish Curry with Quinoa

I'm super excited for today's post for two main reasons - first is that this is one of the tastiest dishes I've had in a while, and second is to announce that I've partnered with the Sustainable Seafood Blog Project!

The idea of the Sustainable Seafood Blog Project is to unite food bloggers and businesses interested in promoting sustainable seafood choices.  When Jessie from Life as a Strawberry asked if I'd be interested in joining, I admit that I was a tiny bit hesitant because while I've heard a lot about sustainable seafood lately and know that it's a really important issue, I didn't feel like I was well informed on it enough myself to talk about it with you guys.  But after a bit of research, I was happy to find out that there are so many resources out there to help consumers make smart choices, so while the idea of sustainable seafood might sound complicated, it's much easier than you might think!

Thai Coconut Red Fish Curry with Quinoa

We've all probably heard about the health benefits of eating fish, but many of us (myself included) are perhaps less aware of the impact certain fishing practises have had on the environment, including overfishing certain species of fish, damaging the environment through harmful fishing methods, and catching unwanted types of fish or marine life.

Without getting into too much detail or trying to sounding too preachy, the idea of sustainable seafood is to support fishing practices that will not damage our oceans or deplete marine life.  The infographic below (courtesy of Jessie) summarizes these issues in a much prettier way than I could put together!

The Sustainable Seafood Blog Project

I'm happy to say that the two main grocery stores I shop at here in Ontario (Loblaw and Sobeys) have made commitments to selling sustainable seafood, and in addition, the Marine Stewardship Council has made it really easy to identify smart choices when you're shopping by just looking for their seal of approval on the product (see the blue checkmark in the images below).

I still only buy fish (or any meat) when it's on sale because it's usually expensive, but all the products pictured below were on sale and cost just as much or less than the fish without those labels, so it's nice that I didn't have to pay a fortune to choose them (unlike with organic fruits and vegetables)!

msc logo

And if you want to read more, there are tons of resources available to you, such as:

The Marine Stewardship Council
Monterey Bay Aquarium Seafood Watch
Vancouver Aquarium Ocean Wise
Sea Choice
And of course, the resources page of the Sustainable Seafood Blog Project.

Thai Coconut Red Fish Curry with Quinoa

So moving on to this recipe, this curry is one of the tastiest meals I've made in a while!  It may look a little complicated at first, but is actually really easy (sound familiar?)... All you have to do is sauté some veggies, throw in a little curry paste (I used red curry paste but green or yellow would work well too!), coconut milk, and a little chicken broth, then add the fish to simmer and that's basically it.

Most curries like this would be served with white rice, but to add a little more nutrition I decided to use quinoa, which I think tastes even better.  The flavours in this dish all come together in such a great way, and it's a pretty healthful meal too, so you can feel good about eating it for lots of reasons!

And if you like seafood, please check out these fabulous bloggers who are also part of the Sustainable Seafood project and are posting more great recipes today!


Thai Coconut Red Fish Curry with Quinoa

Thai Coconut Red Fish Curry with Quinoa

Adapted from several sources, such as recipes from The Foodie Physician and Kristen’s Kitchen

Makes 4 servings

Ingredients:

~2 cups cooked quinoa
2 teaspoons canola oil
1 medium shallot, minced
2 cloves garlic, minced
1 tablespoon grated fresh ginger
1 red bell pepper, sliced into 1” long slices
1 yellow pepper, sliced into 1” long slices
1 thai chili pepper, minced (optional for added spice)
2 tablespoons red curry paste
1 cup fat-free low sodium chicken broth
1 (400mL or 13.5oz) can light coconut milk
1 tablespoon fish sauce
1-1/2 tablespoons brown sugar
2 tablespoons fresh lime juice
150g or about 5oz snow peas
4-6 white fish fillets, cut into 1” pieces – choose a mild white fish that is a sustainable option for your region, such as wild Pacific cod, Wild Alaskan or Pacific halibut, or wild haddock (Canadian)
1/2 teaspoon salt
4 tablespoons chopped cilantro (optional)

Directions:

Cook a box of quinoa according to package directions – I ended up using about 1/2 cup cooked quinoa per serving which was approximately one 200g box.

Heat oil in a large saucepan over medium-high heat.  Add shallot and garlic and cook for about 1 minute, stirring often.  Add ginger, red and yellow peppers, and chili pepper.  Let cook for 5-7 minutes, stirring occasionally, until slightly softened.  Add curry paste, stir to coat, and let cook for another minute.  Add chicken broth and coconut milk and let simmer for 8-10 minutes.  Add fish sauce, brown sugar, and lime juice, and let simmer for another 1-2 minutes.  Add fish, cover, and let simmer 5-7 minutes, until fish is cooked through (may depend on type and thickness of fish).  Season with salt.

Add about 1/2 cup quinoa to each of four bowls.  Pour curry overtop and garnish with about 1 tablespoon cilantro, if desired.  Serve warm.

July 30, 2013

White Bean Dip with Roasted Jalapenos & Goat Cheese

White Bean Dip with Roasted Jalapenos & Goat Cheese

I feel like I’ve been spending a lot of long hours in my windowless cave office lately (as I struggle to learn a data analysis software program that makes absolutely no sense – why are you so confusing, SAS, why??), so I’ve been needing a lot of snacks to get me through the day. One of my go-to healthy snacks that I eat all the time is carrots with hummus – it’s so easy (and cheap!) to whip up a batch of hummus that I then throw in a container and bring to school along with a bag of baby carrots through the week.

I’ve tried a lot of different hummus recipes in the past and have loved them all, but this time I decided to do something a little different and use regular white beans instead of chickpeas and omit the tahini. So it’s just a regular bean dip instead of hummus, but it’s still just as smooth and creamy!

White Bean Dip with Roasted Jalapenos & Goat Cheese

Because white beans are pretty flavourless, I kicked things up by adding roasted jalapenos and cumin for spice, goat cheese for a bit of richness and tang, and some lime juice, cilantro, and honey for added flavour and balance. The first time I made this, I used two jalapenos and the dip was pretty spicy (but still good!), so the next time I only used one and then I could barely detect the spice at all. So I think one and a half would be the perfect amount for me, but you can definitely adjust the amount to your liking! I’d recommend roasting two jalapenos (they’re super cheap anyway), then start by adding one chopped pepper to the dip and keep throwing more in as you taste if it’s not spicy enough.

This goes great with pita chips (or ranch popped rice chips, shown here) or veggies, and while it may not make the jumble of numbers and words on your screen make any more sense, it will at least give you the energy to stay in your office and keep staring at them so it looks like you know what you’re doing!

White Bean Dip with Roasted Jalapenos & Goat Cheese

Before I go, I just wanted to thank everyone for their kind comments on my blogiversary post and for entering the Starbucks gift card giveaway!  A winner has been randomly selected and contacted - thanks again!

White Bean Dip with Roasted Jalapenos & Goat Cheese

White Bean Dip with Roasted Jalapenos & Goat Cheese

Ingredients:

1 (540mL) can white kidney beans
1-2 jalapenos (1 will make the dip quite mild and 2 might be fairly spicy, but it can depend on the pepper)
2 oz plain goat cheese
1.5 tablespoons fresh lime juice
1/4 cup chopped cilantro
1/2 teaspoon honey
1/2 teaspoon cumin
1/2 teaspoon salt
1/4 teaspoon pepper
2 tablespoons extra virgin olive oil

Directions:

Preheat oven to broil (500°F) and move oven rack to top third of oven, a few inches away from the top. Spray jalapeno(s) with cooking spray or rub with a bit of olive oil, and place on a baking sheet. Roast under the broiler until all sides begin to get black patches – time will vary but mine took around 5-10 minutes total. Keep an eye on them and turn a few times to brown them evenly. Remove from oven (use tongs or mitts) and place in a bowl covered in saran wrap to let them steam and loosen the skin for 10 minutes. Remove skins (they should peel off), slice lengthwise, remove seeds, and roughly chop.

Add all ingredients except the olive oil to the large bowl of a food processor. Cover with the lid and add the olive oil to the feed tube so it will slowly drain into the dip. Process until dip is smooth and oil is mixed in. Taste and adjust any amounts to your liking, if necessary. Store in the refrigerator but let warm up to room temperature before eating. Serve with carrots, other veggies, or pita chips.

July 04, 2013

Strawberry, Avocado, & Feta Salsa

Strawberry, Avocado, & Feta Salsa

Sorry for the lack of activity around here lately, but I just returned from a wonderful week-long trip to visit family up in Northern Ontario.  I had fully intended to continue posting while I was away, but time went by way too quickly and to be honest, it felt pretty nice to keep my laptop closed for most of the week and spend my time visiting and just relaxing instead.  We also had beautiful weather so I spent a lot of time outside, with plenty of beach time, a few moments of attempting to brave the freezing cold lake water, going for walks, watching some great Canada Day fireworks, and getting eaten alive by bugs!

It was a great week, but now I'm busy trying to catch up on work and everything else I've missed, so today's post will be rather short!  And since the majority of my readers are American and hopefully spending some time outside or visiting with family themselves for July 4th, I'm assuming you won't want to read a long post today either!

Strawberry, Avocado, & Feta Salsa

This is a simple salsa to throw together that celebrates strawberry season by pairing fresh strawberries with diced avocado, feta cheese, basil, lime juice, and a bit of jalapeno for spice.  It might sound a little weird, but everything works together in a wonderful way!

Strawberry, Avocado, & Feta Salsa

This is fantastic eaten as a dip for tortilla chips but works equally well as a fresh summer crostini.  I have a feeling it would also pair well with chicken for a main course, and since I'll likely be making this plenty more this summer, I'll be sure to test it out!

I hope my Canadian friends had a great long weekend this past weekend and that my American friends enjoy their celebrations today!

Strawberry, Avocado, & Feta Salsa

Strawberry, Avocado, & Feta Salsa

Serves a small group as an appetizer; if you’re serving a larger group, double the ingredients

Ingredients:

1 cup diced strawberries
1/2 cup diced ripe avocado
1-1/2 tablespoons minced shallot
1/2 a jalapeno, minced (seeds removed for less spice)
1/3 cup crumbled feta cheese
1/2 teaspoon lime zest
1 tablespoon + 1 teaspoon fresh lime juice
1/4 cup chopped basil leaves
1 teaspoon sugar
Freshly ground pepper

Directions:

Add all ingredients to a bowl and mix to combine.  Taste and adjust any amounts to your liking if necessary.  Serve in a bowl as a dip for tortilla or pita chips, or spread on toasted baguette slices to serve as crostini.

June 06, 2013

Salmon Spinach Salad with Strawberries and Avocado

Salmon Spinach Salad with Strawberries and Avocado

I never used to get a lot of colds other than the usual back-to-school cold that seems unavoidable and the odd winter cold, but in the past couple of years I feel like I have been getting sick ALL THE TIME.  I can’t even count the number of colds I’ve had in the past year or the amount of cold medicine I’ve had to buy.  And I'm once again sick this week, despite the fact that it’s summer and I don’t know anyone else that has a cold right now.  I don’t know what I’m doing wrong – I eat lots of fruits and vegetables, exercise, take vitamins, and wash my hands regularly – so if you have any good tips for keeping viruses away, I’m all ears!

In the meantime, I’m taking even more vitamins, along with Echinacea and zinc lozenges, and just the other day I bought oil of oregano, which a couple people I know swear by for preventing colds (though I’m a little late for that at this stage!)

Salmon Spinach Salad with Strawberries and Avocado

I’m also squeezing even more vitamins into my meals, like this salmon spinach salad with strawberries and avocado.  Though the combination of ingredients may seem a little strange, they all work really well together and are very nutritious, making this sort of like a superfood salad!  Spinach has plenty of antioxidants, iron, calcium, and vitamins; strawberries provide lots of Vitamin C, as well as fiber, antioxidants, and other good things; and while avocados and salmon are high in fat, it’s the good kind of fat (that can lower your bad cholesterol and increase your good cholesterol), plus avocados are rich in potassium, fiber, folic acid, and Vitamin K, and salmon is full of protein, omega-3s, and Vitamins B and D.  Even the dressing is healthful from the addition of lime juice, shallot, and poppy seeds.

Bottom line: this salad is good for you, easy to make, tastes great, and will fill you up, making it a great summertime meal (whether you’re prone to colds or not!)

Salmon Spinach Salad with Strawberries and Avocado

Salmon Spinach Salad with Strawberries and Avocado

Makes 2 main course servings

Ingredients:

2 (5oz each) salmon fillets (preferably wild)
1 teaspoon olive oil
1 teaspoon fresh lime juice
Salt & Pepper
~4 cups baby spinach*
1-1/2 cups sliced strawberries
1 ripe avocado, cubed

For the Dressing:
2 tablespoons extra-virgin olive oil
1 tablespoon fresh lime juice
1/2 tablespoon white wine vinegar
1/2 tablespoon honey
1 tablespoon minced shallot
1 teaspoon poppy seeds

Directions:

Preheat oven to 400°F.  Place each salmon fillet skin side down on a piece of aluminum foil (on a baking sheet).  Rub each fillet with the olive oil and lime juice and season with salt and pepper.  Wrap each fillet with foil to form two packets.  Bake in preheated oven for about 25 minutes, until cooked through.  Be very careful opening packets after as hot steam will be released.  Let salmon cool slightly.

Meanwhile, add spinach, strawberries, and avocado to a large bowl, and prepare dressing by whisking together the oil, lime juice, vinegar, honey, shallot, and poppy seeds.  Toss salad with the dressing, then divide among two plates or bowls.  Place each cooked salmon fillet on top of each salad and serve.

*Note: I used regular spinach from the market (pictured) but I think baby spinach works better (as written in the recipe).

March 21, 2013

Asian-Style Chicken Noodle Soup

Asian-Style Chicken Noodle Soup

Even though it's now officially Spring and it seems like everyone's already talking about spring produce like asparagus and peas and all those bright and crunchy fresh veggies, it's hard to get into the spring mindset when this is your view out the window:

Asian-Style Chicken Noodle Soup

With the seemingly never-ending snow and cold, I'm naturally still craving warm and cozy comfort food.  And with a sore throat signalling the start of another cold yesterday, I quickly developed a particular craving for the ultimate comfort food, chicken noodle soup.

But because I couldn't show you guys just any old chicken noodle soup, this one has a twist!

 Asian-Style Chicken Noodle Soup

This soup takes on an Asian flavour with the addition of ingredients like mushrooms, bok choy, cilantro, fish sauce, lemongrass, and lime juice, and the use of soba noodles instead of more traditional egg noodles or other pasta.  This gives the soup such a great depth of flavour that still has the comfort factor and familiar taste of chicken noodle soup but is a little more exciting!

Even better, the addition of ingredients like ginger, garlic, and spicy chiles are great for fighting off a cold (at least I hope that's what I'm telling myself!)

Asian-Style Chicken Noodle Soup

If you're lucky enough to live somewhere that actually felt like spring on the first day of spring, send some warm and sunny thoughts up north!  In the meantime, I can't really complain when I have a giant pot of this delicious soup to keep me warm :)

Asian-Style Chicken Noodle Soup

Asian Chicken Soba Noodle Soup

Loosely adapted from LCBO’s Food & Drink

Serves 4-6

Ingredients:

1 tablespoon canola oil
2-inch piece of ginger, peeled and minced
3 cloves garlic, minced
8 oz sliced mini bella or crimini mushrooms
1 large carrot, julienned (I used a couple handfuls of pre-sliced waffle cut carrots instead)
1 yellow onion, chopped
2 liters (8.5 cups) chicken broth
1/2 teaspoon crushed red pepper flakes
1 tablespoon frozen chopped lemongrass (or 2 stalks lemongrass)
2 boneless skinless chicken breasts, fat trimmed off
2 tablespoons fish sauce
1/2 teaspoon chili garlic sauce (or more if you want it to be really spicy!)
8 oz soba noodles*
4-5 heads baby bok choy, ends trimmed and sliced lengthwise
Juice of half a lime
2-3 green onions, thinly sliced
Salt and pepper
Cilantro and additional lime wedges for serving, if desired

Directions:

Heat oil in a large pot over medium-high heat.  Add ginger, garlic, mushrooms, carrot, and onions.  Cook for 5-7 minutes until softened, stirring often.  Add chicken broth, red pepper flakes, lemongrass, and chicken breasts.  If using a lemongrass stalk, remove the outer stalks, cut into chunks, smash, and wrap in cheesecloth – you will need to remove it before serving.  Bring to a boil, cover, and reduce heat to a simmer.  Let simmer for about 20 minutes, until chicken is cooked through.

Remove chicken breasts and set aside.  Add fish sauce and chili garlic sauce to broth and stir.  Add soba noodles and cook in the simmering broth for 5 minutes.  Meanwhile, shred chicken.

Add bok choy and shredded chicken to the pot and let cook for another 2-3 minutes, until bok choy is slightly wilted.  Remove from heat.  Stir in lime juice and green onions, and season with salt and pepper to taste.  Use a sharp knife or clean kitchen shears to cut some of the soba noodles in half, otherwise they will be difficult to divide into bowls.

Serve with additional lime wedges (I highly recommend this) and cilantro, if desired.

*Note: I used soba noodles because I have a ton of them to use up right now (and I like them!) but you could substitute rice noodles if you like.  Just cook them separately according to the package directions (usually soaking in hot water), toss with a bit of sesame oil to keep them from sticking, then add to the soup at the end.

August 27, 2012

Polenta Rounds with Fresh Tomato, Corn & Avocado Salsa

Polenta Rounds with Fresh Tomato, Corn & Avocado Salsa

My sister found this Tumblr site called I'm Remembering last week and since then we haven't been able to stop looking through it.  It's full of nostalgia from the 80s and 90s (aka my childhood) and every time we come across a toy or game that we'd completely forgotten about, it brings back so many memories!  Remember snap bracelets, Lite Brite (they might still make this one but I remember the original), Soda Licious candy (they tasted just like soda flavours!), the game Girl Talk (how did you play this game?  All I remember is a phone), or view masters (again, I remember the toy but not what you actually looked at on those slides)?   And did anyone else have Alphie? We totally forgot about him but remember loving him so much!  Or the Babysitters Club chain letter book?  Pretty much the best book ever made.

They also have a Facebook page where people can share their own memories, making for hours more fun (and procrastination)!  Remember Scholastic book club newsletters that you ordered books from in elementary school?  I lived for those!  How about clackers?  I also found this gem that is definitely NOT something I remember but I wish I did!

Anyway if you grew up during this time (or have kids who grew up during this time), you have to check it out - just be warned that it's addictive!

Polenta Rounds with Fresh Tomato, Corn & Avocado Salsa

One thing I definitely do not remember ever having during my childhood was polenta.  I'm not sure why, it just didn't seem to ever make it into our meals.  I still hadn't tried polenta into my adulthood, but I kept seeing those cute little polenta rounds topped with delicious things and resolved to make a version myself.  I bought a log of pre-cooked polenta from the grocery store at the beginning of this summer, but soon forgot about it in the cupboard.  Last week, I realized that summer was quickly ending and I still hadn't used it, so I threw together a fresh salsa that tasted just like summer (with corn, tomatoes, avocado, herbs, and a bit of jalapeno), baked my polenta rounds (which I thought would be healthier than pan-frying them in oil, though they would probably taste better that way), and devoured them for dinner.

These were super easy to make and would be a great summer appetizer.  I would have enjoyed eating the salsa on its own, but the polenta provided a nice base to support it, and complemented it well tastewise too.  It was a great way to introduce myself to polenta, and next time I think I'll venture further and make my own polenta, like my sister did with these similar (but from-scratch) polenta squares with summer vegetable topping.  I also want to try the softer-style polenta like this corn and basil polenta from Pink Parsley.  What's your favourite way to eat polenta?

Polenta Rounds with Fresh Tomato, Corn & Avocado Salsa

Baked Polenta Rounds with Tomato, Corn & Avocado Salsa

Recipe by Once Upon a Cutting Board

Serves about 10 as an appetizer (1 polenta round each)

Ingredients:

1 (500g) log of pre-cooked polenta - plain or flavoured (such as this one)
2 ears of corn
1-1/2 cups chopped cherry tomatoes
1 ripe avocado, diced
1/2 a jalapeno, de-seeded and minced (use a whole jalapeno for more spice or keep the seeds)
3-4 tablespoons chopped parsley
1 tablespoon extra-virgin olive oil
1 tablespoon fresh lime juice
1/2 teaspoon salt
Freshly ground pepper

Directions:

Preheat oven to 400°F.  Slice polenta into ten 1/2-inch thick rounds, and place on a parchment paper-lined baking sheet.  Bake in the preheated oven for 15-20 minutes.

Meanwhile, cook corn (I cook mine by boiling the ears in a large pot of boiling water for about 5 minutes) and slice off the kernels into a large bowl.  Add the cherry tomatoes, avocado, jalapeno, and parsley to the corn and stir. 

In a small bowl, whisk together the oil, lime juice, salt, and desired amount of pepper, then add to the salsa and mix.  Remove polenta rounds from oven and top with the corn salsa.  Serve on plates with knives and forks (they're too messy to eat by hand).

August 20, 2012

Healthy Summertime Chickpea Chopped Salad

Healthy Summertime Chickpea Chopped Salad

Remember when I told you about the stay-cation I took a couple weeks ago where I ate at restaurants every night and drank lots of beer and then swore I'd only eat salad for the next week?  Well I stayed true to my word and this is what I ate for pretty much the whole week.  I would have loved this even if I hadn't overeaten the previous week, and I would have kept eating it forever if I hadn't needed to try other recipes - it was so good!

I don't think I've ever actually had a chopped salad before, but I'd seen them on a couple of blogs lately - like this chicken chickpea version from Ambitious Kitchen and this chicken and blueberry version from How Sweet It Is - and started craving one so bad!  I actually had to research what exactly a chopped salad is before I went ahead and made my own version, and apparently it just means that all the ingredients are chopped to about the same size.  You'd think I'd have figured that out by the name 'chopped salad', but I had to be sure!

Healthy Summertime Chickpea Chopped Salad

So I decided to go ahead and make a healthy vegetarian version with chickpeas as my main protein; lots of summery ingredients like corn, tomatoes, avocado, cucumber, and red pepper; some olives and fat-free feta thrown in for added flavour; and I tossed it all in a light vinaigrette.

I loved how with the lettuce being the same size as the other ingredients, you don't end up with huge pieces of lettuce and nothing else.  Every bite was full of ingredients and every bite was different - I loved the bites with creamy avocado, I loved the bites with sweet corn, I loved the bites with salty olives, I loved the bites with nutty chickpeas ... you get the idea - I loved every bite!

Healthy Summertime Chickpea Chopped Salad

You can easily change this up to include any ingredients you like, or change the dressing to give it a completely different look and taste.  If you prefer creamier dressings, it would probably be great with a ranch dressing, or try a bbq dressing like Monique from Ambitious Kitchen used in her version.  The possibilities are endless - I think I could eat this for every meal over these last few weeks of summer and not get sick of it!

Healthy Summertime Chickpea Chopped Salad

Healthy Summertime Chickpea Chopped Salad

Recipe inspired by Ambitious Kitchen

Serving size will vary, but I’d guess this serves around 6 as a side dish or 3 as a main dish

Ingredients:

For the Salad:
1 head of romaine lettuce
1 can chickpeas, drained and rinsed
1 cup halved grape tomatoes
1 red bell pepper, chopped (about 1 cup)
1/2 a large cucumber, chopped (about 1.5 cups)
2 ears of corn, cooked and kernels removed (about 1 to 1.5 cups)
1 ripe avocado, diced
1/4 to 1/3 cup pitted sliced kalamata olives, if desired
1/3 to 1/2 cup light feta cheese (I used fat-free)
Desired amount of your favourite salad dressing.  I used the following:

For the Dressing:
1 lime, juice and zest
3 tablespoons olive oil
1 clove garlic, minced
1 tablespoon honey
Salt and pepper to taste

*Please note that all amounts are approximate and can be adjusted to your liking!

Directions:

Wash the lettuce and dry well.  Stack a few leaves of lettuce on top of each other, cut into about 5 pieces lengthwise, then chop into small pieces across the width.  Repeat with remaining lettuce so you have small, 1/2-inch sized pieces of lettuce. 

Transfer lettuce to a large bowl.  Top with chickpeas, grape tomatoes, red pepper, cucumber, corn, avocado, olives, and feta.  Keep ingredients separate if desired for serving, or you can toss them all together if you prefer.

Whisk together all dressing ingredients in a small bowl.  Toss with salad to combine or leave separate to mix into individual servings.

August 14, 2012

Fresh Corn Dip with Tomatoes and Basil

Fresh Corn Dip with Tomatoes and Basil

There are people who love tofu, people who absolutely hate tofu, and people who say they hate tofu but have really only tried it one way, and if they just ate it roasted or sautéed with a flavourful marinade and seasonings then they would probably change their mind. 

I fall somewhere between the second or third category – I’ve always strongly maintained that I hate tofu, and though I admit I haven’t tried every preparation of it, I have tried it at least a couple of times and just can’t get past the texture.  I’m a big texture person – I hate crab, lobster, and shrimp, for example, not because of the taste but because of that horrible texture that I can only describe as rubbery (I’m getting grossed out right now just thinking about it!).  So I don’t just discriminate against tofu, I discriminate against textures!

Fresh Corn Dip with Tomatoes and Basil

Now moving on to something I love, I cannot get enough of fresh summer corn lately.  I can eat a whole bowl of corn kernels with a bit of salt and pepper as a snack and be the happiest girl in the world, and I love incorporating corn into my dinners too.   

Lately I’ve been seeing a lot of corn dip recipes around the web that look amazing, but are often loaded with cheese or cream or other not-so-light ingredients, and since I’m usually the only one eating whatever I make, I didn’t like the idea of having to eat that all by myself.  So I was intrigued when I saw a lighter, fresher corn dip recipe on Whole Living, with tomatoes, basil, and … you guessed it - tofu!

Fresh Corn Dip with Tomatoes and Basil

So it was a battle between my love for corn and my hatred for tofu – which would win out?  Well as you already know, my need for corn dip in my life was stronger, and I convinced myself that maybe silken tofu isn’t as bad as regular tofu, and maybe when it’s mixed into a dip I wouldn’t notice it, and maybe if I added a little goat cheese to the tofu then it would mask any “tofu-y” taste.

And it turns out that every one of those assumptions was right!  The tofu added creaminess to the dip in a way that made it light and fluffy, but I didn’t taste the tofu one bit!   All I tasted was summer in a bowl – the fresh flavours of corn, tomato, and basil, with a bit of tang from the goat cheese and lime juice that helped to cut the sweetness of the corn.  One bite and I was in love with this dip.  I ate it with tortilla chips and spread it on slices of hearty multigrain bread and both ways were delicious! 

Fresh Corn Dip with Tomatoes and Basil

This makes a fantastic summer appetizer, and you don’t even need to tell anyone there’s tofu in it because they won’t know!  And while I’m not sure this converted me to a tofu-lover, I’m definitely intrigued with the idea of sneaking tofu into things in ways that I won’t notice it!  In fact, I’ve already tried a second recipe to use up the rest of my silken tofu and I loved it too, so give this one a try so you can get excited about the second recipe coming soon!

Fresh Corn Dip with Tomatoes and Basil

Fresh Corn Dip with Tomatoes, Basil, and Tofu!

Adapted from Martha Stewart as seen on Whole Living

Serves 4-8 as an appetizer

Ingredients:

2 cups fresh corn kernels (from about 2 large ears)
1/3 cup milk (I used skim)
1/3 cup silken tofu
2 ounces goat cheese
2 teaspoons fresh lime juice
Salt and freshly ground pepper
1 cup chopped tomato (about 2 medium tomatoes)
1/3 cup basil leaves, thinly sliced

Directions:

Cut the kernels off your ears of corn into a large bowl, and rub the back of a large knife along the cobs to extract the corn milk.  Heat 1/3 cup milk in a large skillet over medium-high heat and add the corn.  Cook for 7-9 minutes, stirring occasionally, until corn is tender and most of the milk has been absorbed.  Let cool.

Add 2/3 cup of the cooked corn to a food processor along with the tofu, goat cheese, and lime juice.  Process until smooth, and add salt and pepper to taste.  Transfer to a serving bowl and stir in the remaining corn, tomato, and basil.  Taste and adjust seasoning if necessary.  Serve with tortilla chips or on bread.

June 28, 2012

Watermelon Daiquiri Pops for Canada Day

Frozen Watermelon Daiquiri Pops for Canada Day

As I mentioned in my last post about our "food on a stick" themed meal, there was one more theme-related snack we enjoyed before dinner that I was saving for a separate post - these adorable and refreshing frozen watermelon daiquiri pops!

I didn't even know you could freeze watermelon until I saw a post recently (and can't remember where) showing how to insert popsicle sticks into watermelon slices and freeze them for a super easy popsicle.  I then wondered about the possibility of adding alcohol, as watermelon often seems to be paired with booze, and then found a post on The Shiksa in the Kitchen that did just that!

I knew I wanted to try them, especially with the hot weather we've been having lately, but then I wondered if I could turn them into a Canada Day treat by shaping each pop into a maple leaf, and this is what I ended up with!

Frozen Watermelon Daiquiri Pops

Tori from The Shiksa in the Kitchen gives some great tips about freezing watermelon; she says you can't just freeze it as is or it will lose a lot of flavour.  Instead, it's best to soak it in some sort of sweet liquid first, and using alcohol to make cocktail-flavoured pops works perfectly!  For those who want an alcohol-free treat, she also gives suggestions for that, so be sure to check out her post!

Tori made watermelon mojito pops, but I decided to make watermelon daiquiri pops using rum, triple sec, lime juice, and simple syrup.  All you do is cut the watermelon into maple leafs using a cookie cutter (which worked so well!), soak the pieces in your booze mixture, insert popsicle sticks, freeze, and then you have a sweet and refreshing treat that's perfect for Canada Day and the hot weather!

Frozen Watermelon Daiquiri Pops

There are two things to note about this recipe, the first is that you don't want to eat them the second they come out of the freezer, as they'll be a little too hard.  Just let them thaw for about 5 to 10 minutes before serving, but make sure you don't let them thaw too much!

You can see the difference between a frozen and slightly thawed popsicle in the pictures above and below - the popsicles above are straight out of the freezer and still a little icy, and the popsicle below is one I had taken a few bites out of it already!

Frozen Watermelon Daiquiri Pops

The second thing to mention is that these don't taste too strongly of alcohol, so if you're looking for a super boozy pop, these probably won't satisfy you!  The original recipe said to soak the watermelon in the alcohol mixture for 20 minutes, and most other similar recipes I've seen call for about 15-20 minutes.  I soaked mine a bit longer (for a total of 30 minutes), but of the seven people who tried one, I was one of the only ones who could taste the alcohol in them.

Now don't get me wrong, everyone still loved them, but I just wanted to warn you that they're not a super boozy treat!  I'm guessing that if you wanted to taste the alcohol more, you could try soaking them even longer than I did, or maybe try injecting the alcohol into the watermelon with a syringe.  Just note that I haven't actually tried those methods myself so I can't verify that they'll work, but leave a comment if you do give it a shot and let me know how it turns out!

Anyways, I didn't mind that the watermelon pops weren't too strong because they still tasted great, and I just used my leftover soaking liquid to make daiquiris afterwards by mixing it with some blended watermelon (I got about three drinks out of it, in case you're wondering).  So tasty!

Watermelon Daiquiri

I hope you give this idea a try, and stay tuned because I have another Canada Day recipe coming your way soon!

Frozen Watermelon Daiquiri Pops for Canada Day

Adapted from The Shiksa in the Kitchen

Makes around 7-8 pops, depending on the size of your cookie cutter

Ingredients:

One quarter of a seedless watermelon (about a 4 pound piece)
1/4 cup + 2 tablespoons sugar
1/4 cup + 2 tablespoons water
1/4 cup rum
1/4 cup triple sec
Juice of one lime (2-3 tablespoons)

Special Equipment: Maple leaf shaped cookie cutter, popsicle sticks

Directions:

Slice watermelon into 1-inch wedges (About 8-10 wedges).  Use maple leaf cookie cutter to cut a leaf out of each wedge (make sure you don’t use any of the rind).  You’ll have some scraps leftover, which can be used for another purpose, such as blending up for a drink later!  Transfer pieces to an 8x8 dish, or a dish just big enough to just fit the slices in an even layer.

Note: If you just want a Canada Day-themed simple snack, you could stop here and just serve the leaf-shaped watermelon slices as is, or with a popsicle stick inserted as a fun snack!

Prepare simple syrup: Add sugar and water to a small saucepan, and bring to a boil, whisking constantly, until sugar is dissolved.  Remove from heat and let cool.

Mix simple syrup, rum, triple sec, and lime juice in a small bowl.  Pour mixture over the watermelon slices, and let soak for about 15 minutes per side (30 minutes total). 

Carefully insert a popsicle stick into the bottom of each maple leaf, pushing through the center until it almost reaches the top.  I found this easier if I made a small insertion with a knife first.  Place the popsicles on a foil-lined baking sheet and place in the freezer to freeze for at least 1-2 hours.  Reserve the soaking liquid to make cocktails later!

Remove from freezer about 10 minutes before serving so they're not too hard, but don't let them thaw too much!

Here's a quick step-by-step visual to help you out!

How to make frozen watermelon daiquiri pops for Canada Day

June 22, 2012

Strawberry Pineapple Lime Popsicles

Strawberry Pineapple Lime Popsicles

It has been scorching hot outside all week here, and though I love warm weather, I don't love the kind of heat that feels like it's suffocating you!  I would give anything to have a backyard with a cool, refreshing pool these days, but since I don't think my apartment building plans to turn the parking lot into an outdoor pool any time soon, I've been settling for the next best thing for cooling off - popsicles!  (okay, maybe the second next best thing, after a cold beer)

This was my second attempt at making homemade popsicles this year, and I took a much different approach with these than my last attempt.  My banana date popsicles were yogurt-based, which gave them a creamy texture, but these strawberry pineapple lime popsicles are fruit-based, so they have more of an icy texture that's similar to the standard storebought kind, if that makes sense?

I can't decide which ones I liked better - they're both so good!

Strawberry Pineapple Lime Popsicles

With strawberries at their peak right now, I've been buying them faster than I can eat them, so I decided to use some of my extras in a popsicle.  I also had some pineapple to use up before it went bad, so I combined the two, along with some lime juice and a bit of honey for added sweetness.

The sweet strawberries and honey are perfectly balanced by the tart pineapple and lime in these juicy popsicles, and I love that they're sweet enough to eat for dessert but are still natural and healthy (and full of lots of vitamin C!)

Strawberry Pineapple Lime Popsicles

As you can see from the pictures, I spent a little too long photographing my popsicles and they were starting to melt quite a bit towards the end!  I couldn't help it though, I just loved the bright colours that photographed so well!

I should also mention that I attempted a swirling pattern in these by pouring the pineapple and strawberry mixtures into the molds separately, then swirling them together a little with a knife.  Unfortunately, it wasn't until the last popsicle that I realized it works a lot better if you alternate pouring the two mixtures in layers so they're more evenly distributed.  I just poured them in two equal parts, so you can see how the pineapple part was mainly at the bottom and got a little overwhelmed by the strawberry colour.  I still think they look pretty though, and now you can learn from my mistake!

Strawberry Pineapple Lime Popsicles

Below is a picture of an almost eaten popsicle so you can get an idea of the fruity texture.  It's quite different from the last picture in my banana date popsicle post, but like I said, I still love them both!

Hope you all stay cool and have a great weekend!

Strawberry Pineapple Lime Popsicles

Pineapple Strawberry Lime Popsicles

Adapted from Jennifer Murray on About.com

Makes 4-6 popsicles, depending on the size of your popsicle mold

Ingredients:

1 cup diced strawberries
1 cup diced ripe pineapple
4 teaspoons fresh lime juice
2 teaspoons honey (optional)

Directions:

Add strawberries, 2 teaspoons lime juice, and 1 teaspoon honey to a blender and blend until smooth.  Transfer to a glass or measuring cup and rinse out the blender.

Blend the pineapple, remaining 2 teaspoons lime juice, and 1 teaspoon honey until smooth.  Transfer to a second measuring cup.

Alternate pouring pineapple juice and strawberry juice into each popsicle mold (I found alternating two portions of each worked best), then use a knife to gently swirl together (but not enough so that they complete blend into one colour!)  Freeze.

Strawberry Pineapple Lime Popsicles

I had to add one more picture of my plate after I'd removed the melting popsicles - I thought it looked so pretty!

April 13, 2012

Mandarin Chicken Salad

Mandarin chicken salad

I’ve been fortunate enough to travel to Asia a few times now, and while I love experiencing the incredible and diverse food Asia has to offer, one of the things I always find myself missing is a fresh, crisp salad. A lot of vegetables over there are cooked, and sometimes you can’t trust the fresh ones because they may have been washed in tap water. Towards the end of my trips, I actually start dreaming about raw vegetables and would give up all the amazing food there just to have one bowl of refreshing salad!

So the first thing I did when I got home from my most recent trip was to make myself a giant bowl of salad! I wanted to make something with Asian ingredients though, and realized it was the perfect time to try a salad recipe I’d had bookmarked for a year but kept forgetting to make: this mandarin chicken salad from Munchin with Munchkin. While it looked like a lot of ingredients to buy, I actually had all the ingredients for the dressing already, and I didn't mind buying the vegetables because I knew I'd eat whatever was leftover as a snack, so it was money well spent!

I changed quite a few little things with the recipe in order to suit my tastes (and based on what ingredients I had on hand), so be sure to check out the original recipe too so that you can also adjust the ingredients to your tastes! You should also check out the rest of Kris’ amazing blog while you’re there – it was just voted the Best Recipe Blog in The Kitchn’s Homies awards!
This salad was so fresh and flavorful and exactly what I was craving after my trip. I loved how the sweet mandarins were balanced by all the crunchy vegetables, and the sweet and sour vinaigrette gave it the Asian flavour I was still desiring. I have a feeling I’ll be craving this salad a lot more now that I know how much I love it!

Mandarin chicken salad
Mandarin Chicken Salad

Adapted from Munchin with Munchkin

Serves 2

Ingredients:

For the Dressing:
1 tablespoon rice vinegar
1 tablespoon fresh lime juice

1/4 teaspoon chili garlic sauce (optional for a bit of spice)
1 tablespoon sesame oil
1 teaspoon soy sauce
1 tablespoon dark brown sugar
1 garlic clove, minced
1/2 teaspoon sweet Thai chili sauce 
Dash of salt

For the Salad:
1 boneless, skinless chicken breast, cooked and shredded into small pieces (I cooked mine in sesame oil)
2 cups lettuce
1/2 red bell pepper, cut into thin strips
1 medium carrot, cut into matchsticks
1/4 cup snow peas
1/4 cup shelled edamame, cooked as per package directions
2-3 mandarins, segmented
2 tablespoons ground peanuts (ground in a food processor)
2 tablespoons sesame seeds

Directions:

In a small bowl, whisk together all ingredients for the dressing. Taste and adjust any amounts to your liking. Set aside.

In a large bowl, combine salad ingredients, toss with dressing, and divide salad between two plates/bowls, with the peanuts and sesame seeds sprinkled on top.

Notes:
- Next time I might eliminate the carrots and snow peas and increase the mandarins. Choose ingredients and amounts to your own taste!
- Optional additional toppings may include green onions, cilantro, and chow mein noodles

Ingredient Index

Related Posts Plugin for WordPress, Blogger...