Showing posts with label mustard - dijon. Show all posts

May 04, 2015

Maple Balsamic Roasted Salmon, Brussels Sprouts, & Potatoes

Maple Balsamic Roasted Salmon, Brussels Sprouts, and Potatoes

I know it's a little late for brussels sprouts season and most of you are probably too focused on asparagus right now to think about wintry vegetables, but I'm happy to eat brussels any time of year (and we don't have local asparagus here yet last time I checked)!

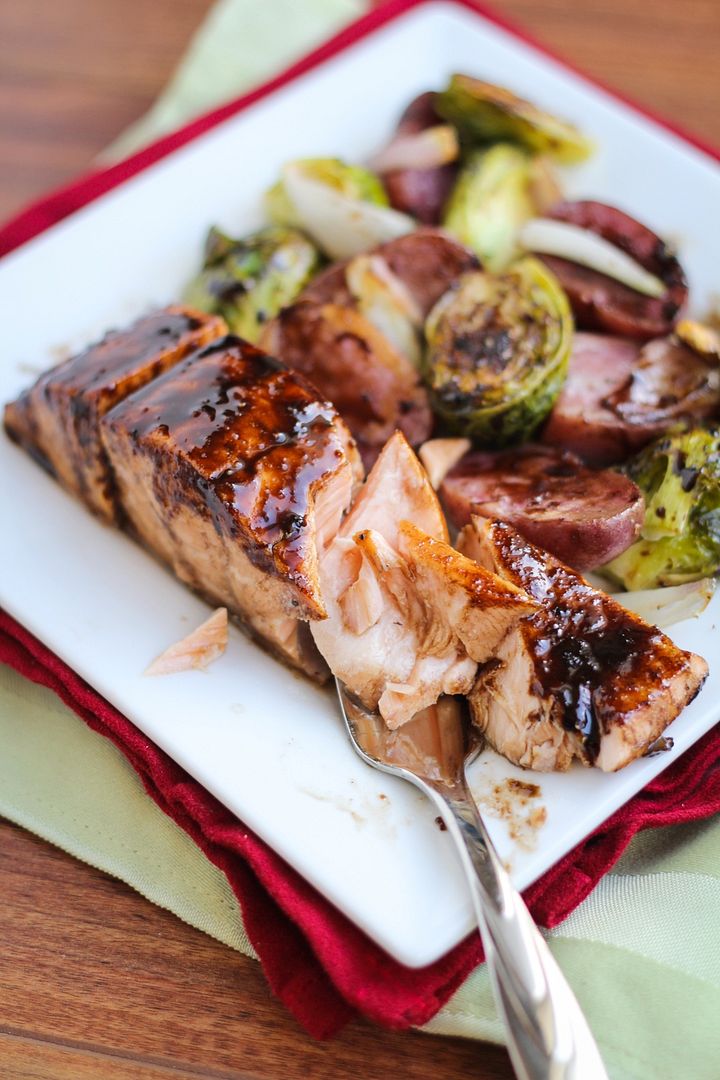
I can also enjoy a meal like this any time of year - roasted salmon, vegetables, and potatoes all tossed in an easy homemade glaze. There's nothing revolutionary about this dish and you've likely seen or made a version of it once or several times before, but it's a great recipe to have in your collection because it's simple, healthful, flavourful, and satisfying!

Maple Balsamic Roasted Salmon, Brussels Sprouts, and Potatoes

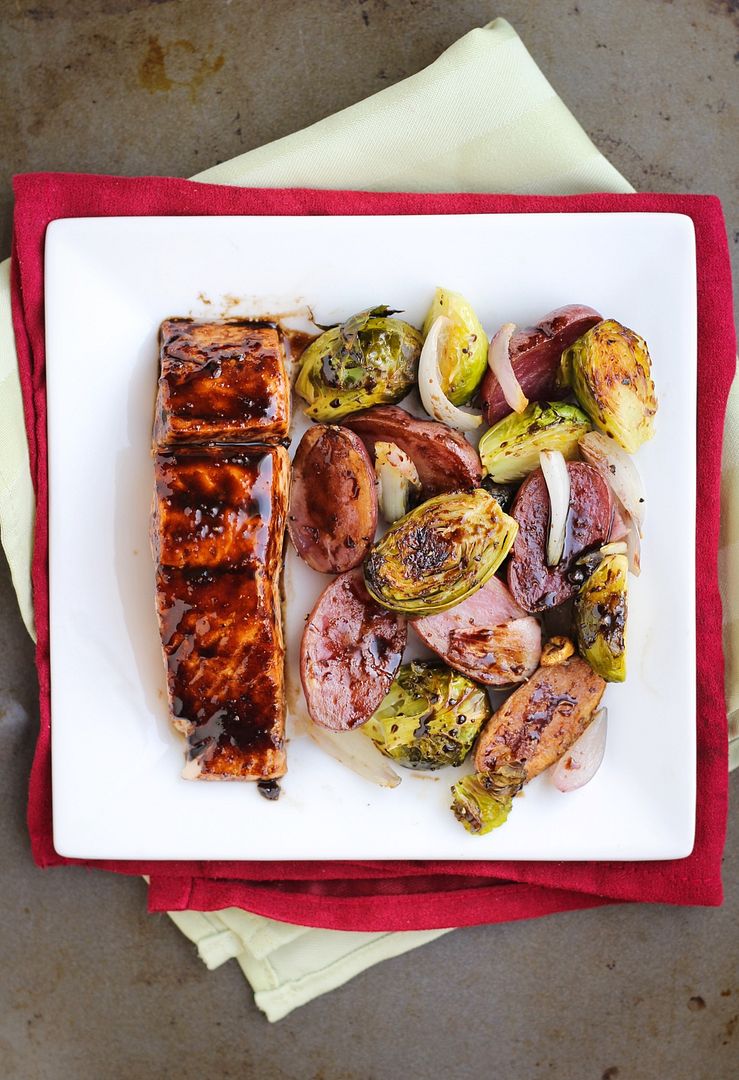
I love adding a glaze to salmon because that little extra step makes such a difference in flavour; I usually use whatever ingredients I have on hand but that often includes maple syrup. I also love tossing roasted brussels sprouts and potatoes in balsamic vinegar and eating them just like that. So I decided to combine those flavours together with a maple balsamic glaze that I brushed heavily on the salmon and lightly on some roasted brussels sprouts, potatoes, and shallots on the side.

I don't often like coordinating main dishes with side dishes because it involves too much work but everything about this dish flows easily together, doesn't take long or dirty too many dishes, and most importantly tastes so good you'll want to add it into your meal rotation no matter the time of year!

Maple Balsamic Roasted Salmon, Brussels Sprouts, and Potatoes

Maple Balsamic Roasted Salmon, Brussels Sprouts, & Potatoes

Serves 4

Inspired by Real Simple but recipe is my own

Ingredients:

For the roasted veggies:
1 lb brussels sprouts, stems trimmed and outer leaves removed, halved
1 lb baby potatoes or fingerling potatoes, halved
3-4 shallots, peeled and chopped
3-4 cloves of garlic, chopped
1-2 tablespoons olive oil

For the glaze:
1 teaspoon olive oil
1 clove garlic, minced
1/4 cup balsamic vinegar
2 tablespoons pure maple syrup
1 tablespoon Dijon mustard
~1/4 teaspoon each salt and pepper

1 lb or 4 fillets of salmon

Directions:

Preheat oven to 425°F.

Toss brussels sprouts, potatoes, shallots, and garlic with olive oil. Season with salt and pepper and spread in a single layer on a foil-lined baking sheet.  Roast in preheated oven for 20-25 minutes.

Meanwhile, prepare glaze by heating 1 teaspoon olive oil or a light drizzle in a small saucepan over medium heat. Add garlic and cook for about 30 seconds. Add balsamic vinegar, maple syrup, Dijon, salt, and pepper. Let simmer, stirring often, and watching closely, until slightly thickened. This could take around 5 minutes. I don’t reduce the glaze until it’s completely thick; I remove it from the heat when it’s thickened but still pourable.

Remove vegetables from oven and toss.  Brush glaze over salmon fillets (you won’t use all the glaze) and place on the same or a separate foil-lined pan, skin side down.  Return salmon and vegetables to oven and roast for another 10-12 minutes or until salmon and vegetables are cooked through.  Brush remaining glaze over salmon and roasted veggies.  Season with salt and pepper if desired.

October 02, 2014

Smashed Chickpea, Blue Cheese, & Apple Sandwich

Smashed Chickpea, Blue Cheese, Apple, and Walnut Sandwich - a healthy and hearty vegetarian lunch idea!

With fall well underway, I’ve been craving heartier meals that incorporate seasonal ingredients like pumpkin and apples. I’ve seen a lot of smashed chickpea or “chickpea salad” sandwiches around the web before and have wanted to try my own version for a while now. I knew I wanted the crunch of apples in there, and because I can’t get enough of the apples-blue cheese combination, I mixed my apples and chickpeas with blue cheese, throwing in some walnuts for more texture, and a quick mustard and apple cider vinaigrette for added flavour. Combined with thick slices of fresh 7 grain whole wheat bread, lettuce, sprouts, and a little extra mustard, this made for a really satisfying sandwich (when my dad saw my lunch one day he asked if I was Dagwood) that I loved!

Smashed Chickpea, Blue Cheese, Apple, and Walnut Sandwich - a healthy and hearty vegetarian lunch idea!

If I’d wanted it to be more of a chickpea salad sandwich, I could have added mayo, but I don’t ever have mayo around and I liked the flavour of the mixture on its own so I left it out. Without something like mayo to get everything to stick together, the filling is a bit messy in a sandwich, but that’s all part of the fun! You could try adding some if you prefer though, or even use a mixture of mayo and plain Greek yogurt to keep this on the lighter side.

And if blue cheese isn’t your thing, here are a few other chickpea sandwiches you could try!

Smashed chickpea salad from Smitten Kitchen
Smashed chickpea and avocado salad sandwich from Two Peas & Their Pod
Curried chickpea salad sandwich from The Simple Veganista
Cranberry walnut chickpea salad sandwich from The Simple Veganista
Herbed chickpea sandwich (with feta and dill) from Martha Stewart
Smashed chickpea & pesto sandwich from Bake Your Day
Pink chickpea smash salad from Happy Healthy Life

Smashed Chickpea, Blue Cheese, Apple, and Walnut Sandwich - a healthy and hearty vegetarian lunch idea!

Smashed Chickpea, Blue Cheese, & Apple Sandwich

Recipe my own but inspired by many other versions of smashed chickpeas that others have created!

Makes 4 sandwiches

Ingredients:

For the Chickpea Mixture:
1 (540mL) can of no-salt added chickpeas, drained and rinsed
1 large apple, cored and diced – any crunchy and sweet variety that you like will work
1/4 cup chopped walnuts
2 oz crumbled blue cheese
2 tablespoons chopped parsley
1 tablespoon extra-virgin olive oil
2 teaspoons apple cider vinegar
1 teaspoon Dijon mustard
1 shallot, minced
Salt and pepper

For the Sandwiches:
8 slices whole grain bread
Lettuce, and sprouts if desired
Extra mustard if desired (such as Dijon, honey mustard, or deli style mustard)

Directions:

In a small bowl, whisk together the olive oil, vinegar, Dijon, and shallot.  Let sit for at least 5 minutes (I find this takes some of the bite out of the shallots).

Smash chickpeas with a potato masher or large fork; they don’t have to be completely smashed, just partially.  I found it difficult to do with a fork so I pulsed mine several times in a food processor; this is quicker if you don’t mind washing an extra dish!  Mix the apples, walnuts, blue cheese, and parsley into the chickpea mixture.  Mix in the olive oil dressing and season mixture generously with salt and pepper.

Divide chickpea mixture evenly among 4 sandwiches, along with lettuce, sprouts, and extra mustard if desired (I liked these best with added mustard!).  Try to flatten or “smush” the chickpea mixture onto each sandwich so it sticks together.  Even still, these might be messy and I learned that it’s best to hold on to both ends of your sandwich as you’re eating to prevent the filling from falling out!

June 25, 2014

Lentil, Grape, & Blue Cheese Arugula Salad

Lentil, Grape, Apple & Blue Cheese Arugula Salad

Now that it's officially summer, I've been craving salads for dinner a lot more, but my salads have to be interesting to keep me interested, with plenty of different textures and flavours and a good source of protein - usually either beans, quinoa, edamame, or lentils.

Lentil, Grape, Apple & Blue Cheese Arugula Salad

I saw the combo of grapes and blue cheese somewhere a while ago and have been thinking about how to use them together since.  Because lentils have a pretty earthy flavour that need brightening up from other ingredients, I figured they would make the perfect base for a salad with grapes for sweetness and the sharp flavour of blue cheese that I can't even describe because it tastes like nothing else (in a good way!)

Lentil, Grape, Apple & Blue Cheese Arugula Salad

After doing a bit of searching I found out that lentils.ca, one of my favourite resources for lentil information and recipes, had a recipe along the lines of what I was looking for, with lentils, arugula, grapes, blue cheese, and walnuts.  I followed their lead, adding apples for crunch (a necessary addition, in my opinion), using a slightly different dressing, and leaving the walnuts raw instead of candying them (though that would probably be good too; I was just lazy).

Lentil, Grape, Apple & Blue Cheese Arugula Salad

Not only did this make for a healthful meal with plenty of fiber, protein, and vitamins, but it had such a great combination of flavours and textures.  I loved how the bursts of sweet grapes and crunchy apples balanced out the sharp arugula and blue cheese along with the nutty, earthier flavours in the lentils and walnuts.
Lentil, Grape, Apple & Blue Cheese Arugula Salad

You could eat this as a main course on its own or as a side dish.  We ate some of our leftovers piled on top of whole wheat naan bread as a sort of knife-and-fork salad, which we really enjoyed.  Ryan thought this dish would have been better covered in buffalo sauce, which I strictly forbade, but considering he was willing to eat it for three meals in a row (and it was pretty inexpensive for the amount of food we got), I'd say it won him over!

Lentil, Grape, Apple & Blue Cheese Arugula Salad

Lentil, Grape, & Blue Cheese Arugula Salad

Recipe inspired by Lentils.ca

Serves 4-6

Ingredients:

Lentils:
4 cups water
1 cup (dry) green or brown lentils
1/2 teaspoon salt

Dressing:
3 tablespoons extra-virgin olive oil
2 tablespoons red wine vinegar
2 teaspoons honey
1 teaspoon Dijon mustard
1 shallot, minced
1/4 teaspoon each salt and pepper

Salad:
1-1/2 cups red seedless grapes, halved
1 apple, diced (I used a gala)
3/4 cup chopped walnuts, lightly toasted if desired
1/2 cup crumbled blue cheese (you could use up to 3/4 cup for a stronger blue cheese flavour)
5oz baby arugula

Directions:

Rinse lentils.  Bring water, salt, and lentils to a boil in a medium saucepan.  Reduce heat to a simmer and cook until lentils reach desired texture, about 15 minutes.  Drain excess water and let lentils cool to room temperature.

Meanwhile, prepare dressing by whisking together the olive oil, vinegar, honey, shallot, salt, and pepper in a small bowl.  Set aside.

Add cooled lentils, grapes, apple, walnuts, and blue cheese to the arugula.  Add dressing and toss to combine.  Season with additional salt and pepper if desired.  Eat on its own as a main course or as  side courses.  It’s also good on top of naan bread!

January 31, 2014

Healthy 'Cheezy' Roasted Cauliflower

Healthy 'Cheezy' Roasted Cauliflower

Even though my team didn’t quite make it to the Super Bowl this year, I’m still looking forward to this Sunday, not only to watch some very talented players compete in what should be an exciting game, but also to enjoy one of my favourite parts of the big game – the food!

Healthy 'Cheezy' Roasted Cauliflower

This year I’m going to try to keep things a little healthier than normal, though. I’ve been so busy with schoolwork over the past week that I feel like I haven’t been eating nearly as well as I usually do. Case in point: last night’s dinner consisted of peanuts, crackers, and a granola bar. Not the most nutritious meal I've ever had.

Healthy 'Cheezy' Roasted Cauliflower

These cheezy cauliflower bites are the perfect healthy snack food to go with the big game, or to enjoy anytime! Throughout the football season we’ve been making roasted cauliflower tossed with buffalo sauce (in fact, this was how I finally got Ryan to admit that cauliflower can taste good), but I changed things up this time by going with a cheezy ranch type flavour. But without the cheese (hence the use of the ‘z’)!

Nutritional yeast (which indeed lives up to its name and is full of nutritional value, but with a cheesy nutty flavour) coats these cauliflower florets along with some mustard, seasoning, and a bit of olive oil, then they get roasted in the oven until they’re slightly crispy and delicious.

Healthy 'Cheezy' Roasted Cauliflower

The original recipe is from Clean Eating Magazine, though I made quite a few changes like adding more spices, adding mustard to complement the cheesy flavour and decrease the amount of oil needed to get the spices tso stick, and rather than dipping each cauliflower in oil, I just tossed everything together with some oil to cut the amount needed in half.  You might end up with less of the coating sticking to each piece this way, but I still thought there was plenty.  

There are other versions of this online that call this type of dish ‘cauliflower popcorn’, which I resisted because this really tastes nothing like popcorn, but it is still so tasty and will disappear quickly, so plan accordingly if making it for the game this weekend!

Healthy 'Cheezy' Roasted Cauliflower

Cheezy Roasted Cauliflower

Adapted from Clean Eating Magazine

Serves 2-4, depending on serving size

Ingredients:

Non-stick cooking spray
1 head cauliflower
2 tablespoons olive oil
2 tablespoons Dijon mustard
1/2 cup nutritional yeast
1/2 teaspoon garlic powder
1/2 teaspoon onion powder
1/4 teaspoon mustard powder
1/2 teaspoon salt
1/4 teaspoon freshly ground pepper

Directions:

Preheat oven to 400°F.  Line a large baking sheet with aluminum foil and spray lightly with non-stick cooking spray. 

Chop cauliflower into bite-sized florets and add to a large bowl.  Pour olive oil and mustard into bowl and toss until cauliflower is thoroughly and evenly coated.  In a small bowl, mix nutritional yeast, garlic powder, onion powder, mustard powder, salt, and pepper.  Pour mixture over the cauliflower and toss until evenly coated.

Spread cauliflower in an even layer on prepared baking sheet.  Sprinkle any leftover seasoning overtop.  Roast  in preheated oven for 20 minutes, remove from oven and turn cauliflower over, then roast for another 20-25 minutes, until browned.  Serve warm.

October 08, 2013

Pear, Blue Cheese, & Caramelized Onion Panini

Pear, Blue Cheese, & Caramelized Onion Panini

I know I just posted a panini recipe fairly recently, but this new panini was so good that I had to share it with you guys immediately!

I also know that these pictures are extremely similar to the last set, but there are only so many ways you can photograph a sandwich. The one thing I don’t like about paninis is that because everything gets pressed together, whatever's between the bread is almost impossible to show in photos (and what parts you can see look indistinguishable).  But I love making and eating paninis, so you’ll have to use your imagination a little to see through those pieces of bread to the deliciousness that’s in between them!  Here's a little help - this is what was inside my sandwich before I pressed it together:

Pear, Blue Cheese, & Caramelized Onion Panini

I wanted to make an autumn-ish panini with one of my favourite flavour combinations – pears or apples with blue cheese and caramelized onions.  I’ve used at least a couple of these ingredients together in the past, like in these apple, caramelized onion, and blue cheese naan pizzas, apple turkey burgers with caramelized onions and brie, and roasted potatoes and green beans with caramelized onions and blue cheese – there’s something about caramelized onions and blue cheese together that I just can't get enough of.  

Add in some juicy, lightly sautéed pears, some peppery arugula and spicy honey Dijon, press it together until it's warm and melty, and you have what may be my new favourite sandwich!

Pear, Blue Cheese, & Caramelized Onion Panini

And before someone points it out, yes I’m aware that the onions as pictured above are much more on the burnt side than the caramelized side – I swear I do know how to caramelize onions, but I only had a tiny onion to work with that had been open in the fridge plus I was in a big rush when I made this.  Too thin slices + too high heat = burnt onions.  Try not to make the same mistake I did, but if you’re really in a hurry, you could leave them out and this panini would still be delicious; I recommend making time to add them in though - caramelized onions make everything better!  Plus they can always be made ahead of time and stored in the fridge to add to all sorts of things!

I’ve also been on a big blue cheese kick lately, adding it to anything I can think of, but I know a lot of you don’t like blue cheese (though I cannot understand why!), so you could substitute something like brie or gruyere instead if you like.  Your sandwich will have a different flavour profile, but will still be amazing and even more melty!

Pear, Blue Cheese, & Caramelized Onion Panini

Pear, Blue Cheese, Caramelized Onion, & Arugula Panini

Adapted from Clean Eating

Makes 1 sandwich

Ingredients:

1/2 tablespoon olive oil
1/2 medium-large yellow or red onion, thinly sliced
Salt & Pepper
1 teaspoon balsamic vinegar (optional)
1/2 ripe pear, cored and thinly sliced
2 slices whole grain bread
2 teaspoons honey Dijon mustard
1/2 oz blue cheese, sliced thinly
Handful of baby arugula

Directions:

Heat oil in a medium to large skillet over medium heat.  Add onions, stir to coat with oil, and season with salt and pepper.  Let cook over medium-low heat, stirring occasionally, until onions are soft and caramelized, about 25-30 minutes.  I like to add a splash of balsamic vinegar in the last few minutes of cooking to deglaze the pan and add some flavour to the onions, but this step is optional.

Remove onions from pan, and add sliced pear.  Cook over medium heat for around 3 minutes, until softened and slightly golden coloured.  Remove from heat.

Spread mustard on one slice of bread, top with arugula, onions, pears, and blue cheese, and the other piece of bread.  Heat in a panini press, or if you don’t have one, heat the sandwich on a griddle pan (or skillet) with a heavy pot on top of the sandwich to press it into the skillet (I put a can inside the pot to weigh it down), then flip and repeat on the other side.  Serve warm.

September 27, 2013

Chicken, Pear, & Goat Cheese Salad with Wheat Beer Vinaigrette

Chicken, Pear, and Goat Cheese Salad with Wheat Beer Vinaigrette

Now that fall has officially begun, I’m craving all things autumn: apples, pears, cranberries, squash, sweet potatoes, apple cider, warm drinks, and pumpkin everything, though I’ve had particular cravings for pumpkin baked goods and pumpkin pie. It’s crazy to think that (Canadian) Thanksgiving is only a couple weeks away and I haven’t made anything with pumpkin yet – I think that needs to change this weekend!

But before I start baking, my first venture into comforting fall dishes began a little healthier with this salad!

Chicken, Pear, and Goat Cheese Salad with Wheat Beer Vinaigrette

I’ve been wanting to try using beer in a vinaigrette for a while now - the house salad at a popular restaurant chain around here includes a beer dressing, and though you can’t taste it, the idea of including beer in your dressing makes the idea of salad for dinner so much more exciting!  So I found a recipe for a pear and walnut salad with wheat beer vinaigrette from Vegetarian Times and used that as a base for the salad that I had in mind.

Wheat beer is pretty mild, but when you reduce it, it intensifies in flavour (which is why you don’t want to start with a strong or bitter beer).  Once you add all the other ingredients for the dressing though, you’d have no idea there’s beer in there, it just subtly enhances the flavour in a nice way that complements the other fall ingredients in the salad – including pears, goat cheese, pecans, cranberries, and chicken.

Chicken, Pear, and Goat Cheese Salad with Wheat Beer Vinaigrette

I loved this salad as is (and think it would be great for Thanksgiving!), but you could also make tons of substitutions to it to make it your own. Blue cheese instead of goat cheese would be delicious, or apples instead of pears, walnuts instead of pecans, spinach or arugula instead of mixed greens, or even leave out the chicken for a vegetarian side salad. You could also of course use any dressing you like if you don't keep beer in the house - a maple balsamic vinaigrette would probably taste great!

Hope you all enjoy the first official full weekend of fall!

Chicken, Pear, and Goat Cheese Salad with Wheat Beer Vinaigrette

Chicken, Pear, & Goat Cheese Salad with Wheat Beer Vinaigrette

Adapted from Vegetarian Times

Serves 4 as a main dish

Ingredients:

For the Dressing:
1/4 cup + 2 tablespoons wheat beer
1 tablespoon minced shallot
1/2 tablespoon honey
1/2 tablespoon Dijon mustard
2 tablespoons balsamic vinegar
1/4 cup extra virgin olive oil
1/4 teaspoon dried thyme (optional)
1/8 teaspoon each salt and pepper

For the Salad:
~4 cups mixed salad greens
2 chicken breasts, cooked and sliced
2 ripe bosc or red-skinned pears, halved, cored and thinly sliced
3 oz goat cheese, crumbled (or as an alternative you could use blue cheese)
1/4 cup toasted pecans or walnuts
1/4 cup dried cranberries

Directions:

Prepare the vinaigrette: Add wheat beer to a small saucepan, bring to a boil, and let simmer until reduced to 2 tablespoons (about 5-7 minutes).  Remove from heat and whisk in the remaining dressing ingredients (shallot through to pepper).  Set aside.

Prepare the salad: Divide greens among 4 plates or bowls.  Top each salad with sliced chicken and pears, and sprinkle pecans, cranberries, and goat cheese on top.  Drizzle each salad with the vinaigrette and serve immediately.

Note: All amounts are approximations - adjust based on your own tastes if desired.

August 06, 2013

Lemony Lentil Salad with Dill & Feta

Lemony Lentil Salad with Dill & Feta

As I mentioned in my recap of things I made and did in July, I was recently reminded of how much I love lentil salads when I tried a recipe from My New Roots.  Not only are they easy to make and highly adaptable to different flavours and ingredients, but they usually make a lot of leftovers that are great for packing filling lunches, plus they’re super healthy – lentils are low in fat and really high in protein and fiber.

So as soon as I finished all the leftovers from the last lentil salad I tried (and there were a lot of leftovers!) I immediately made a new one, and I’m going to try to keep this up as much as possible, considering I now have three giant bags of lentils in my cupboard to use up!  

Lemony Lentil Salad with Dill & Feta

While the last lentil salad I tried was heavily spiced, this time I wanted something more bright and summery.  I knew I wanted to use lemon and dill, so when I came across a recipe for a lemony lentil salad with dill and feta from Eating Well I knew I was on the right track.  Of course, I can never seem to leave a recipe alone, so I made a few changes, starting with using dry lentils instead of canned lentils (canned are still fine, but if you’re concerned about sodium then it’s best to use dry - I use them because they're cheaper and easy to cook).  I also used shallot instead of red onion, added a clove of garlic, used more cucumber and replaced the red pepper with cherry tomatoes, and for the dressing I added a bit of honey for sweetness, reduced the lemon juice (it’s still very lemony!) and reduced the olive oil from 1/3 cup down to 2 tablespoons, which was plenty of oil for me.

I loved the balance of the lemony dressing with the salty feta, along with the bright flavour of dill and the crunch of summer veggies.  I threw a handful of fresh arugula into each serving to make it more salad-like and also cut the strong lemon flavour down to just the right amount (so I recommend this step!)

I hope you guys love lentils as much as I do, and if you think you don’t, perhaps it’s time to give them another try!

Lemony Lentil Salad with Dill & Feta

Lemony Lentil Salad with Dill & Feta

Adapted from Eating Well

Makes 4-6 servings

Ingredients:

1-1/4 cups dry brown or green lentils
1/4 cup fresh lemon juice (from about 1 lemon)
1/3 cup chopped fresh dill
2 tablespoons minced shallot
1 clove garlic, minced
2 teaspoons Dijon mustard
1/2 teaspoon honey or agave
1/4 teaspoon each salt and pepper
2 tablespoons extra virgin olive oil
1-1/2 cups chopped cucumber
1 cup chopped grape or cherry tomatoes
3/4 to 1 cup crumbled feta cheese
Arugula for serving

Directions:

Combine lentils with about 3.5 cups of water (enough to cover them by a couple of inches) in a medium or large saucepan.  Bring to a boil, cover, reduce heat to a simmer, and let simmer for 15-20 minutes until tender (but not mushy!).  Remove from heat, drain, and rinse with cold water to cool.

While lentils are cooking, prepare dressing by whisking together the lemon juice, dill, shallot, garlic, mustard, honey, salt, and pepper in a small bowl.  Slowly add the olive oil until combined. 

Toss cooled lentils with the dressing.  Mix in the cucumber, tomatoes, and desired amount of feta and toss to combine.  Season with additional salt and pepper, if desired.  Serve in bowls with a big handful of arugula added to each, if desired.

June 03, 2013

Arugula Pasta Salad with Chickpeas, Veggies, and Goat Cheese

Arugula Pasta Salad with Goat Cheese, Olives, Chickpeas, and Roasted Veggies

As I mentioned in my last post for this mandarin quinoa salad (which is already my most popular recipe this year – note to self: keep posting quinoa recipes!), I’ve been trying out lots of different exercise classes this term in an effort to stay active.  Last Wednesday I tried my first AquaZumba class, which was the first time I’ve taken a class in the water since my swimming lessons days as a kid.  It was kind of what I expected in that our beautiful instructor looked unfairly cool doing all her dance moves at the side of the pool while I likely looked like a floundering sea monster attempting to keep up in the water, but it was also better than I expected in that I actually had a lot of fun (and loved the fact that I could exercise without sweating)!

The success of AquaZumba has now given me the courage to try out Aqua Fit, which I’m guessing won’t be nearly as much fun.  I’m slightly dreading the idea that it might involve treading water, which I haven’t done since swimming lessons because I hated it so much.  I could never seem to keep my head above water, and the swimming instructor would always tell us our homework while we were treading water at the end of class and I would panic because my ears would be underwater so I couldn’t hear what they were saying.  But now that I'm older (and already have failing joints), I'm hoping my body will be a little more appreciative that I'm letting it work out in the water and won't fail me when it comes to the treading water part!

Arugula Pasta Salad with Goat Cheese, Olives, Chickpeas, and Roasted Veggies

One of the nice things about water classes is that they make you super tired at the end of the night, giving you a good night’s sleep.  They also make you super hungry, which is where having a big batch of this pasta salad in the fridge comes in handy!

This is just an easy vegetarian dish that’s kind of like a salad, kind of like pasta, kind of like pasta salad, and kind of like pasta with salad.  With whole wheat pasta for fibre, lots of veggies for nutrients, chickpeas for protein, and some goat cheese for richness, it’s a well-balanced dish that makes for great lunches (or post water workout meals) throughout the week! 

Arugula Pasta Salad with Goat Cheese, Olives, Chickpeas, and Roasted Veggies

Arugula Pasta Salad with Chickpeas, Veggies, Olives, and Goat Cheese

Loosely based on a recipe from Cooking Light

Serves 4-6

Ingredients:

375g box of whole wheat penne
8 oz green beans, ends trimmed
1 pound halved cherry tomatoes, divided
4 tablespoon extra-virgin olive oil, divided
Salt & pepper
2 tablespoons minced shallots
2 tablespoons fresh lemon juice
1 tablespoon Dijon mustard
1 teaspoon dried basil
1 tablespoon honey
1/2 cup pitted sliced kalamata olives
1/2 cup (2 ounces) crumbled goat cheese
1 (540mL) can chickpeas, drained and rinsed
3 cups packed arugula

Directions:

Preheat oven to 400°F. 

Cook pasta according to package directions.  Drain and set aside.

Meanwhile, toss green beans and half the cherry tomatoes with 1 tablespoon oil and season with salt and pepper.  Spread in an even layer on a foil-lined baking sheet and roast in preheated oven for 15-20 minutes.

Prepare the dressing by whisking the remaining 3 tablespoons oil with the shallots, lemon juice, Dijon mustard, basil, and honey in a small bowl.  Add salt and pepper to taste.

Combine cooked pasta, roasted vegetables, remaining fresh cherry tomatoes, olives, goat cheese, and chickpeas in a large bowl.  Mix in the arugula.  Add dressing and toss to coat.  Serve warm or chill for a cold pasta salad (though I preferred it warm).  Season with additional salt and pepper and top with additional goat cheese if desired.

*Note – the pictures are missing the additional fresh cherry tomatoes; I forgot to add them until after

May 07, 2013

Roasted Potatoes and Green Beans with Caramelized Onions & Blue Cheese

Roasted Potatoes and Green Beans with Caramelized Onions & Blue Cheese

The weather has been absolutely gorgeous in Southern Ontario lately and I am loving everything about it (except how hard it is to get work done when you know how nice it is outside)!  This past weekend I wore shorts out for the first time this year, the farmer's market was outdoors and even had some local produce available, and I spent some time in the park reading and taking pictures of the beautiful flowers that the April showers brought!

may flowers

I also made some delicious meals with the veggies and cheese I bought at the market, my favourite of which being this twist on a potato salad.

I was never a big fan of potato salads growing up because I usually had the cold, mayonnaise-covered versions, but warm potato salad is a totally different story.  I love this warm dijon roasted asparagus & potato salad, and but this green bean, caramelized onion, and blue cheese version might be even better!  In this dish, mini potatoes get roasted with green beans until they're both nice and browned up, while onions caramelize on the stovetop at the same time.  Then they get mixed together, tossed in a blue cheese dressing, and sprinkled with green onions and a little more blue cheese for good measure.  Needless to say, you have to like blue cheese to appreciate this dish!

Roasted Potatoes and Green Beans with Caramelized Onions & Blue Cheese

I don't know when potato salad stops being a salad and starts being just roasted potatoes, but whatever you call this, it's so good - you just have to get past the somewhat boring colours that made it hard to look good in photos!  This would be a great side dish to go with steak or burgers this summer, but I liked it so much I just ate it on its own!

Roasted Potatoes and Green Beans with Caramelized Onions & Blue Cheese

Roasted Potatoes and Green Beans with Caramelized Onions & Blue Cheese

Adapted from Eating Well

Serves about 6 as a side dish

Ingredients:

1-1/2 pounds mini potatoes, scrubbed and cut in half (I used a mix of red, white, and blue potatoes)
8 ounces green beans, ends trimmed
5 teaspoons extra virgin olive oil, divided
Salt & pepper
2 medium yellow onions, peeled and sliced
2 tablespoons white wine vinegar
2 teaspoons Dijon mustard
3 tablespoons crumbled blue cheese
Additional blue cheese and sliced green onions for topping

Directions:

Preheat oven to 450°F.  Toss potatoes and green beans with 2 teaspoons oil and season with salt and pepper.  Spread evenly on a foil-lined baking sheet and roast in preheated oven for 25-30 minutes, stirring once, until tender and golden brown.

Caramelize your onions at the same time that the potatoes are roasting.  Heat 2 teaspoons olive oil in a large skillet over medium heat.  Add onions, stir to coat with oil, and season with salt and pepper.  Spread onions out evenly across the pan and let cook, stirring occasionally, until onions are soft and caramelized, about 25-30 minutes.  Don’t stir the onions too often so they can brown, but don’t leave them alone long enough to burn or stick to the pan (though I like the burnt bits in this potato salad!) 

Meanwhile, prepare the dressing by whisking together the vinegar, Dijon, blue cheese, and 1 teaspoon oil in a small bowl.

When onions and potatoes are both done, combine them in a bowl and add dressing while warm.  Toss to coat.  Serve warm, topped with additional crumbled blue cheese and chopped green onions or chives, if desired.

May 02, 2013

Asparagus & Arugula Salad with a Poached Egg on Toast

Roasted Asparagus & Arugula Salad with a Poached Egg on Toast

So I really wanted to wait until local asparagus was available before I posted an asparagus recipe this Spring, but this week I finally broke down and bought some of the imported stuff from the grocery store.  I was feeling too left out because it seems like every other blogger I follow has been posting asparagus recipes for a month now, but our asparagus season in Ontario hasn’t even begun yet (though it should really soon!) 

Of course, as soon as I got home I discovered that my asparagus smelled like someone had used it as toilet paper – so gross.  Serves me right for being impatient!  I tried Googling if smelly asparagus is still edible, but the only links that came up were about smelly pee from asparagus, so I decided to just give it a good rinse and use it anyway because it still looked fine as long as I kept my nose at a proper distance!  Turned out that it was fine once cooked, but I learned my lesson and will wait for the fresh stuff before I make my next asparagus dish.

Roasted Asparagus & Arugula Salad with a Poached Egg on Toast

I hope I didn’t turn you off this dish talking about smelly asparagus, because it was really good - it’s light and fresh and tastes just like Spring!  Peppery arugula is tossed in a light lemon dressing, topped with asparagus that’s been roasted just long enough to soften it up a bit and deepen its flavour but still keep it crisp, followed by a poached egg with a runny yolk that makes everything creamy and delicious.  I liked this so much that I made it again the next night (stinky asparagus and all), but this time added a piece of hearty Bavarian rye toast, which made the whole thing even better.  This makes a great lunch or light dinner, but could easily be eaten for breakfast or brunch too!

I'm hoping that the market will have some local Spring veggies available this weekend (though it will more likely be the following weekend), I'm not sure I can wait much longer!

Roasted Asparagus & Arugula Salad with a Poached Egg on Toast

Roasted Asparagus and Arugula Salad with Poached Egg

Adapted from Cooking Light

Serves 1

Ingredients:

Roasted Asparagus:
Handful of asparagus stalks (desired amount for one serving)
1-2 teaspoons olive oil
Salt and pepper

Arugula Salad:
2 handfuls of baby arugula
1 tablespoons extra virgin olive oil
1/2 tablespoon lemon juice
1/2 tablespoon minced shallot
1/4 teaspoon Dijon mustard
Salt and pepper

Poached Egg:
2 tablespoons white vinegar or white wine vinegar
Dash of salt
1 large egg

Assembling:
Salt & Pepper
Freshly grated parmesan cheese
1 or 2 slices of hearty whole grain bread, toasted

Directions:

Preheat oven to 450°F.  Snap off the woody ends of the asparagus spears where they naturally break off.  Toss asparagus with oil and season with salt and pepper.  Spread on a foil-lined baking sheet and bake in preheated oven for 5 minutes.

Meanwhile, prepare dressing by whisking oil, lemon juice, shallot, and Dijon in a small bowl.  Season with salt and pepper to taste.  Toss with arugula in a small bowl.

Fill a large skillet almost to the rim with water (or fill a shallow saucepan with a couple inches of water) and bring to a gentle boil. Add vinegar and salt to water. Break egg into a small cup, then bring the edge of the cup to the water and gently tip the egg into the water.  Turn off heat, cover, and let cook for 4 minutes (or 3 minutes for a runnier yolk).  Lift the egg out of the pan with a slotted spoon and set on a paper towel to drain.

Transfer arugula to a plate with the toast (you can either put the arugula on top of the toast or on the side), add roasted asparagus and poached egg atop the toast, and top with parmesan and salt and pepper.

*Note: You can use 2 poached eggs instead of 1 if you want this to be more filling

April 23, 2013

Cheezy Ranch Hummus

Cheezy Ranch Hummus

Before I get into this post, I feel the need to first clarify that I did not spell "cheesy" wrong in the title.  I'm guessing that the majority of people reading this already knew that, but for those who might not have heard the term "cheezy" before, it's used to describe something that tastes cheesy but doesn't actually use dairy cheese.  I'm not vegan and there is no way I could ever give up real cheese, but there are some dishes where cheese just doesn't really work, like in hummus.  Fortunately, there is a magical little ingredient called nutritional yeast that can blend right in to not only add cheesy flavour but also lots of nutrients.  Again, I'm sure a lot of you have heard of it before, but in case nutritional yeast is new to you (I had no idea what it was a couple of years ago), I described it more in this post for broiled pesto tomatoes, and I also used it in this pizza hummus to get the same cheesy flavour I was going for in this ranch version.

Cheezy Ranch Hummus

This hummus was inspired by Pickles & Honey's vegan cool ranch hummus I saw a while ago and loved.  I don't buy Doritos anymore because I know I'd eat the whole bag in one sitting, but Cool Ranch was always one of my favourite flavours.  I changed almost everything from the original recipe to make my own version, and I wouldn't say that mine is "cool ranch" flavoured, but rather combines elements of ranch dressing like fresh herbs and onion and garlic powder with nutritional yeast for a cheezy ranch hummus that makes a fantastic dip for veggies!

Cheezy Ranch Hummus

In other news, Spring has finally sprung in Southern Ontario and I couldn't be happier!  I love seeing flowers and robins and feeling the sun on my face again.  I hope those still stuck with the white stuff will see it all melt away soon!

Springtime

Cheezy Ranch Hummus

Inspired by Pickles & Honey

Ingredients:

1 (540mL or 19 fl oz) can chickpeas, drained and rinsed
3-4 tablespoons water
3 tablespoons tahini
2 tablespoons fresh lemon juice
3 tablespoons fresh chopped parsley
2 tablespoons chopped chives
1 tablespoon fresh chopped dill
1 teaspoon garlic powder
2 teaspoons onion powder
1/2 teaspoon salt
1/4 teaspoon pepper
2 tablespoons nutritional yeast
1/2 teaspoon dijon mustard
Dash Worcestershire sauce (optional, leave out to keep it vegetarian)
2 tablespoons extra virgin olive oil

Directions:

Add all ingredients except for the olive oil to the large bowl of a food processor.  Process until smooth.  Pour the olive oil into the feed tube of the food processor and let slowly drain into hummus as you continue to pulse.  Once everything is well combined, taste and adjust any amounts to your liking.  Store in the refrigerator and serve with veggies or as a sandwich spread.

October 19, 2012

Apple Turkey Burgers with Caramelized Onions & Brie

Apple Turkey Burgers with Caramelized Onions and Brie

I love experimenting with different types of veggie burgers – from bean burgers to quinoa to even broccoli burgers! – but I also love a good meat burger once in a while.  While I can sometimes tolerate a beef burger, I MUCH prefer turkey burgers, which is a good thing as they’re also a much healthier choice!  I’ve tried a lot of awesome turkey burger recipes in the past, like Thai peanut turkey burgers (which I really must make again) and BBQ pineapple burgers, but these apple ones might just be my new favourite!

These burgers are extra juicy with the addition of grated apple in the patties, then get tons of flavour from the toppings: crunchy apples, melted brie, and caramelized onions.  Each component works so well together to create a sophisticated but super easy burger – don’t leave any of the toppings out!  The caramelized onions are the only time consuming part of this meal but they can easily be done in advance and reheated when it’s time to eat.  And if you’re vegetarian, I think these would work really well as a chickpea burger too!

What's your favourite type of burger?

Apple Turkey Burgers with Caramelized Onions and Brie

Apple Turkey Burgers with Caramelized Onions and Brie

Recipe adapted from Carolina Girl Cooks and Iowa Girl Eats

Makes 4 burgers

Ingredients:

4 small yellow onions, peeled and sliced into half-moons (or 2 larger yellow onions)
1 tablespoon olive oil
1 lb lean ground turkey
2 granny smith apples, divided
1 teaspoon Dijon mustard
1/2 teaspoon dried thyme
1/2 teaspoon dried sage
Salt and pepper
8 slices Brie cheese
4 hamburger buns

Directions:

Start by caramelizing the onions, as this step can take up to half an hour.  Heat olive oil in a large skillet over medium heat.  Add onions, stir to coat with oil, and season with salt and pepper.  Spread onions out evenly across the pan and let cook, stirring occasionally, until onions are soft and caramelized, about 25-30 minutes.  Don’t stir the onions too often so they can brown, but don’t leave them alone long enough to burn or stick to the pan.  You may need to reduce the heat or add a splash of water to deglaze the pan a few times to prevent onions from burning.  Once they’re done, set aside in a small bowl.  This step can be done ahead of time and onions can be warmed up in the microwave before topping burger.

Grate one apple for using in the turkey burger and keep the second apple aside for topping the burger later.  Prepare turkey burgers by gently mixing ground turkey, grated apple, Dijon mustard, thyme, sage, and a sprinkle of salt and pepper in a bowl.  Form into four patties, being careful not to overwork the mixture. 

Heat a large skillet over medium-high heat and spray with cooking spray or drizzle with oil.  Cook turkey burgers until cooked through (center no longer pink, juices run clear, internal temperature of 165°F), about 5 minutes per side.  Add 2 slices of brie cheese to each burger about 2-3 minutes before it’s done cooking so the brie can melt slightly.

Thinly slice the second apple.  Top each bun with a turkey burger (with brie), sliced apples, and caramelized onions.

Ingredient Index

Related Posts Plugin for WordPress, Blogger...