Showing posts with label oil - vegetable. Show all posts

March 04, 2014

Chocolate Peanut Butter Swirl Pancakes

Chocolate Peanut Butter Swirl Pancakes

Today  is one of my favourite days of the year, Pancake Tuesday!  Better known as Fat Tuesday, it's a day traditionally meant for eating richer, fatty foods before Lent, which somehow led to eating pancakes (though I don't really agree that they're a rich or fatty food!)  To my family and I, it just means it's a day to eat pancakes for dinner!

Chocolate Peanut Butter Swirl Pancakes

As a kid I always loved the traditional blueberry and chocolate chip pancakes for pancake dinner, but now I love using the day to try new flavours of pancakes I've never had before.  Last year I made these delicious earl grey vanilla tea pancakes with honey tea syrup, and the year before that was these caramel latte pancakes, which I also loved.

Chocolate Peanut Butter Swirl Pancakes

But it's getting harder and harder to think of pancake flavours that haven't been done before, so this year I decided to combine two flavours into one!  And what better combination than the best of friends, chocolate and peanut butter.

Chocolate Peanut Butter Swirl Pancakes

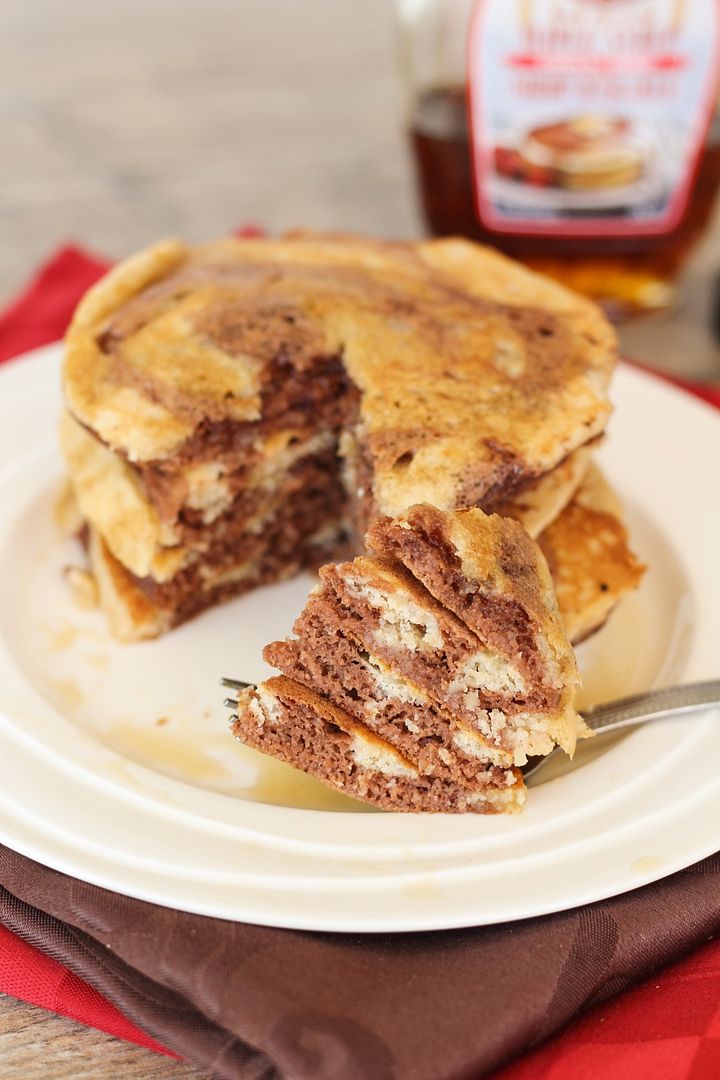
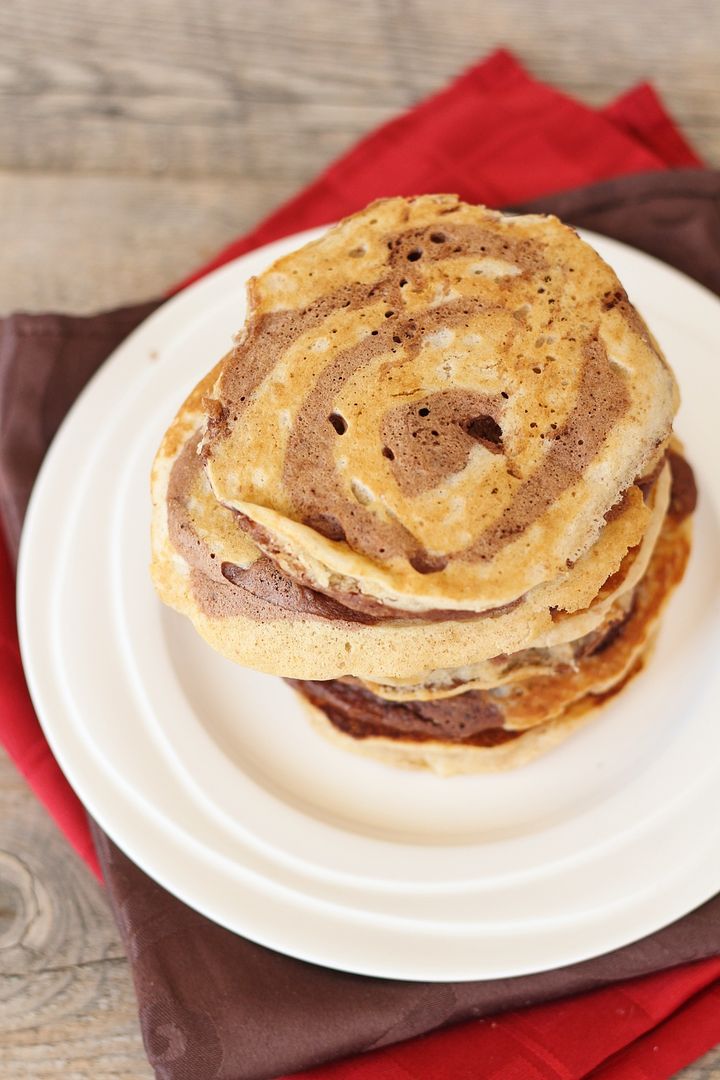
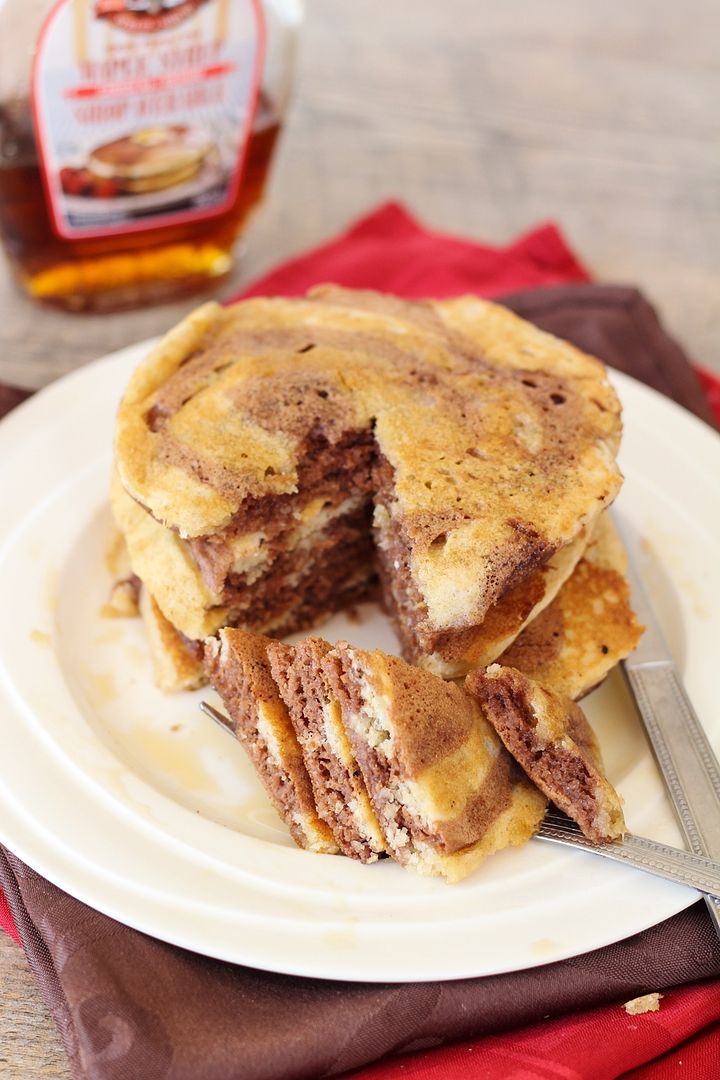
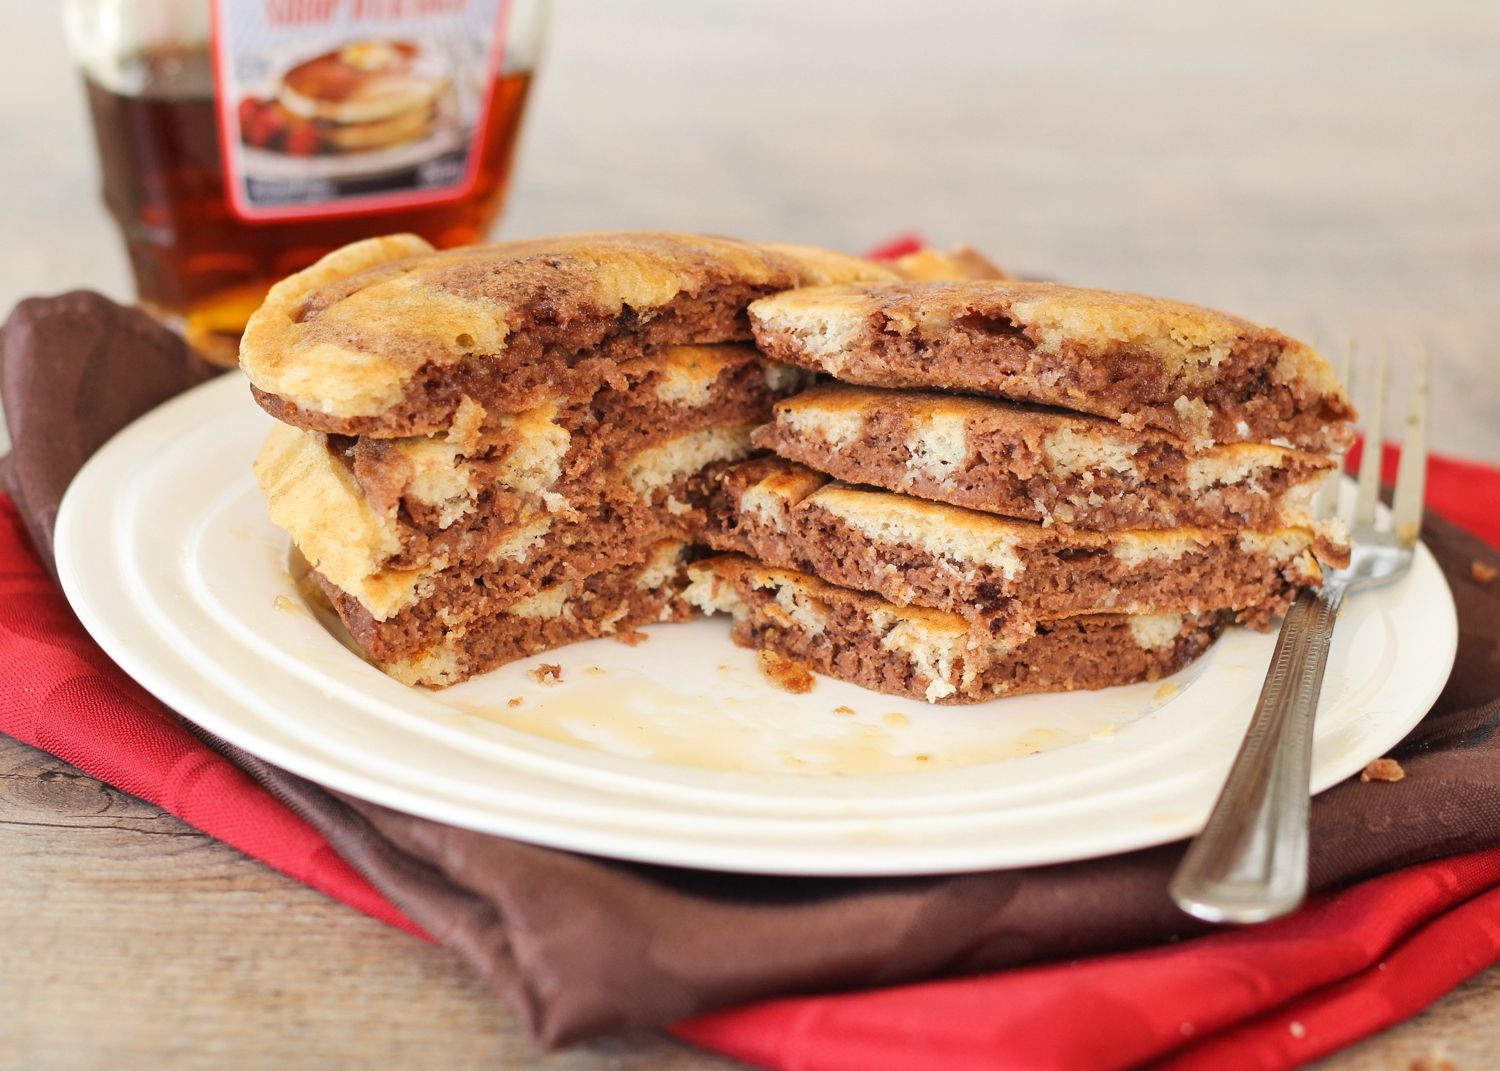
These really are no harder than regular pancakes because the chocolate and peanut butter batters are basically the same, the only difference being the addition of cocoa for the chocolate batter versus peanut butter for the peanut butter batter (duh, I know).  Because the peanut butter batter is thicker, you'll pour the chocolate into your pan first in a pancake shape, then swirl the peanut butter batter on top just using a simple ziplock bag.

The browning of the pancakes hides the swirl a little, but I still love the contrast in colours you see, and the balance of peanut butter and chocolate in the taste is absolutely perfect - I love that you can taste both equally!

Chocolate Peanut Butter Swirl Pancakes

These may just be my new favourite pancakes, and with a certain peanut butter loving fiance's birthday coming up this weekend, I think I have the perfect excuse to make them again soon!

Chocolate Peanut Butter Swirl Pancakes

Chocolate Peanut Butter Swirl Pancakes

Recipe by Once Upon a Cutting Board but peanut butter pancake batter adapted from Food.com

Makes around 10 pancakes

Ingredients:
For the Chocolate Batter:
1/4 cup all-purpose flour
1/4 cup whole wheat flour*
1 teaspoon baking powder
1/4 teaspoon salt
1 tablespoon sugar
1 tablespoon cocoa powder
1/2 large egg, lightly beaten
1/2 cup milk (I used almond milk)
1 tablespoon vegetable oil
1/2 teaspoon vanilla extract

For the Peanut Butter Batter:
1/4 cup all-purpose flour
1/4 cup whole wheat flour*
1 teaspoon baking powder
1/4 teaspoon salt
1 tablespoon sugar
1/2 large egg, lightly beaten
1/2 cup milk (I used almond milk)
1 tablespoon vegetable oil
1/2 teaspoon vanilla extract
1/4 cup smooth peanut butter

*note: feel free to replace the whole wheat flour with all-purpose flour if you don’t have whole wheat

Directions:

Prepare the chocolate and peanut butter batters separately, but notice that the batters contain almost identical ingredients (the chocolate batter has cocoa and the peanut butter batter has peanut butter), so you can prepare them side by side, making it easy. Add all your dry ingredients to two separate bowls for the separate batters and whisk the mixture together, then add the wet ingredients to each bowl and gently whisk or fold just until the wet and dry ingredients are combined. Note that for the egg, you can lightly beat one egg then divide it in two for the two batters. Transfer the peanut butter batter to a squeeze bottle or a Ziplock bag with a small corner cut off.

Heat two large non-stick skillets over low-medium heat and spray with non-stick cooking spray if needed. To make the pancakes, you’ll pour the chocolate batter into a pancake then swirl the peanut butter on top because it’s a thicker batter. Pour chocolate batter by about 1/4 cup full onto the pan, then immediately swirl peanut butter batter on top. It will look something like this:

chocolate peanut butter swirl pancakes

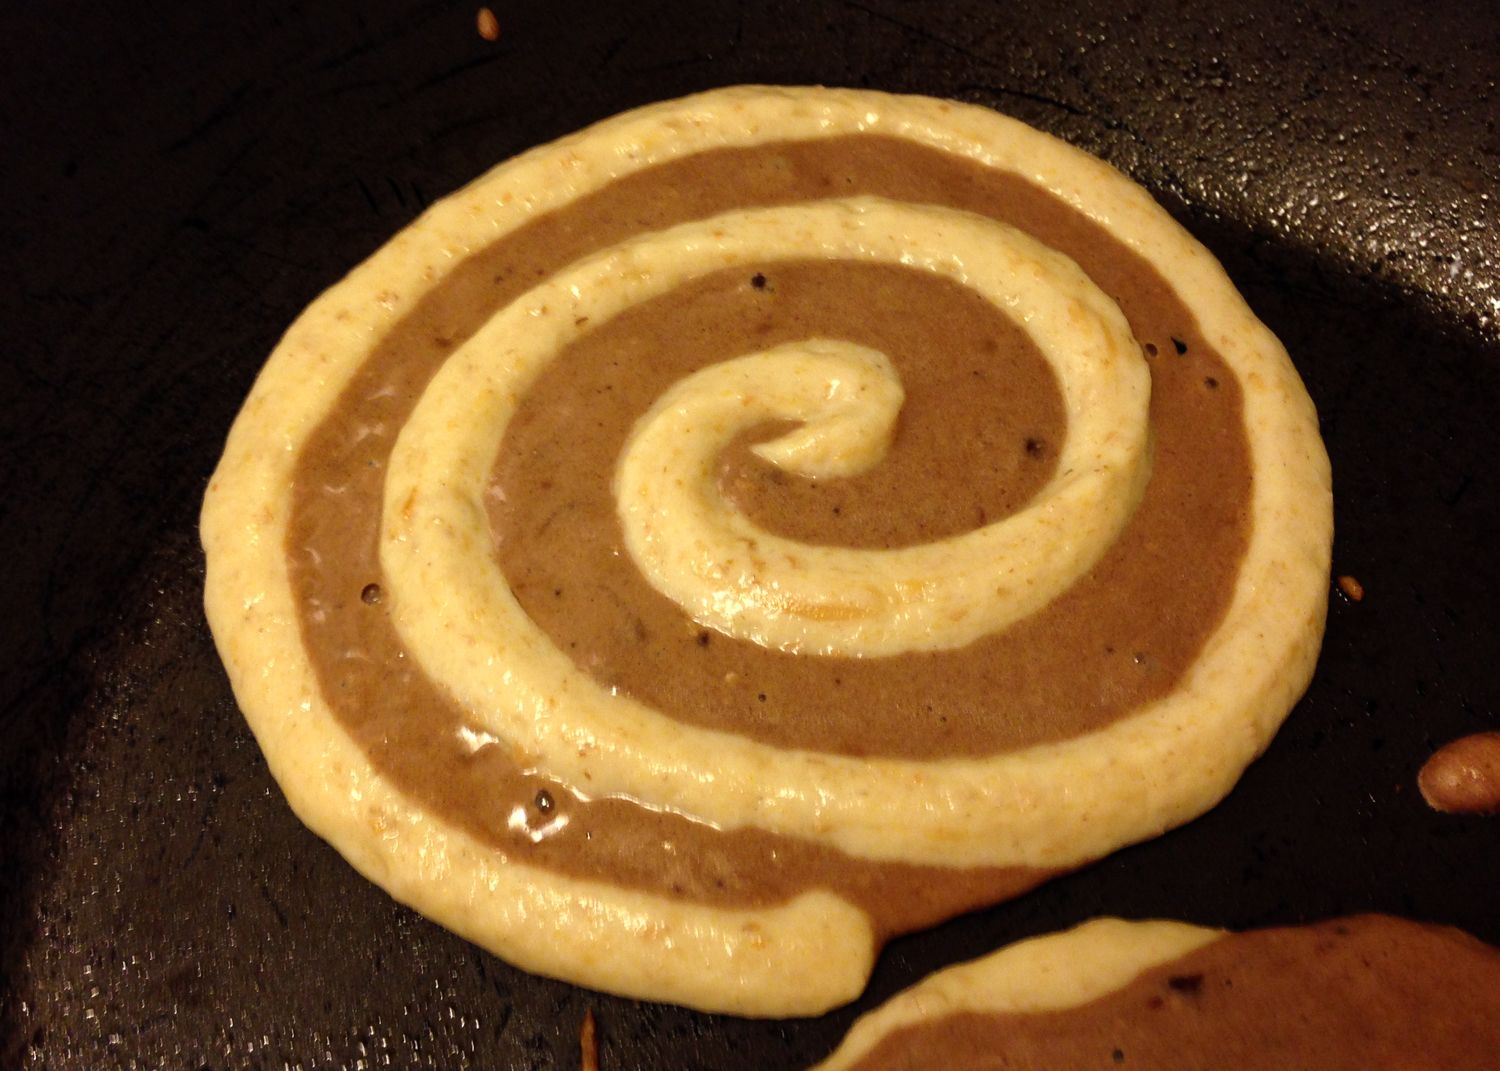
Cook for a couple minutes until bubbles form on top, then cook for one to two minutes on the other side, until cooked through. If you let the pancakes brown too much, it will hide the swirl, so you want to try to cook these over low heat, which may require a bit more time than usual. Repeat with remaining pancake batter; you will end up with more peanut butter batter leftover so just use that to make a few plain peanut butter pancakes. You can serve those in the middle of your stacks to help balance out the chocolate flavour.

Serve pancakes warm, with pure maple syrup if desired. 

April 16, 2013

Lemon Yogurt Snack Cake with Coconut Cream Cheese Frosting

Lemon Yogurt Snack Cake with Coconut Cream Cheese Frosting

The sun has finally come through shining here the past few days, but for those who are still buried in snow, and for all of those affected by the events in Boston this past week, I'm sharing this bright and light lemon yogurt cake with coconut cream cheese frosting to help spread some warm and sunny thoughts.

Lemon Yogurt Snack Cake with Coconut Cream Cheese Frosting

This is a simple snack cake made of a dense lemon yogurt cake base topped with a coconut cream cheese frosting and some toasted coconut flakes.  I tried to lighten it up a bit from the original recipe by reducing the oil and sugar, and the texture still came out great and I loved how the lemon and coconut flavours shone through and complemented each other.  This is a great spring cake to make and share with others to spread the sunshine :)

Lemon Yogurt Snack Cake with Coconut Cream Cheese Frosting


Lemon Yogurt Snack Cake with Coconut Cream Cheese Frosting

Adapted from Emily Loves Food

Makes one 9x9-inch cake, about 16-20 squares

Ingredients:

For the Cake:
1 cup plain low-fat Greek yogurt
1/3 cup vegetable oil
1/3 cup fresh lemon juice
2 teaspoons grated lemon zest
1/2 teaspoon vanilla
3/4 cup sugar
2 large eggs
2 cups all-purpose flour
1 tablespoon baking powder
1/2 teaspoon salt

For the Frosting:
8 oz cream cheese (reduced fat, if desired), at room temperature
1/4 cup unsalted butter, at room temperature
1-1/2 cups icing sugar (use 2 if you want it sweeter)
1/2 teaspoon vanilla extract (or coconut extract, if desired)
1/2 cup sweetened shredded coconut

1/2 cup sweetened shredded coconut, toasted for topping

Directions:

Preheat oven to 350°F.  Line a 9x9-inch baking pan with parchment paper on the bottom.

Mix the “wet” ingredients together with a whisk until well combined: yogurt, oil, lemon juice, lemon zest, vanilla, sugar, and eggs.  In a separate bowl, whisk together the dry ingredients: flour, baking powder, and salt.  Add the dry ingredients to the wet ingredients and stir until just combined.  Spread mixture into prepared baking pan and even out with a spatula.  Bake in preheated oven for 30-35 minutes, until a toothpick inserted in the middle comes out clean.  Remove from oven and let cake sit in pan for about 10 minutes to cool, then transfer cake to a wire rack to cool completely.

Meanwhile, prepare frosting.  Beat cream cheese and butter until smooth, about 2-3 minutes.  Add icing sugar and beat until combined.  Add vanilla and coconut and beat until just combined.  When cake has cooled, frost the top with the frosting.  It should  make a thick layer.

Toast the additional 1/2 cup of coconut in a dry skillet over medium heat until golden brown.  Sprinkle overtop frosting.

December 19, 2012

Mini Baked Peppermint Mocha Doughnuts

Mini Baked Peppermint Mocha Doughnuts

First I made cheesecake bars, then there were shortbread cookies, and now here I am with another peppermint holiday dessert, this time doughnuts! For those of you who hate peppermint, I promise this is the last one (at least for a little while)!

These go a step further than basic peppermint by adding chocolate and coffee flavours to resemble one of my favourite Starbucks’ holiday drinks, the peppermint mocha. (Although I’ve since discovered white peppermint mocha frappucinos and that is now my new favourite drink – try it!)

Mini Baked Peppermint Mocha Doughnuts

Though I don’t often make doughnuts because they’re better eaten fresh and I don’t usually have a big group of people to feed fresh doughnuts to, I do love them because they’re so cute and easy to eat, plus they’re a little better for you than their full-sized, fried counterpart.

These little guys have a coffee chocolate base covered in a peppermint white chocolate glaze with a sprinkle of crushed candy canes on top. They’re so festive looking and reminded me a lot of a peppermint mocha!

These had just the right amount of subtle coffee flavour for me, but you could add more coffee or espresso powder if you want a strong coffee taste. Or you could eliminate it and just go with a chocolate base if you don’t like coffee. Similarly, you could eliminate the peppermint extract from the icing if you’re not into minty things – I know some people who tried these weren’t really a fan and I assume it’s because they either don’t like coffee baked goods or minty baked goods or the combination of the two. If you’re not sure if you do, just leave out the coffee and peppermint and you’ll have a chocolate doughnut with a little crunch of candy cane that will be just as good!

Mini Baked Peppermint Mocha Doughnuts

In other news, my holiday preparations are in a lot better shape than the last time I wrote – all but one of my gifts I ordered online have now arrived and I’ve finished my shopping for all but two people. I’m sure people who finished their shopping in November would scoff at that, but it’s pretty good for me! I’m also done with school for the semester (though I’ll still have work to do from home over the holidays) and am looking forward to spending lots of time with my family and boyfriend and doing lots of Christmassy activities over the next week!

Mini Baked Peppermint Mocha Doughnuts

Mini Baked Peppermint Mocha Doughnuts

Idea inspired by Starbucks’ peppermint mocha; glaze recipe my own; chocolate doughnut recipe adapted from Buns in My Oven

Makes 24 mini doughnuts

Ingredients:

For the Chocolate Coffee Doughnuts:
1 cup all purpose flour
1/4 cup + 2 tablespoons sugar
1 teaspoons baking powder
1/4 cup cocoa powder
1/4 teaspoon salt
1 tablespoon instant coffee
1 large egg
1/2 cup buttermilk (or regular milk with a teaspoon of white vinegar added)
1/2 teaspoon vanilla extract
1 tablespoon vegetable oil

For the White Chocolate Peppermint Glaze:
1/4 cup white chocolate chips
1/2 cup powdered sugar
1/2 teaspoon peppermint extract - optional for peppermint flavour, but you could leave out and just use the candy canes if you like
1-2 tablespoons milk
Crushed candy canes (about 1/4 cup total)

Directions:

Preheat oven to 325°F.  Lightly spray a mini doughnut pan with non-stick cooking spray.

In a large bowl, whisk together the flour, sugar, baking powder, cocoa, salt, and instant coffee.  In a medium bowl, whisk the egg, then whisk in the buttermilk, vanilla, and vegetable oil.  Add the wet ingredients to the dry ingredients and stir with a wooden spoon or spatula until just incorporated.  Transfer mixture to a ziplock bag, snip off the corner, and squeeze the batter into the doughnut pan, only filling each mold halfway full (they will puff up when baking).  It's a lot easier to fill the molds by squeezing it out of a bag, trust me.

Bake in preheated oven for 6-8 minutes, until cooked through and the top springs back when touched.  Remove from pan and let cool on a wire rack.

Prepare icing by melting the chocolate chips in a small bowl in the microwave, then stirring in the icing sugar and peppermint extract (if using).  Add 1 tablespoon of milk, stir, and add up to 1 additional tablespoon of milk until desired consistency is reached (I used the full 2 tablespoons, which makes a thin glaze).

Once doughnuts have cooled, dip the top of each doughnut in the icing, then set back on the wire rack, which should be placed over a baking sheet or sheet or parchment paper to catch drippings.  I like to coat each doughnut twice to ensure there is enough glaze.  Only coat a few doughnuts at a time the second time, then sprinkle crushed candy cane over the top while the icing is still wet so it sticks.

These are best served immediately and eaten on the same day, but note that after about half a day, the candy canes may start to melt into the icing.

October 30, 2012

Halloween Cobweb Cookies

Halloween Cobweb Cookies

Today I have a short post to squeeze in one more Halloween recipe before the big day tomorrow!  This is a really easy recipe for cobweb shaped cookies, which I saw on Betty Crocker (the same place I found the idea for my mummy potatoes with meatballs - lots of great ideas on that site!).  All you have to do is whip up a quick batter, transfer it into a squeeze bottle, then pour it onto a skillet in a cobweb shape.  After that you bake the cookies so that they crisp up, dust them with a little powdered sugar to make the cobwebs white, and top them with a chocolate spider!

I made these really quickly this morning and in my rush I forgot to choose the prettiest cobwebs for photos, but I think it's better this way so that you get a realistic idea of what they look like!  You might also notice that my chocolate spiders look pretty much nothing like spiders - clearly working with chocolate is not my forte!

Still, these cookies were easy to make and tasted great!  They're the type of cookie you keep snacking on because they taste so light and then suddenly realize you've eaten the whole batch (especially  if you're a certain boy who liked to stack multiple cobwebs together to eat as one)!  I think they would be a fun project for kids to help out with for Halloween too!

It feels weird to me that Halloween hasn't actually happened yet since I already dressed up on Saturday (my sister and I went as citizens of the Capitol from the Hunger Games - it was such a fun costume!), but I still have some Halloween events to look forward to at school tomorrow.  Hope you all have a safe and happy Halloween!

Halloween Cobweb Cookies

Cobweb Cookies

Slightly adapted from Betty Crocker

Makes 15-20 cookies

Ingredients:

1/4 cup + 2 tablespoons all-purpose flour
1/4 cup sugar
2 tablespoons vegetable oil
2 tablespoons milk
1/4 teaspoon vanilla extract
1 large egg
Semisweet chocolate chips for the spiders (I used about 1/3 cup chocolate chips)
Powdered sugar for dusting on top of cobwebs

Directions:

Preheat oven to 325ºF.  Prepare chocolate spiders by melting chocolate chips in the microwave, transferring to a ziplock bag and snipping off a tiny amount from the corner, then piping chocolate into spider shapes on a wax paper-lined baking sheet.  Transfer to fridge to harden.

Whisk flour, sugar, oil, milk, vanilla, and egg together in a medium bowl until smooth.  Pour into a plastic squeeze bottle with a narrow opening.

Heat a large non-stick skillet over medium heat and lightly grease or spray with cooking spray.  Working quickly, squeeze batter onto pan in a cobweb shape, like so:


Let cook 30 to 60 seconds until bubbles form at the top and the bottom is golden brown.  Carefully flip with a spatula and cook for an additional 30 to 60 seconds.  Remove from pan and let cool on a wire rack.  They will feel like pancake texture at this point.

Transfer cookies to a non-stick baking sheet and bake in preheated oven for 5 to 7 minutes or until almost crisp.  Transfer to a wire rack to cool; cookies will continue to crisp up as they cool.  Once cool, dust tops with powdered sugar and attached hardened spiders to the cookies with a dollop of melted chocolate.


October 09, 2012

Chicken & Cheesy Rice with Broccoli and Sundried Tomatoes

Chicken and Cheesy Rice with Broccoli & Sundried Tomatoes

I hope all my Canadian readers out there had a great Thanksgiving weekend!

I enjoyed a fabulous Thanksgiving meal with my family - everyone pitched in with favourite classics like turkey and stuffing along with some new dishes like a spicy root vegetable curry.  We had four different types of dips as an appetizer; turkey with homemade gravy, stuffing, cranberry sauce, scalloped potatoes, blue cheese and walnut salad, and the curry as our main meal; followed by pumpkin pie and a pumpkin cheesecake ice cream pie for dessert!  I also contributed this apple and pear sparkling sangria and sweet potato honey dinner rolls.  I was stuffed by the end of the night but had such a great evening spending time with my family, and I still enjoyed plenty of leftovers the next day!

Chicken and Cheesy Rice with Broccoli & Sundried Tomatoes

Now it's time to get back into regular weekday meals - and there's certainly nothing wrong with that, especially when it's something like this chicken with cheesy rice, broccoli, and sundried tomatoes!

This dish doesn't use too many ingredients, doesn't dirty many dishes, is reasonably healthy, and you might even have most of the ingredients in your house already.  And of course, it's ridiculously good and so comforting!

As much as I love Thanksgiving dinner, I don't think I could handle more than two nights of it in a row; this, however, I could eat every night and still love just as much!

(Please ignore my horrendous slicing of the chicken in these pictures - the light was quickly fading outside so I was in a hurry to finish it so I could go take pictures!)

Chicken and Cheesy Rice with Broccoli & Sundried Tomatoes

Chicken and Cheesy Rice with Broccoli and Sundried Tomatoes

Adapted from Heat Oven to 350, Originally from Cooks Illustrated Best 30-Minute Meals

Serves 2-3

Ingredients:

2 boneless, skinless chicken breasts
Salt and pepper
2 teaspoons vegetable oil
1/2 large head of broccoli, chopped into florets
2 oz (about 1/2 cup loosely packed) sundried tomatoes, not packed in oil (from a bag)
3/4 cup instant enriched white rice (feel free to use brown rice if you prefer)
3/4 cup low-sodium, fat-free chicken broth
1/2 cup shredded cheddar cheese

Directions:

Trim any fat off the chicken breasts and season with salt and pepper.  Heat oil in a large nonstick skillet over medium-high heat.  Brown chicken well on one side, about 4-5 minutes, then transfer to a plate.

Meanwhile, bring water to a boil in a medium or large saucepan.  Add the broccoli florets and sundried tomatoes and blanch for 2 minutes.  Rinse with cold water and drain.  Chop sundried tomatoes into quarters, depending on the size.

After browning chicken, add rice and chicken broth to the skillet.  Nestle chicken into the rice with the browned side facing up.  Cover and cook over medium-low heat until liquid is absorbed, rice is cooked, and chicken is cooked through (thickest part of chicken registers 160 degrees), about 8-10 minutes.

Transfer chicken to a clean surface and slice into thin pieces.  Add the broccoli, sundried tomatoes, and cheddar into the rice mixture and mix until cheese is melted.  Season with salt and pepper to taste.  Divide rice mixture among plates and top with the sliced chicken.  Serve immediately.

September 12, 2012

Earl Grey Vanilla Tea Cake

Earl Grey Vanilla Tea Cake

On Monday I got hit with a cold at full force ... I don't want to complain too much because I know a cold is to be expected around this germy time of back-to-school, but normally I get a few days of warning signs first.  You know that little tickle in your throat that tells you a cold is on its way and you'd better start taking vitamins like crazy to try to lessen its blow?  This one came with no warning signs, just the whole works right from the start - sore throat, runny nose, sinus congestion, fluctuating body temperature, I'm sure you all know the drill!

It doesn't help that I have a crazy amount of work to get done this week, which is hard when I'm so tired because my stuffy nose just does not want me to get any sleep!  So, in my efforts to rid myself of this cold as quickly as it came on, I have been taking lots of vitamins, eating lots of fruits and veggies, and drinking a TON of tea!

Earl Grey Vanilla Tea Cake

And what goes better with a cup of tea than a delightful tea cake!  

This healthy-ish and not-too-sweet loaf contains the actual contents of three bags of earl grey tea, steeped in a bit of milk, along with some warm spices and vanilla so the smell and taste of the end product really remind you of earl grey tea.  I've been snacking on this with every cup of tea (which is probably not a good thing considering how much tea I've been drinking), and it's especially good warmed up or toasted.  You could probably even change up the tea and spices to any flavour you like - a chai bread would be really nice too!

Even if all my tea drinking doesn't chase away this cold, at least it's given me an excuse to eat lots of tea cake :)

Earl Grey Vanilla Tea Cake

Earl Grey Vanilla Tea Loaf


Makes one 8x4 inch loaf

Note: This loaf has a light and delicate crumb, much more like a cake than more dense and moist banana bread-like loaves.  If you want to add to the subtle citrus notes of the Earl Grey tea, you can add a splash of lemon juice to the loaf.

Ingredients:

3 bags earl grey vanilla tea
1/4 cup milk
1 cup all-purpose flour
1 cup whole wheat pastry flour
2 teaspoons baking powder
1/2 teaspoon kosher salt
1/4 teaspoon cardamom
1/4 teaspoon nutmeg
1/2 teaspoon cinnamon
1/4 cup vegetable oil
3/4 cup sugar
2/3 cup plain yogurt
2 large eggs
1-1/2 teaspoons vanilla

Directions:

Preheat oven to 350°F.  Line the bottom of an 8-1/2 by 4-1/2 inch loaf pan with parchment paper and spray with non-stick cooking spray. 

Add the milk to a small saucepan and empty the contents of the tea bags (snip off the tops first) into the pan.  Heat over low heat, stirring occasionally, until the milk is warm and tea begins to steep.  Turn off heat and set aside.

In a large bowl, whisk together the flours, baking powder, salt, cardamom, nutmeg, and cinnamon.  In a medium bowl, combine the oil, sugar, yogurt, eggs, and vanilla.  Stir the milk and tea mixture into the wet ingredients.  Pour the wet ingredients into the dry mixture and fold together with a flexible spatula until just combined (do not overmix). 

Pour the batter into the prepared pan and bake in preheated oven for 40-50 minutes or until a tester inserted in the middle comes out clean (mine was just slightly overdone at 45 minutes so you might want to check on it at 40 minutes first, though the exact time will depend on your oven).  Cool completely on a wire rack before slicing.

Ingredient Index

Related Posts Plugin for WordPress, Blogger...