Showing posts with label peanuts. Show all posts

October 16, 2012

Sweet Potato Peanut Bisque

Sweet Potato Peanut Bisque

My twin sister recently returned from a trip to Kenya, and of all the delicious food she tried and described to me, some familiar and some completely new, the one that stuck with me the most was peanut soup.  Maybe it's just because it's been getting colder here, but ever since she mentioned peanut soup I haven't stopped craving it!

One of the first recipes I came across in my search for peanut soup was this sweet potato peanut bisque from Eating Well.  Not only is it inspired by (West) African cuisine, but I also loved that it included sweet potatoes, which Gen had talked about during her trip, as apparently the sweet potatoes in Africa are much better than here!

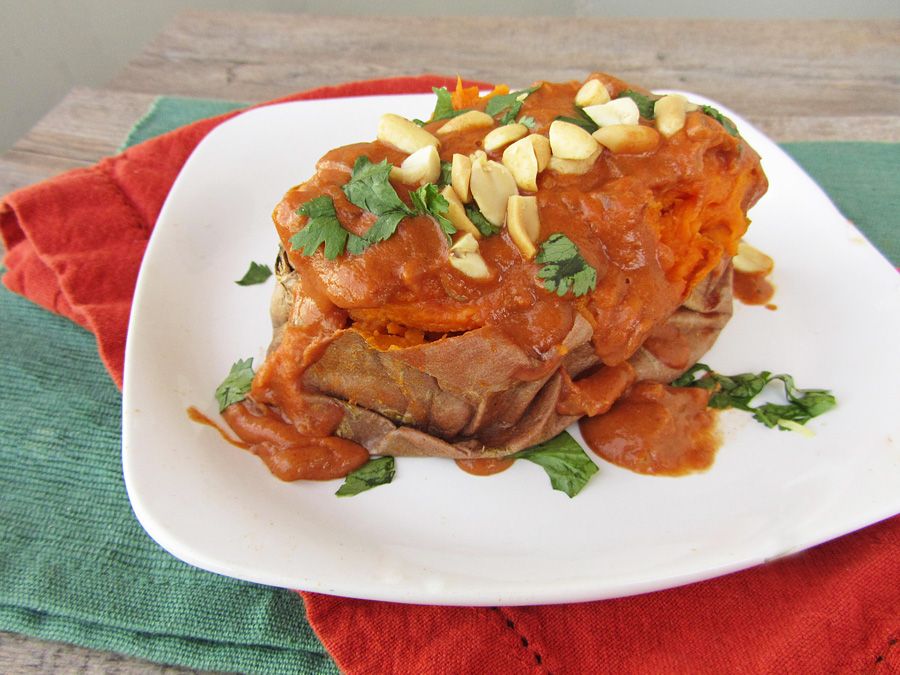
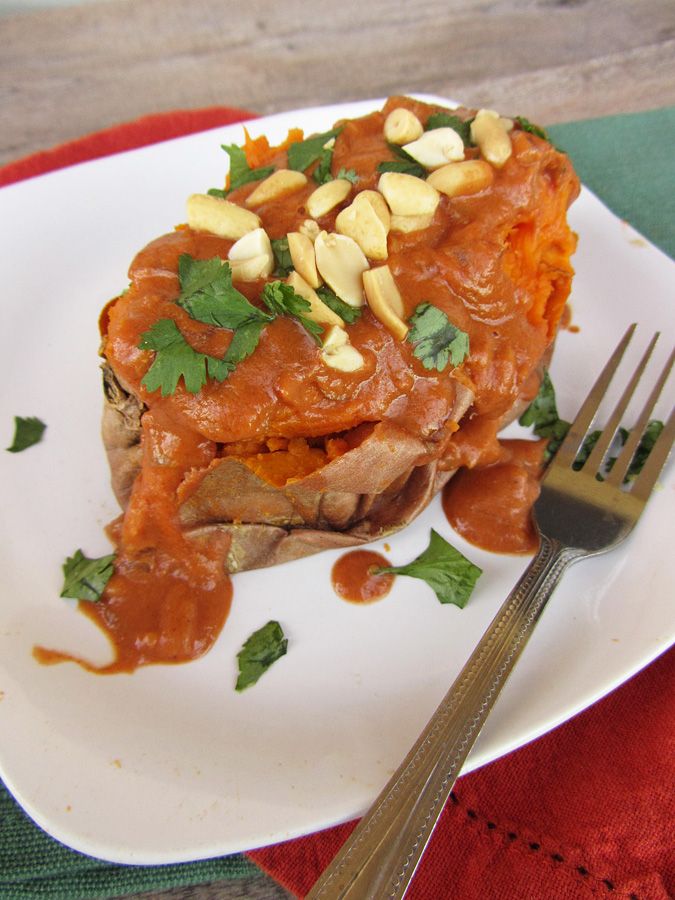
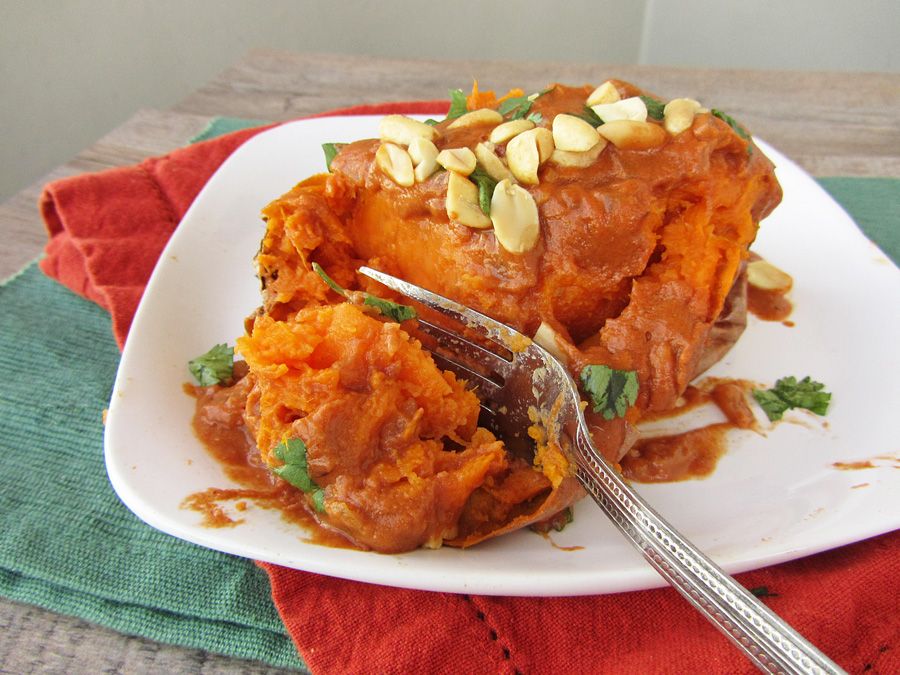
I knew I'd love the recipe because I've already paired sweet potatoes and peanut butter together in two other African inspired recipes that I love: sweet potato and peanut stew and sweet potatoes with West African style peanut sauce.  If you're hesitant about the combination of sweet potatoes, tomatoes, and peanut butter, don't be!  It works!

Sweet Potato Peanut Bisque

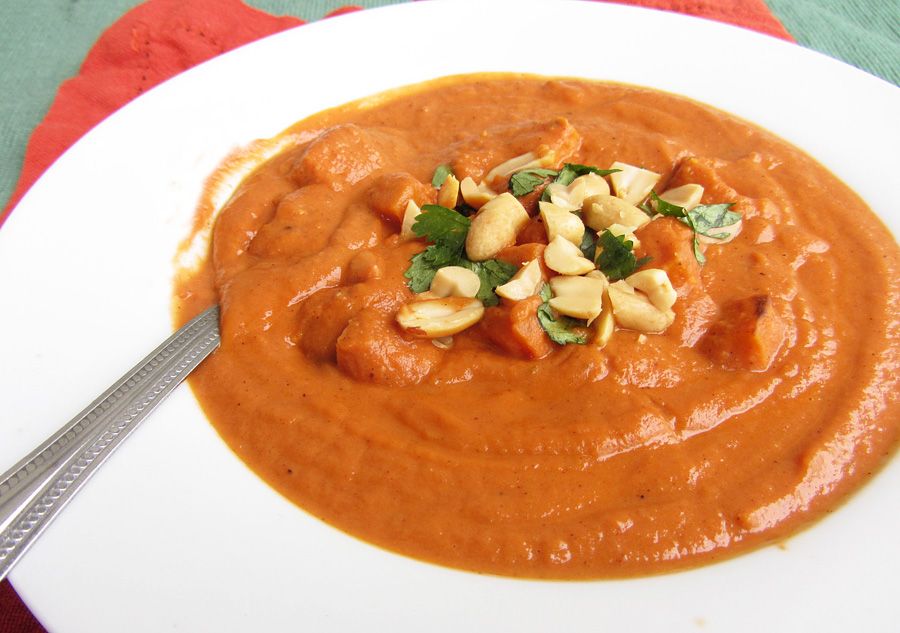
I absolutely loved this soup and it satisfied my craving for something warm and comforting perfectly!  The flavours all worked so well together and the bisque was so thick and creamy while still being healthy.  The addition of the green chile made this really spicy, which I liked, but you can definitely cut down the amount of chiles for less spice, or use a dash of cayenne at the end to more easily control the amount of spice you add.

While this soup is (supposed to be) more reflective of West African cuisine, if you'd like to read about the food my sister enjoyed in Kenya (in East Africa), along with some cute safari animal pictures, you should check out her blog post about it!

Sweet Potato Peanut Bisque

Sweet Potato Peanut Bisque

Adapted from Eating Well

Serves 2-3

Ingredients:

1 large sweet potato (around 12 ounces), peeled and chopped into bite-sized pieces
2 tablespoons olive oil
Pinch of cinnamon
Salt and pepper
1 small yellow onion, diced
1 clove garlic, minced
1 teaspoon minced fresh ginger
1/2 to 1 small green chile, minced (use half a chile for less spice, I used a whole green chile and the soup was quite spicy)
1/2 teaspoon allspice (I used 1/4 teaspoon cinnamon + 1/8 teaspoon nutmeg + 1/8 teaspoon cloves)
1-1/2 cups strained crushed tomatoes (or just crushed tomatoes if you can’t find strained)
1 cup chicken or vegetable stock
1/4 cup smooth peanut butter
Chopped cilantro and peanuts for garnish

Directions:

Preheat oven to 450°F.  Toss chopped sweet potato with 1 tablespoon olive oil, cinnamon, and season with salt and pepper.  Spread on a foil-lined baking sheet and roast in preheated oven for 20-30 minutes, until tender.

Meanwhile, heat remaining tablespoon of oil in a large saucepan over medium-high heat.  Add onions and sauté until softened and beginning to brown, stirring often, about 4-5 minutes.  Add garlic, ginger, chiles, and allspice, and cook, stirring, for another 30 seconds to 1 minute.  Stir in crushed tomatoes, reduce heat to simmer, and let simmer gently for 10 minutes.

Add vegetable stock and peanut butter to the tomato sauce.  Transfer half the sauce along with half of the roasted sweet potatoes to a blender and puree until smooth (you don't want to fill the blender too high with hot liquid so blend it in two batches).  Puree the remaining half the sauce, then pour all the puree back into the saucepan to heat.  Add the remaining half of the sweet potatoes to the soup and cook over low heat until heated through.  Season to taste with salt and pepper.  Serve and garnish with chopped cilantro and peanuts.

September 28, 2012

Baked Sweet Potatoes with West African-Style Peanut Sauce

Sweet Potatoes with West African-Style Peanut Sauce

My twin sister Genevieve (from Vanilla & Spice) is in Kenya right now and I'm super jealous, so I thought I'd make myself an African-style meal to pretend that I'm also over there.  It didn't quite work (the pretending I'm in Africa part), but the meal did turn out to be delicious!

This is a simple, filling, and comforting dish made by baking a sweet potato and smothering it in a thick, creamy tomato-peanut sauce.  I know Kenya isn't in West Africa, and honestly I don't even know if this is a true West-African dish anyway, but Cooking Light says it is, so I'm going with it!

Sweet Potatoes with West African-Style Peanut Sauce

You might think it's weird to pair sweet potatoes and peanut butter together, but trust me, it works!  This actually reminded me of a lot of the African sweet potato and peanut stew that I love so much, except that the sweet potato is more the star of this dish.

If you're not convinced, the sauce pairs well with veggies too.  I served some of my extra sauce with steamed broccoli for a light lunch, and really enjoyed it!

Broccoli with West African-Style Peanut Sauce

Cooking Light suggests pairing a sweet potato with chicken, but I was really full from the sweet potato alone.  This may be because I doubled the amount of sauce called for, and the sauce is pretty filling, but I thought it was necessary to double it to make sure there was enough for every  bite of sweet potato.  I think pairing one of these smothered potatoes with a side of salad makes for a satisfying vegetarian meal, but go ahead and add a protein if you like too, I do think the sauce would work well with chicken!

This may or may not be a completely authentic African meal, but it's still something a little different than what I'm used to, and is a great autumn dish!

Sweet Potatoes with West African-Style Peanut Sauce

Baked Sweet Potatoes with West African-Style Peanut Sauce

Adapted from Cooking Light

Serves 2

Ingredients:

2 medium sweet potatoes
1 teaspoon olive oil
1/2 a small onion, finely diced
1 garlic clove, minced
2 teaspoons grated or minced fresh ginger
1 teaspoon cumin
1 teaspoon ground coriander
Dash of cayenne
1/2 cup water
1/2 cup crushed tomatoes (tomato sauce)
3 tablespoons smooth peanut butter
1/2 teaspoon lemon juice
1 teaspoon sugar
1/4 teaspoon salt
2 tablespoons chopped cilantro
2 tablespoons chopped peanuts (optional)

Directions:

Preheat oven to 400°F.  Pierce sweet potatoes with a fork all over, and bake directly on the middle oven rack for 45 minutes or until tender.

Heat oil in a medium saucepan over medium heat.  Add onion, ginger, and garlic, and cook for about 3 minutes, stirring often.  Add cumin, coriander, and cayenne, and cook for another minute.  Add water, tomato sauce, peanut butter, lemon juice, sugar, and salt.  Stir or whisk until smooth, bring to a simmer, and cook for 2-3 minutes, until slightly thickened.  Remove from heat.

Split potatoes lengthwise (not cutting all the way through), and squeeze the sides of the potato (with oven mitts on) so the filling fluffs out, if desired.  Spoon sauce over potatoes and sprinkle with peanuts and cilantro.  If you want to make sure sauce covers more of the sweet potato, cut the sweet potato up before adding the sauce.

April 13, 2012

Mandarin Chicken Salad

Mandarin chicken salad

I’ve been fortunate enough to travel to Asia a few times now, and while I love experiencing the incredible and diverse food Asia has to offer, one of the things I always find myself missing is a fresh, crisp salad. A lot of vegetables over there are cooked, and sometimes you can’t trust the fresh ones because they may have been washed in tap water. Towards the end of my trips, I actually start dreaming about raw vegetables and would give up all the amazing food there just to have one bowl of refreshing salad!

So the first thing I did when I got home from my most recent trip was to make myself a giant bowl of salad! I wanted to make something with Asian ingredients though, and realized it was the perfect time to try a salad recipe I’d had bookmarked for a year but kept forgetting to make: this mandarin chicken salad from Munchin with Munchkin. While it looked like a lot of ingredients to buy, I actually had all the ingredients for the dressing already, and I didn't mind buying the vegetables because I knew I'd eat whatever was leftover as a snack, so it was money well spent!

I changed quite a few little things with the recipe in order to suit my tastes (and based on what ingredients I had on hand), so be sure to check out the original recipe too so that you can also adjust the ingredients to your tastes! You should also check out the rest of Kris’ amazing blog while you’re there – it was just voted the Best Recipe Blog in The Kitchn’s Homies awards!
This salad was so fresh and flavorful and exactly what I was craving after my trip. I loved how the sweet mandarins were balanced by all the crunchy vegetables, and the sweet and sour vinaigrette gave it the Asian flavour I was still desiring. I have a feeling I’ll be craving this salad a lot more now that I know how much I love it!

Mandarin chicken salad
Mandarin Chicken Salad

Adapted from Munchin with Munchkin

Serves 2

Ingredients:

For the Dressing:
1 tablespoon rice vinegar
1 tablespoon fresh lime juice

1/4 teaspoon chili garlic sauce (optional for a bit of spice)
1 tablespoon sesame oil
1 teaspoon soy sauce
1 tablespoon dark brown sugar
1 garlic clove, minced
1/2 teaspoon sweet Thai chili sauce 
Dash of salt

For the Salad:
1 boneless, skinless chicken breast, cooked and shredded into small pieces (I cooked mine in sesame oil)
2 cups lettuce
1/2 red bell pepper, cut into thin strips
1 medium carrot, cut into matchsticks
1/4 cup snow peas
1/4 cup shelled edamame, cooked as per package directions
2-3 mandarins, segmented
2 tablespoons ground peanuts (ground in a food processor)
2 tablespoons sesame seeds

Directions:

In a small bowl, whisk together all ingredients for the dressing. Taste and adjust any amounts to your liking. Set aside.

In a large bowl, combine salad ingredients, toss with dressing, and divide salad between two plates/bowls, with the peanuts and sesame seeds sprinkled on top.

Notes:
- Next time I might eliminate the carrots and snow peas and increase the mandarins. Choose ingredients and amounts to your own taste!
- Optional additional toppings may include green onions, cilantro, and chow mein noodles

September 23, 2011

Peanut Butter Granola

peanut butter granola
After the oh-so-delicious but not-so-healthy raspberry cheesecake crepes I shared earlier this week, I thought I’d better even things out with a healthy (but still delicious!) breakfast recipe today.
I’d never tried making my own granola because there are so many tasty varieties you can just buy at the store. Also, I usually have a pretty good supply at home to use up because I stock up on Archer Farms granola at Target whenever I go to the States (if you haven’t tried Pecan Sticky Bun or Chocolate Chunk Hazelnut Biscotti, you’re missing out!) But one of the flavours I find to be missing from store-bought varieties is peanut butter, so when Ryan (a peanut butter lover) was coming up for a visit recently, I decided to surprise him with a healthy breakfast for a change.

I made this peanut butter granola the night before and had to try very hard to stop myself from eating it all that night – it’s soo good! The peanut butter flavour is definitely there, but isn’t too overwhelming. It smells absolutely amazing while it’s baking and tastes so good eaten warm out of the oven. But I managed to restrain myself and transferred (most of) it to an airtight container to have for breakfast the next morning, and several mornings after that (it kept well for a week, but I haven’t tested it any longer than that so I’m not sure how long it stays fresh in total).

We loved this granola as is, but you could also customize it with other mix-ins like raisins or cranberries, or add some mashed bananas to make it an “Elvis granola” like this one from Healthy Exposures (my sister has tried that recipe and loved it).

There are also lots of options for serving it. It’s delicious as a snack on its own, or in a bowl with some vanilla yogurt. I fancied it up a bit for Ryan and I by serving it in a breakfast parfait with vanilla honey Greek yogurt and peanut butter – see Chocolate & Carrots for an idea of what this looks like. I also sent some granola home with Ryan and he said he ate it with even more peanut butter mixed in, but I’d probably only recommend that for extreme peanut butter lovers!

Now that I know how easy it is to make your own granola, I can’t wait to try other flavours that you can’t buy in the store – pumpkin granola is next on my list!

peanut butter granola
Peanut Butter Granola

Adapted from Jif (as seen on All Recipes)

Ingredients:
1/3 cup creamy peanut butter
1/4 cup honey
1/2 teaspoon ground cinnamon
1/2 teaspoon vanilla
2 cups uncooked rolled oats
1/3 cup unsalted roasted peanuts

Directions:

Preheat oven to 300°F. Combine peanut butter and honey in a microwave-safe bowl and heat for about 30 seconds, until peanut butter melts. Stir the mixture until smooth, then mix in the cinnamon and vanilla.

Spray a large non-stick baking sheet with cooking spray, or line with parchment paper for easier clean-up after. Spread oats over the baking sheet and pour peanut butter mixture over top. Stir together until oats are evenly coated, and spread them out in an even layer. Leave some chunks of oats stuck together if you want chunky granola. Alternately, you could mix the oats with the peanut butter mixture in a large bowl before spreading on the cookie sheet – I just didn’t want to dirty an extra dish!

Bake for about 20-30 minutes, stirring at least every 10 minutes to make sure oats are evenly cooked, until granola is slightly browned. Remove from oven and mix in the peanuts. Let cool and store in an air-tight container.

September 16, 2011

Kiwi Mango Fresh Rolls with Lime Dipping Sauce

kiwi mango summer rolls

Starting this blog has encouraged me to try new things in the kitchen that I may never have challenged myself to do otherwise, like making a savoury crepe dish and shaped yeast bread, and using familiar ingredients in new ways, like asparagus ribbons and frozen banana ice cream. The best part about trying new things is that I realize how easy recipes that have always intimidated me actually are.

These fresh rolls are a perfect example of something I’ve always wanted to make but have been too scared to actually try. The idea of trying to make the filling myself and then somehow wrap it up in rice paper seemed like something only professionals could do, but it turns out they’re not only easy to make, but fun too! You just have to make sure you don’t put too much filling in a roll, then roll it up tightly around the filling. And be careful with the wrappers because they get quite sticky, so if you accidentally fold it in a way you don’t like, it might be hard to undo!

The hardest part about them was actually finding the rice paper rolls in the grocery store (I ended up finding them in the international aisle) so if you’re unsure what to look for, here’s a picture of what I used to give you an idea:

kiwi mango summer rolls

For my first fresh roll attempt I chose a recipe for kiwi summer rolls from Eating Well, but decided to throw some mango in there too, since it complements the other flavours in the roll really well. These didn’t take very long to make and turned out so pretty! They were also really tasty and so different from anything I’d usually eat. All the flavours – lime, honey, mango, kiwi, mint, and a hint of chili pepper - worked well together, creating the perfect combination of sweet and spicy. The rolls really absorb the lime dipping sauce which I loved, so I definitely wouldn’t recommend leaving the sauce out!

These would be a great appetizer to bring to a party if you want to impress your friends! You can customize the recipe below to your tastes (I should note that if you don’t like spicy food you might want to omit the red pepper flakes in both the rolls and the sauce) or create your own flavour combination – have fun!

kiwi mango summer rolls

Kiwi Mango Fresh Rolls with Lime Dipping Sauce

Adapted from Eating Well

Makes 8 rolls

Ingredients:

1 1/2 ounces thin rice noodles (vermicelli)
1/4 cup fresh mint leaves, chopped
1/4 teaspoon red pepper flakes, divided
1/4 cup honey, divided
2 tablespoons fresh lime juice
8 round rice-paper wrappers (8-inch)
4 kiwifruit peeled, sliced in half lengthwise, then thinly sliced crosswise
1 mango, julienned
1/3 cup peanuts, coarsely chopped

Directions:

Cook the rice noodles according to package directions (mine only required boiling them for 1 minute). Drain and rinse under cool water, and pat dry with paper towels. Transfer to a medium bowl and toss with the chopped mint, 1/8 teaspoon red pepper flakes, and 1 tablespoon of honey.

To make the dipping sauce, whisk together the remaining 3 tablespoons honey, lime juice, 1/8 teaspoon red pepper flakes, and 1 tablespoon water in a small bowl.

For each roll, soak a rice paper wrapper in a bowl of warm water until softened, according to package directions (10-30 seconds). Transfer to a work surface or clean tea towel. In the centre of the right half of a wrapper, lay 1/8 of the noodle mixture, 1/8 of the kiwi, 1/8 of the mango, and 1/8 of the peanuts. Fold the top and bottom of wrapper over filling. Wrap the right end of the wrapper tightly over filling, then roll tightly toward the left to enclose filling. Cover with a damp tea towel until ready to serve. Repeat with remaining wrappers.

Cut each roll in half on the diagonal (if desired) and serve with dipping sauce.

August 04, 2011

Frozen Peanut Butter Pie

frozen peanut butter pie
Before I tell you about this incredible pie, let me “introduce” my boyfriend Ryan. A lot of food bloggers have cute nicknames for their significant others. I’m not sure if this is to protect their identity, to help readers identify them easily, or just for fun. Either way, I thought I’d give Ryan a chance to choose a nickname for himself in case he had any qualms about me using his real name on this blog. He decided that he wanted to be called Tiger Claw. I decided to stick with Ryan.

The only thing you need to know about Ryan is that he is o.b.s.e.s.s.e.d. with peanut butter. He eats it on toast every single morning, but goes absolutely crazy for chocolate peanut butter desserts. I’m bringing this up for two reasons. First is to warn you that you might see a lot of peanut butter recipes on this blog. Gotta keep my #1 fan happy! Second is because it brings me to this recipe.


When I mentioned in passing that I’d seen a good looking peanut butter pie on another blog, Ryan was already sold. I knew there was no chance I would get out of making it once the idea was planted in his head. Fortunately, it sounded pretty easy and I didn’t have to buy many ingredients for it. Unfortunately, the recipe called for whipping cream, and I did not have access to an electric mixer at Ryan’s nor did I trust my puny arms to do it the old fashioned way.

So I had to make a couple changes to the recipe by using Cool Whip instead. I know a lot of people are against using this type of product (if you’ve ever looked at the list of ingredients in Cool Whip you’ll know why). I chose to push my knowledge of the ingredients out of my mind temporarily, and convinced myself that this had a lot less fat in it than whipping cream, so combined with my choice to use reduced fat cream cheese, I was doing myself a favour. Plus, it saved me time, and the results were still amazing!

If you are a peanut butter lover, or love a peanut butter lover, you have to make this pie. It’s creamy, rich, and because it stays in the freezer, it makes a perfect treat to cool you down in the summer heat. I added some nuts to the topping to give it a bit of crunch, but you could leave these off if you want and just drizzle chocolate on top instead. The oreo crust is a little hard to cut through with your fork after being in the freezer, but this is where you can use those muscles you saved earlier by not whipping the cream!


Frozen Peanut Butter Pie

Adapted from Tracey’s Culinary Adventures, originally from Martha Stewart’s Pies & Tarts

Makes 1 9-inch pie

Ingredients:

Crust
1 3/4 cups oreo crumbs (about 22 cookies)
6 tablespoons unsalted butter, melted
pinch of salt

Filling
6 oz cream cheese, at room temperature
1/2 cup icing sugar
1 teaspoon salt
1 1/4 cups smooth peanut butter (not natural or chunky)
1 teaspoon vanilla extract
4 cups (1 container) frozen whipped topping, thawed in the refrigerator

Topping
2 tablespoons peanuts, chopped
2 tablespoons pecans, chopped
2 tablespoons walnuts, chopped
2 ounces semisweet chocolate

Directions:

For the crust:

Preheat the oven to 350°F. Crush the oreo cookies into fine crumbs using a food processor or blender. Add the melted butter and stir with a fork until all the crumbs are moistened (the mixture will be quite wet). Press into the bottom and up the sides of a 9-inch pie pan. Refrigerate about 15 minutes so the crust is firm, then bake until set, about 10 minutes. Transfer to a wire rack to cool completely.

For the filling:

Use an electric mixer to beat the cream cheese, icing sugar, and salt on medium speed until light and fluffy, about 2 minutes. Beat in the peanut butter and vanilla. Use a rubber spatula to gently fold in the cool whip in two batches.

Transfer the filling to the cooled crust and spread in an even layer. Freeze uncovered for at least 4 hours, or up to 1 day covered in plastic wrap.

*Note – You’ll likely have some leftover filling, but if you have any peanut butter lovers in the house, I’m sure it won’t be hard to get rid of!

For the topping:

Sprinkle the chopped nuts over the surface of the pie.

Put the chocolate in a microwave-safe bowl and heat in 30 second bursts at 50% power, stirring between bursts, until chocolate is melted and smooth. Transfer to a ziplock bag and snip a tiny bit off the corner. Hold the bag over the pie and drizzle the melted chocolate in a zig zag pattern.

Remove the pie from the freezer about 10-15 minutes before you are ready to serve. If you have trouble cutting it, running your knife under warm water will help.

I'm currently at the airport waiting to board my flight up North for a week's vacation! I've scheduled for a delicious dinner recipe to be posted while I'm away, but unfortunately I couldn't find the time to get any other posts ready before I left. I promise I'll make up for it with lots of recipes when I get back!

Ingredient Index

Related Posts Plugin for WordPress, Blogger...