Showing posts with label white wine. Show all posts

January 22, 2014

Caramelized Onion and Potato Soup

Caramelized Onion and Potato Soup

And just when we thought the worst of the cold weather was over, it came back this week to give us a reminder of why summer is so great!

I'd almost forgotten already what it feels like when your nostrils start to freeze up as soon as you step outside and your lungs hurt when you breathe in the cold air.  Needless to say, I'll be spending as much time indoors as possible this week and enjoying lots of hot chocolate and soup!

Caramelized Onion and Potato Soup

I've actually been making a lot more soup than normal lately, not just because of the weather but because I received an immersion blender for Christmas that I've loved trying out!  It makes pureeing soups so much easier than transferring it in batches to a blender, and more importantly it means a lot less dishes to clean up after, which is probably my favourite thing about it.

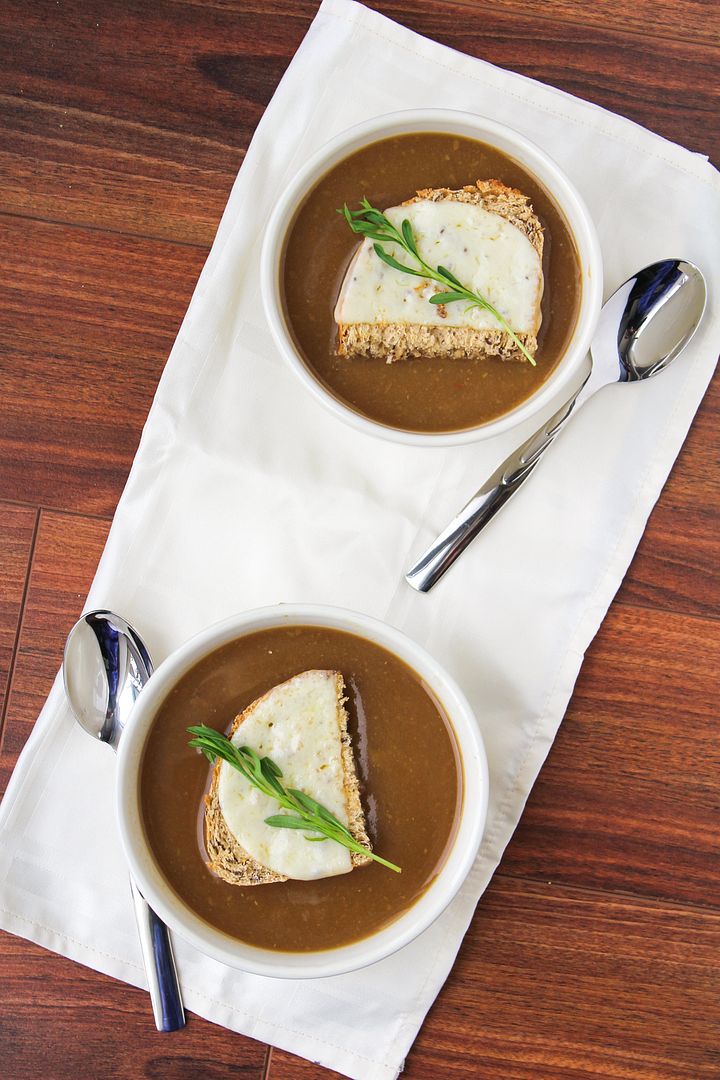
I have my eye on so many soup recipes I want to try now, but onion soup has stood out as the most comforting option lately, and it was an excellent choice!

Caramelized Onion and Potato Soup

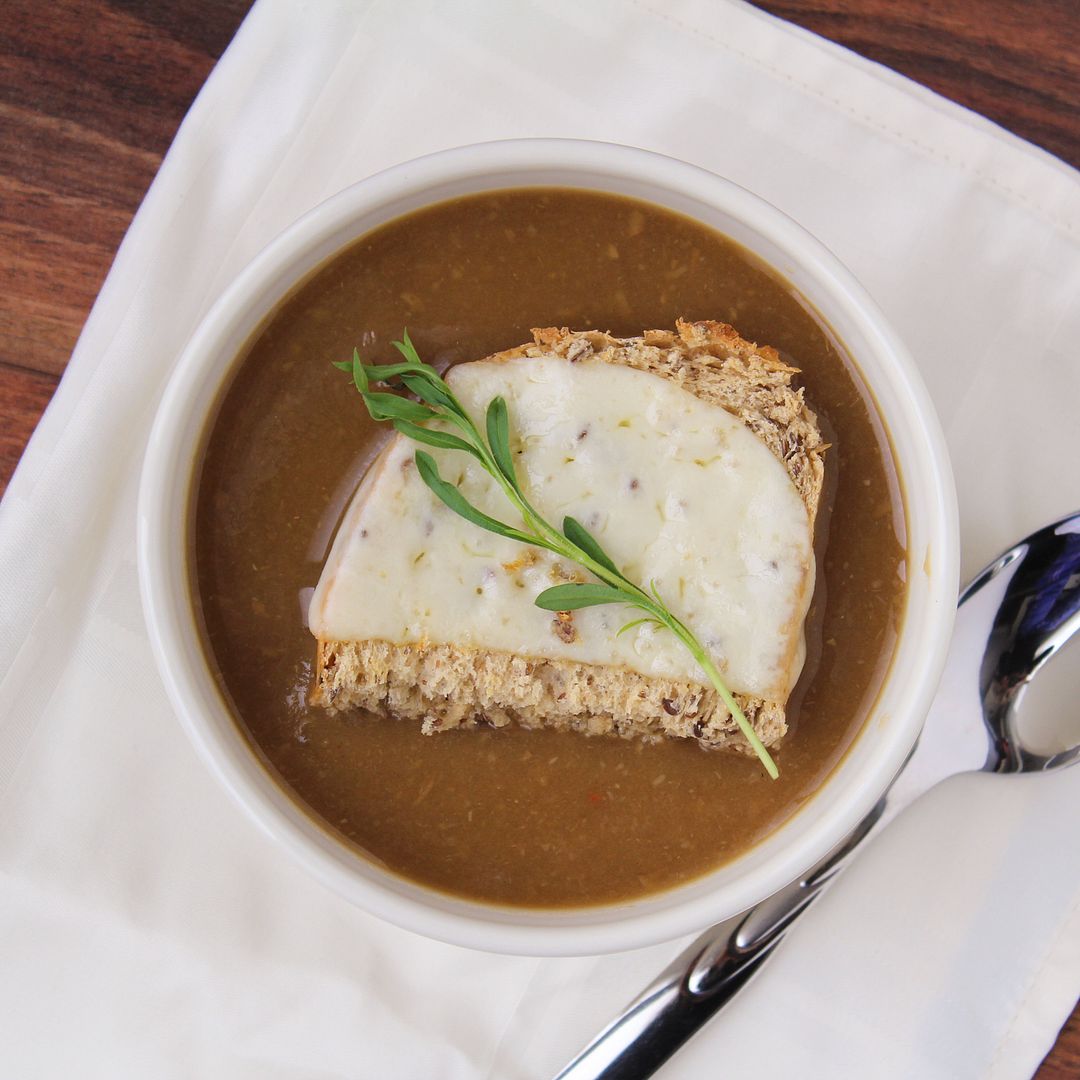
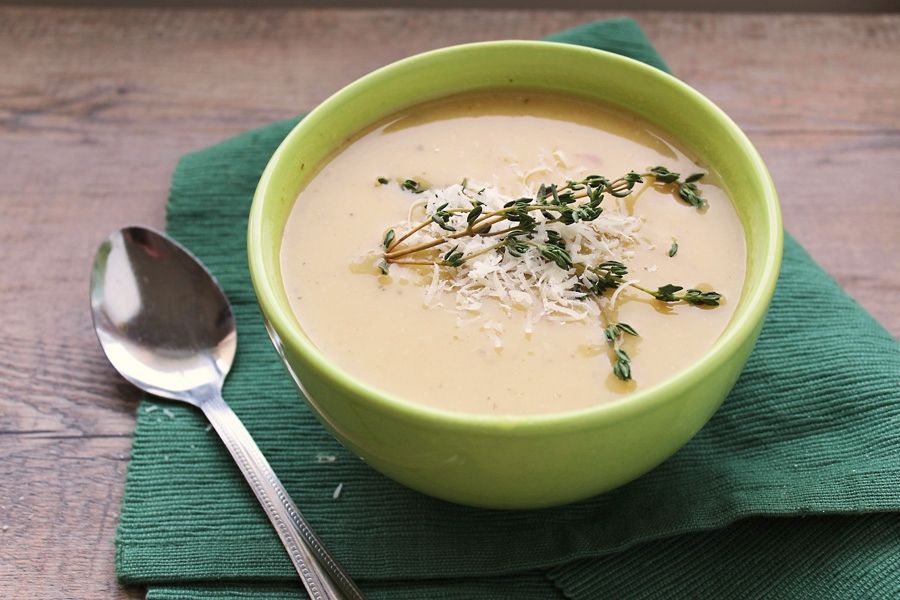
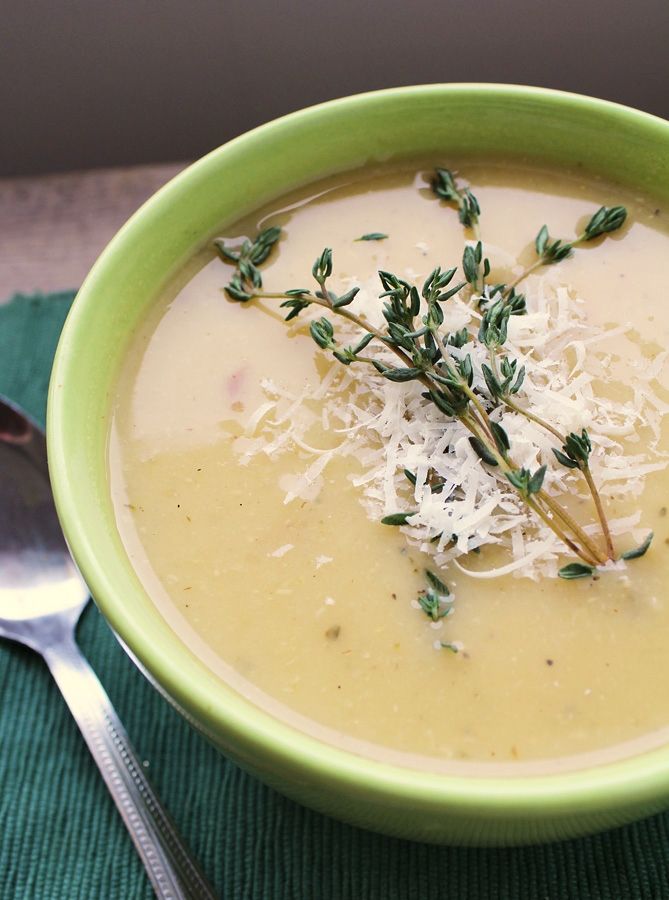
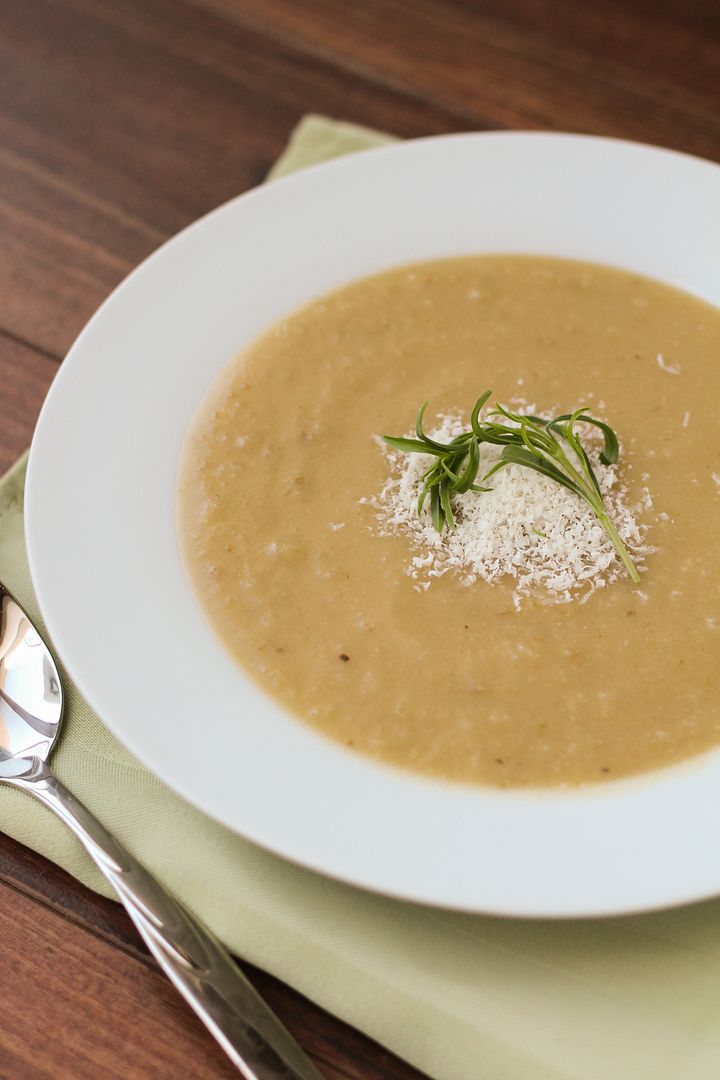
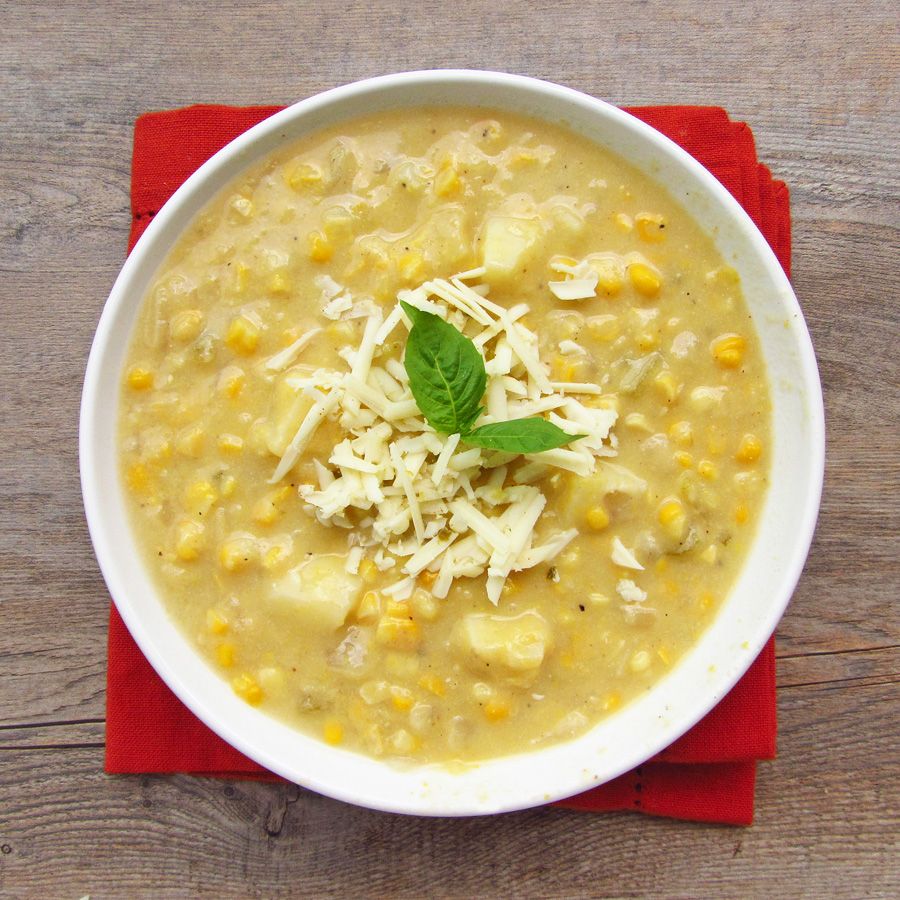
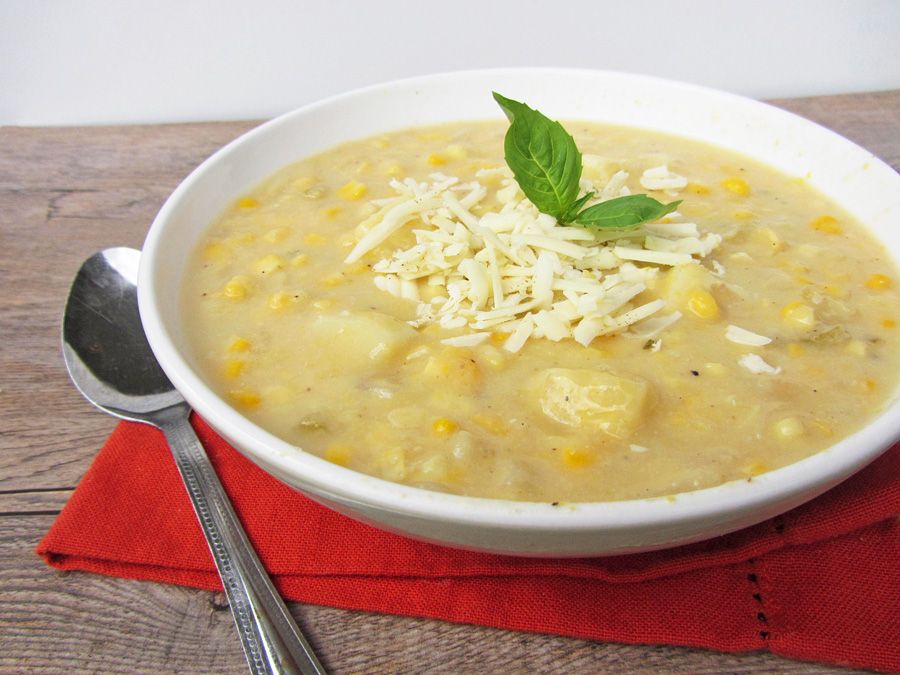
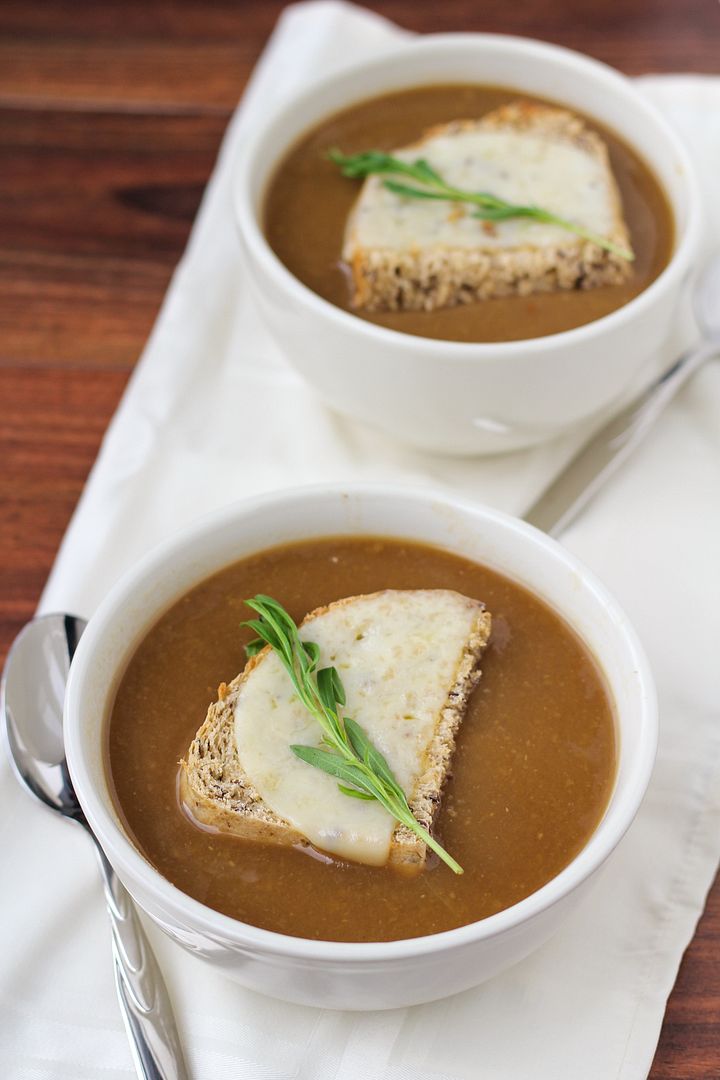
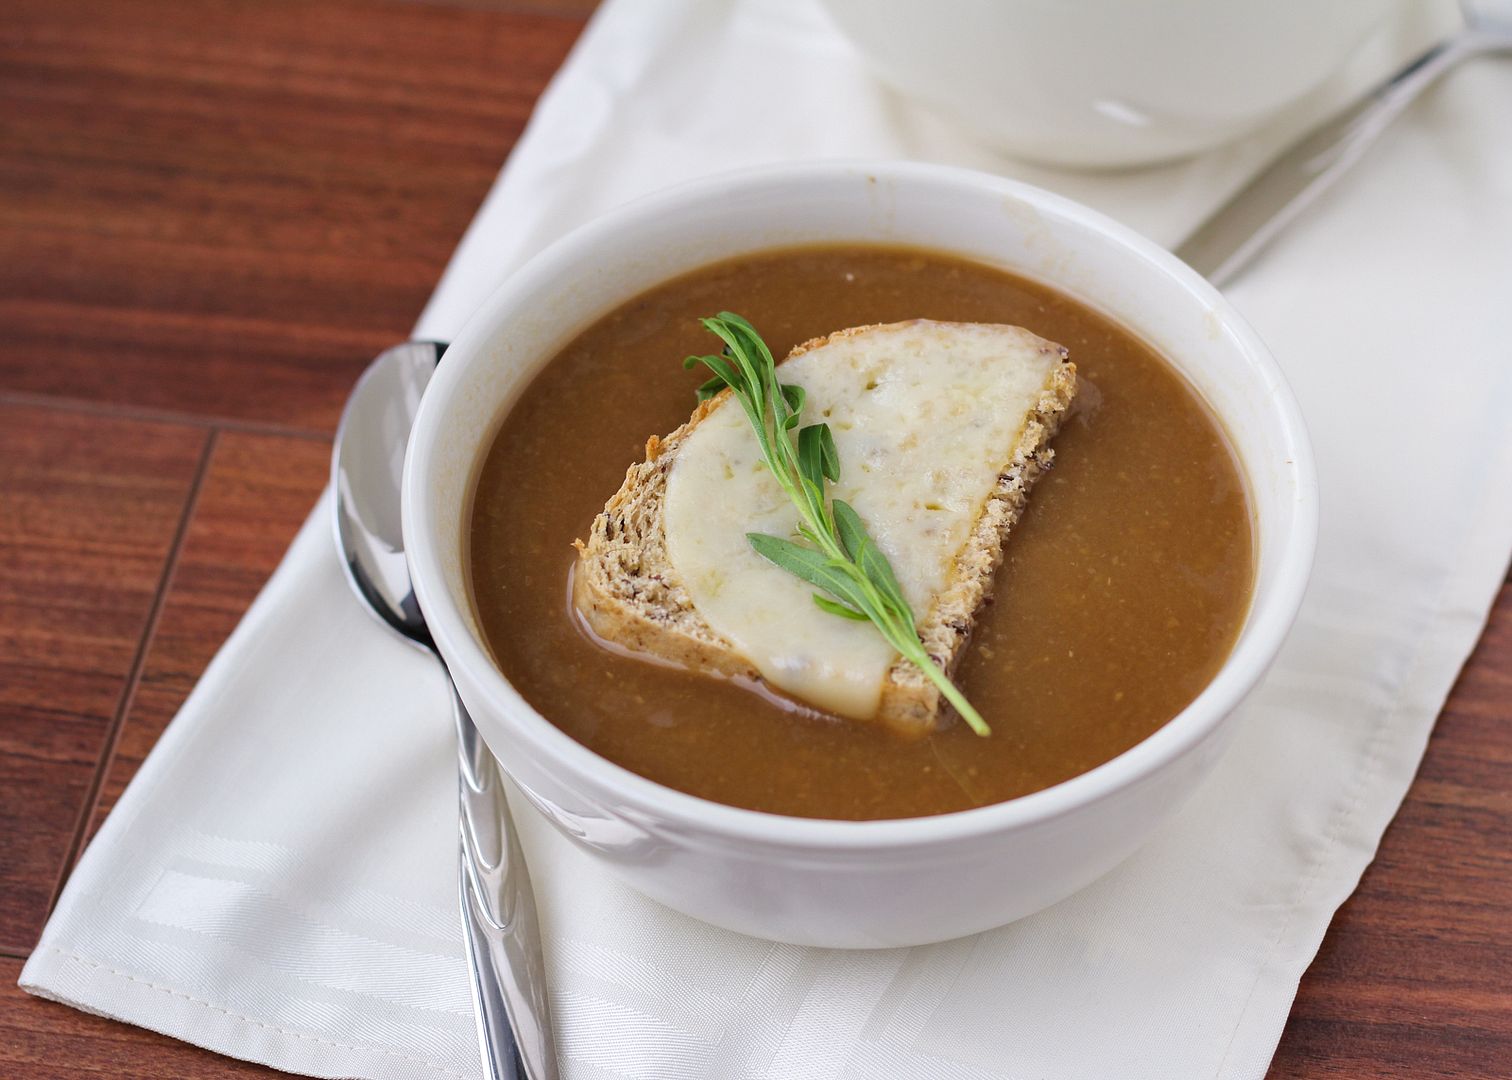
This caramelized onion and potato soup is very similar to a French onion soup, but easier and faster to prepare, and perhaps a little bit healthier.  I didn't cook my onions quite as long as you would for a French onion soup - just long enough to give them that deep golden brown colour and rich flavour - and I also cooked them in just a bit of olive oil instead of tons of butter.  The other  main differences are that this version contains some garlic for flavour and potatoes for thickness, and that I pureed it all into a smooth soup (though next time I'll probably leave a few chunks in there for texture - I just got carried away with my immersion blender!).  Then I topped it with a simple piece of toasted whole grain bread with some melted cheese instead of baking the whole thing in the oven (with a lot more cheese).

You end up with a rich but light tasting soup that's perfect for a cozy winter evening indoors!

Caramelized Onion and Potato Soup


Caramelized Onion & Potato Soup

Adapted from different recipes found on Whole Living, Yankee Magazine, and Bon Appetit

Serves around 4 as main course servings; 8 as smaller side dish servings

Ingredients:

2 tablespoons olive oil or canola oil
6 medium yellow onions, peeled and thinly sliced into half moons (or 3-4 large onions)
4 cloves garlic, minced
Salt and pepper
1 tablespoon white wine vinegar
1/2 cup dry white wine
1 tablespoon all-purpose flour
8 cups (2L) low sodium beef broth
1-1/2 to 2 cups chopped yellow potatoes
2 bay leafs
2 sprigs of thyme
4-7 slices thick rustic whole grain bread
4-8 slices gruyere, swiss, or provolone cheese

Directions:

Heat oil in a large heavy-bottomed saucepan or Dutch oven over medium heat.  Add onions and garlic, stir to coat with oil, and let sit for about 5 minutes, stirring occasionally.  Season with salt and pepper and stir.  Cook for an additional 25-30 minutes, stirring occasionally, until softened and caramelized with a deep golden brown colour.  (Cook for up to 45 minutes if needed).  Add vinegar to deglaze the pan.  Add wine and stir, scraping up the browned bits from the bottom of the pan.  Let simmer until reduced slightly, about 2-3 minutes.  Sprinkle flour over onions and stir.

Add beef broth, potatoes, thyme, and bay leaves.  Bring to a boil, then reduce heat and let simmer, partially covered, stirring occasionally, until potatoes are softened.  Discard bay leaves and thyme sprigs.  If desired, puree soup with an immersion blender or by transferring in batches to a blender.  You may puree all of the soup if you want it to be smooth, part of the soup for some texture, or none if you want it to be chunky, depending on what you prefer.  Season with salt and pepper to taste.

Preheat broiler.  Arrange cheese on bread and broil until cheese is melted, about 1 to 2 minutes.  Serve alongside or on top of soup.

January 11, 2013

Roasted Garlic & Shallot Soup

Roasted Garlic & Shallot Soup

Since my cold doesn't seem to be going anywhere, I tried to help it along this week with a big batch of garlic soup!  I remember reading somewhere that raw garlic is good for colds, and in the past I've tried horrible things like making garlic tea and scarfing down pieces of bread with raw cloves of garlic hidden inside.  But since those things probably don't make a difference anyway, this time I decided to go ahead and roast the garlic and turn it into a warm and comforting soup so I could at least enjoy a delicious meal in my runny, stuffy, coughy misery!

Roasted Garlic & Shallot Soup

Some of the reviews of the original recipe on Cooking Light said it had no flavour, but I don't know what they're talking about - I found that the roasted garlic and shallots provided so much flavour on their own, and then you add sauteed onions, white wine, vegetable broth, and fresh thyme - how much more flavour could you need?  I also made a few changes to the recipe, like using yellow fleshed potatoes instead of Russets because I find they have better flavour, substituting the chicken broth for vegetable to make it vegetarian, eliminating the blue cheese croutons and just topping the soup with parmesan to make it easier, and using skim milk instead of 2% so it was even lighter.

Don't be scared by the amount of garlic in this - it all gets roasted, which I can testify is about a million times better than eating whole cloves of garlic raw!  And while this may not have helped my cold at all, it still made me feel better to have this waiting for me for dinner every night this week!

roasted garlic and shallot soup

*The above picture was taken in Jan 2014 - same recipe, just used savory instead of thyme as I didn't have any thyme (and used better lighting!).

Roasted Garlic & Shallot Soup

Adapted from Cooking Light

Makes about 4 bigger portions or 8 smaller portions

Ingredients:

5 whole garlic heads, unpeeled (about 40-50 cloves) - try to use good quality garlic if possible as it will have more flavour than the cheap packages of imported garlic - I've learned that lesson!
3 tablespoons olive oil, divided
1 teaspoon salt, divided
1 teaspoon freshly ground black pepper, divided
10 shallots, unpeeled (about 3/4 pound)
2 cups coarsely chopped onion (about 2 small yellow onions)
1 cup dry white wine (I used Sauvignon Blanc), at room temperature
3 cups vegetable stock
2 cups (1/2-inch) cubed peeled yellow-fleshed potato (about 3/4 pound)
1 teaspoon chopped fresh thyme
1 cup skim or 2% milk, at room temperature
Grated parmesan cheese plus extra thyme for topping (optional)

Directions:

Preheat oven to 400°F. Remove the outside layer of white papery skin from the garlic, cut the tops off each head, and place on tin foil. Drizzle with 1 tablespoon olive oil and sprinkle with 1/4 teaspoon salt and 1/4 teaspoon pepper. Wrap with foil and place on a baking sheet, then roast for 10 minutes in preheated oven. Meanwhile, prepare a shallot foil package by drizzling shallots with 1 tablespoon oil, sprinkling with 1/4 teaspoon salt and 1/4 teaspoon pepper, and wrapping with foil. After the 10 minutes have passed, add the shallots to the pan and continue to roast both the garlic and shallots for another 25 minutes. Remove from oven and let cool until cool enough to handle. Squeeze garlic out of the skins and peel shallots, discarding skins.

While garlic and shallots are cooling, heat 1 tablespoon oil in a Dutch oven over medium heat. Add onion, and cook for 6-10 minutes, stirring occasionally, until softened and lightly browned. Add garlic cloves, peeled shallots, and wine. Reduce heat and simmer uncovered for 5 minutes.

Stir in vegetable stock, potatoes, and thyme. Bring to a boil, then cover, reduce heat, and let simmer for 20-25 minutes, until potatoes are tender. Cool slightly, then puree in batches in a blender (I did mine in 3 batches), transferring pureed portion to a bowl each time. Pour pureed soup back into Dutch oven, stir in milk, 1/2 teaspoon salt, and 1/2 teaspoon pepper. Reheat for about 5 minutes, taste, and adjust any seasonings if necessary.

Top each portion with grated Parmesan cheese and a sprinkling of fresh thyme, if desired.

January 08, 2013

Butternut Squash & Kale Baked Risotto

Butternut Squash & Kale Baked Risotto

I'm so excited to finally have a new recipe on the blog!  I loved spending the holidays at home and having amazing meals cooked for me most nights, but it also feels good to be back in my own kitchen cooking again, especially using healthy ingredients after a bit of overindulgence over the holidays!

I love risotto, and while it's pretty easy to make, I don't always love standing over a hot stove stirring for half an hour.  I had no idea that baked risotto existed until recently and was very eager to try it out as soon as possible!

This uses all the same ingredients and follows most of the same steps as regular risotto, but when you get to the part of slowly adding broth to the rice and stirring, you just pour it all in at once instead and bake it on the oven (see pic below).

Butternut Squash & Kale Baked Risotto

This version adds butternut squash and kale so it's healthy and tasty!  I found that the texture doesn't turn out to be exactly as creamy as traditional risotto, but it was pretty close.  I know the pictures somehow make it look like regular rice, but it was much creamier than that!  I'd still make the regular version if I wanted to impress guests (or get a good arm workout), but this is a nice shortcut option to have for weeknight meals.

I completely forgot to add the parmesan cheese before taking these photos - it helps the rice stick together and adds flavour, so don't forget it!

Butternut Squash & Kale Baked Risotto

Butternut Squash & Kale Baked Risotto

Adapted from Martha Stewart

Serves about 6

Ingredients:

1 tablespoon olive oil
1 medium yellow onion, diced
2 garlic cloves, minced
1/2 teaspoon dried thyme
1-1/2 cups Arborio rice
Salt and pepper
1/2 cup dry white wine (I used Sauvignon Blanc)
4 cups peeled and diced butternut squash (from a small to medium 2 pound squash)
1 (900 mL) carton low-sodium chicken broth (substitute vegetable broth for vegetarian version)
1 bunch kale, tough stems removed, sliced crosswise into 1/2-inch strips
Grated parmesan cheese for serving

Directions:

Preheat oven to 400°F.

Heat the oil in a large saucepan over medium heat. Add onion and cook, stirring occasionally, for 5-6 minutes until softened. Add garlic and thyme and cook for 1 more minute, until fragrant. Stir in the rice and cook, stirring frequently, for 3 minutes. Season with salt and pepper.

Add wine and cook until almost absorbed, stirring often, about 2 minutes. Add the squash and broth and bring to a boil. Stir in the kale. Transfer to a 9x13 glass baking dish, cover with aluminum foil, and bake in preheated oven for about 25 minutes, until most of liquid is absorbed and rice is tender. Let sit for about 5 minutes before serving. Top each portion with grated parmesan cheese.

Note: The original recipe called for the use of a Dutch oven - that way you don’t have to transfer the rice to a baking dish as you could just transfer the pot to the oven. I didn’t have a Dutch oven where I was cooking this, but it still worked fine without one.

August 22, 2012

(Lighter) Corn Chowder with Pepper Jack Cheese

(Lighter) Corn Chowder with Pepper Jack Cheese

I think of all the peak food seasons in the summer, I look forward to corn season the most.  It lasts such a short time and there is really no substitute during the rest of the year that even comes to close to the amazing taste of fresh sweet corn.  I grew up eating a lot of corn in the late summer months, but never really ventured far from eating it straight off the cob with a bit of butter, salt, and pepper.  We didn't need to try anything else when it was so good that way!

When I saw a fresh corn soup on Oh My Veggies a couple of months ago, I commented that I'd never heard of a warm corn soup, and I think I was the only one who hadn't!  Once I thought about it though, I realized that these warm corn soup lovers were probably on to something amazing that I'd been missing out on for far too long.  I tested it out one night by basically dumping some corn and milk in a pot then blending it, and it was delicious.  Then I imagined how much better it would be with a bit of wine, chicken stock, potatoes, and cheese to make a chowder, and got right on it!

I found a recipe for a white cheddar corn chowder on Whole Living that didn't use butter, flour, or heavy cream, but still allowed for a bit of indulgence with potatoes and a small amount of cheddar cheese (which I replaced with pepper jack for a bit of spice).  Even though it was much lighter than say, Ina Garten's cheddar corn chowder with bacon, half-and-half, butter, and tons of cheese, it didn't taste light at all!  This was so thick, rich, and comforting, but with the bright summer flavours of fresh corn.  It was one of those meals where I could not wait to eat leftovers and was so sad when it was gone.  I cannot believe I've been missing out on corn soup for so long - don't miss out like me and make this while fresh corn is still in season!

P.S. Don't judge this dish  by the photos! It's hard enough to photograph soup but I took these in poor lighting late in the evening - trust me that it's a lot better than it looks here!

(Lighter) Corn Chowder with Pepper Jack Cheese

Corn Chowder with Pepper Jack Cheese

Adapted from Martha Stewart Living via Whole Living

Serving sizes for soup are difficult to estimate, but I’d say this makes about 3 main course servings or 6 side dish servings

Ingredients:

1 tablespoon olive oil
1 medium yellow onion, chopped
1 celery stalk, diced
1/2 teaspoon ground coriander
1/4 teaspoon cumin
1/2 cup dry white wine (I used Sauvignon Blanc)
2-1/2 cups peeled and chopped (1/2 inch pieces) yellow potatoes (about 3 medium potatoes)
2 cups low-sodium fat-free chicken broth
1 cup skim milk
3 cups fresh corn kernels (from about 3-4 ears of corn)
1 teaspoon salt
Freshly ground pepper
2 oz pepper jack cheese, grated

Additional grated pepper jack cheese for topping, if desired

Directions:

Heat oil in a large saucepan over medium heat.  Add onion and cook until softened, stirring often, about 4 minutes.  Add the celery and cook until tender, about 4 minutes.  Add the coriander and cumin and stir for about 30 seconds.  Add the wine, raise heat to medium-high, and cook until most of the liquid has evaporated, for about 2 to 3 minutes. 

Add the potatoes, chicken broth, and milk, and bring to a boil, skimming any foam that forms on the surface.  Reduce heat and simmer until potatoes are tender, about 20 minutes.

Add corn and cook until tender, about 5 minutes.  Remove soup from heat.  Transfer 2 cups of soup to a blender, let cool slightly, remove the plastic stopper from the blender lip and cover with a paper towel, then puree.  You can puree a larger portion of the soup if you prefer a smoother soup.  Return the puree to the rest of the soup in the saucepan, stir, and reheat if necessary.  Add grated cheese and stir until mixed in.  Season with salt and pepper.  Pour into bowls and top with additional grated cheese and pepper if desired. 

June 15, 2012

Pasta with Chicken & Broccoli in a Mushroom White Wine Sauce

Pasta with Chicken & Broccoli in a Mushroom White Wine Sauce

When I was looking through my hundreds of bookmarked recipes for a comforting, easy meal to make for dinner one night, I came across this pasta with roasted garlic, white cheddar, and wine sauce on Annie's Eats and it fit the bill perfectly. Most normal people would have made the recipe as written, because it looked pretty amazing. But because I can't seem to follow a recipe for the life of me, my brain immediately started whirring with ideas to change things up a little, and this is what I came up with!

Instead of making a butter-flour based sauce with chicken broth and a bit of white wine, I decided to use equal parts wine and broth, and I switched to a mushroom broth (and threw in some onions and mushrooms) so the sauce would have lots of flavour. I eliminated the butter because the cheese made the sauce thick and rich enough. I kept in the roasted garlic but added a bit of Dijon mustard for an extra kick. Finally, I threw in some sundried tomatoes for added flavour and texture.

Everything was so flavourful and combined into an amazing meal that tasted rich but was still reasonably healthy by my standards. The best part was the sauce, which you can't really see in the pictures because it absorbed into the ingredients pretty well, but it had such a deep flavour that really made the dish. It may seem like a lot of work to make this, but if you prepare a few things ahead of time, like the roasted garlic and chicken, then it's pretty easy to throw together. And of course, you can easily make it vegetarian by leaving out the chicken as there's plenty else going on in this pasta!

Hope you all have a fabulous weekend! Mine will be filled mostly with school work and housework, but I'm hoping to get out to enjoy the sun a bit - it's been gorgeous here lately!

Pasta with Chicken & Broccoli in a Mushroom White Wine Sauce

Pasta with Chicken & Broccoli in a Mushroom White Wine Sauce

Adapted from a recipe originally from Good Things Catered (no longer active) and seen on Annie’s Eats

Makes 4-6 servings

Ingredients:

2 heads of garlic
1 tablespoon olive oil, divided
1 teaspoon Dijon mustard
1 large chicken breast
1 lb penne pasta (whole wheat or regular)
1 head of broccoli, chopped into florets
1 small onion, diced
8 oz pre-sliced white or crimini mushrooms, roughly chopped
1 cup dry white wine (I used Sauvignon Blanc)
1 cup mushroom stock (I made this from a bouillon cube, but if you can’t find it, you could substitute chicken stock)
1-1/2 cups grated sharp white cheddar cheese
1 tablespoon flour
Ground black pepper
1/2 cup diced sundried tomatoes (rehydrated if necessary)

Directions:

Preheat oven to 350°F.  Cut the ends off the two heads of garlic so that the cloves are exposed.  Drizzle the exposed cloves with a teaspoon of olive oil, then wrap the heads with aluminum foil and place on a baking sheet.  Roast in the preheated oven for about 1 hour.  Unwrap and let cool, then squeeze the garlic out of the skin and mash into a paste.  Mix the Dijon mustard into the garlic paste.  Set aside.

Heat a teaspoon of olive oil in a non-stick skillet over medium-high heat.  Cook chicken breast in the skillet for about 5-6 minutes per side, until cooked through.  Remove from heat and let rest a few minutes before slicing into small pieces. Set aside.

Bring a large pot of salted water to a boil.  Add pasta and cook for length of time specified on package.  Set chopped broccoli in a steamer basket over the boiling water and cover.  Steam for about 3 minutes until crisp-tender, then remove from heat.  When pasta is finished cooking, drain and set aside.

At the same time, heat a teaspoon of olive oil in a large saucepan over medium-high heat.  Add chopped onion and mushrooms and cook until soft, stirring often, about 5-7 minutes.  Add the roasted garlic paste and stir for about a minute.  Add the white wine and mushroom broth and bring to a boil.  Let simmer until reduced by about half, about 5-6 minutes, stirring occasionally.  Stir in the cheddar cheese until melted.  Add the flour and whisk the mixture over low heat, until thickened slightly.  Season generously with pepper.

Combine the pasta, chicken, broccoli, sundried tomatoes, and sauce in a large pot.  Heat briefly over low heat if not warm enough.  Serve warm.

March 03, 2012

Quinoa Risotto with Mushrooms, Spinach, and Goat Cheese

quinoa risotto with mushrooms, spinach, and goat cheeseAfter finally learning how to make risotto a couple of months ago, then experimenting a bit with a beet and goat cheese version recently, I've been wanting to try other versions using healthier grains instead of white rice. I've seen a lot of barley risottos that sound delicious, but I feel like either my arm would fall off or my face would melt off (or both) if I had to stand above a steaming pot stirring for over 40 minutes, so I haven't been too eager to try one out!

Recently though, I saw a quinoa risotto (and can't remember where now) that intrigued me. I've already talked about my love for quinoa before, but I never knew you could cook it risotto-style. I loved the idea of replacing rice with a healthier seed, and especially loved that it wouldn't take any longer to cook than regular risotto.

quinoa risotto with mushrooms, spinach, and goat cheeseI decided to make a version with onions, mushrooms, spinach, and goat cheese, which all went really well together. The quinoa was cooked in the same way as regular risotto; I sauteed the onions and mushrooms first, then added the quinoa to briefly toast it, stirred in white wine until it was absorbed, then slowly added vegetable stock while stirring for about 25 minutes. The quinoa didn't reach quite the same creamy consistency as regular risotto when it was finished cooking, but once I stirred in the goat cheese at the end, it was perfect!

This risotto was rich and flavourful and I loved eating it for lunch all last week! I'm not always crazy about cooked spinach so next time I might leave it out, but I did like that it added a different texture and colour to the dish, along with added nutrients. Feel free to experiment with different add-ins and ingredients, just don't leave out the goat cheese, it makes the dish!

Quinoa Risotto with Mushrooms, Spinach, and Goat Cheese
Quinoa Risotto with Mushrooms, Spinach, & Goat Cheese

Adapted/Inspired by several sources, including Daily Garnish and Skinny Chef

Serves about 2-3 as a main course or 4-5 as a side-dish

Ingredients:

4 cups vegetable stock
1 tablespoon olive oil
1 small onion, diced
8 oz package of sliced white or crimini mushrooms, chopped
4 cloves garlic, minced
1 cup uncooked quinoa
1/2 cup dry white wine (I used Sauvignon Blanc)
6 oz baby spinach
2 oz (about 1/4 cup) goat cheese
Salt and pepper

Directions:

Add vegetable broth to a medium saucepan and bring to a gentle simmer. Keep it gently simmering as you make the risotto.

Heat olive oil in a large saucepan over medium-high heat. Add the onions and mushrooms and sauté until softened and lightly browned, stirring often, about 5-7 minutes.

Add the garlic and the quinoa and cook for another 1-2 minutes, stirring often, until quinoa is lightly toasted and fragrant.

Add the wine and stir until all the liquid has been absorbed.

Begin adding vegetable broth to the quinoa, a small ladle at a time, stirring constantly. When each addition of liquid is absorbed by the quinoa mixture, add another small ladleful. Continue adding broth and stirring for about 25-30 minutes total, until quinoa is cooked through and no longer crunchy.  You won't have to stir it quite as much as you would traditional risotto - if you like you can add the broth in just three additions and stir occasionally to prevent sticking.

Add spinach to quinoa and stir until spinach is wilted. Add goat cheese and stir until melted and completely mixed in.

Remove from heat, taste, and add salt and pepper if desired. Serve warm.

UPDATE: Two commenters below have noted that they thought this was just as good cooked as regular quinoa (without the risotto method), so if you're short on time you could give that a try and let me know how it works out!

February 11, 2012

Beet & Goat Cheese Risotto

beet and goat cheese risottoWhen I posted my pretty pink cranberry bars on Wednesday, I promised to share another naturally pink dish that would be perfect for a special Valentine's dinner, and here it is: gorgeous beet risotto. I only recently discovered how easy risotto is to make at home after years of thinking it was one of those things that only professional chefs can pull off. Really, the hardest part about making risotto is having to stir the rice for 20 minutes straight, but even that is something that anybody with a bit of patience can do!

I knew I wanted to make a beet risotto for Valentine's Day because it would be fancy enough for a nice dinner and festive enough for the holiday because of its beautiful colour. I had a hard time choosing a recipe because there seem to be so many different ways of making beet risotto: boiling the beets and using their cooking water, roasting them and just adding the chopped beets at the end, pureeing them and mixing that into the rice as it cooks, etc.. Fortunately, my sister had recently tried a recipe from All Seasons Cuisine that she said was amazing, and after checking it out and discovering that it had goat cheese in it, I was immediately sold!

This recipe combined a couple of the methods I had seen in others - beets are roasted before cooking the rice, then some of the beets are pureed and mixed into the cooked rice, while the rest of them are diced and tossed in at the end. I loved the way the pureed beets thickened and coloured the rice, and I especially loved the textural contrast that the diced beets added. The original recipe also called for the addition of beet greens (which is why theirs looks darker than mine). Unfortunately my beets didn't come with their greens attached so I had to leave them out, but I think they would have added another nice layer of texture.

This post is already getting too long and I haven't even told you how this tasted yet, so let me make it clear right now that this tastes amazing! Because a lot of goat cheese is added, I found it to be the predominant flavour over the beets. I was fine with that because I absolutely love goat cheese and it added a nice richness to the risotto, but if you really want the beets to be the star of this dish, you could simply omit the cheese. I tasted the risotto before adding any cheese and it was still delicious! Either way, this is sure to be the star of your Valentine's dinner, or any other day's meal! And served with my beet hummus as an appetizer and cranberry bars for dessert, you could have a complete pink meal (without any food colouring!) for your loved one(s), or show yourself some love and save it all for yourself :)


Beet & Goat Cheese Risotto

Adapted from All Seasons Cuisine

Serves about 4-5 as a side dish, or 2-3 as a main

Ingredients:

1 pound red beets (about 3 medium beets)
Greens from the beets (optional – I omitted)
1/4 cup olive oil, divided
4 cups vegetable stock (I used one 900mL container)
1/2 large yellow onion, peeled and diced
1 cup Arborio rice
1/2 cup dry white wine (I used Sauvignon Blanc)
1/4 to 1/3 cup goat cheese
1/4 cup grated parmesan cheese (optional for a cheesier flavour)
Handful of chopped parsley
Salt and pepper

Directions:

Preheat oven to 400°F. If beets still have greens attached, trim them off and set them aside. Wrap beets in foil, like a packet, and set on a baking sheet. Roast in the oven for 1 hour, or until beets are tender. Remove and let cool slightly.

Trim the ends off the beets and peel off the skin. Dice about two-thirds of the beets and set aside. Roughly chop the remaining third of the beets and place in the small bowl of a food processor. Add 2 tablespoons of olive oil and a dash each of salt and pepper, then puree until smooth. Set aside.

If using the beet greens, wash and dry them, thinly slice them, and set aside.

Add vegetable broth to a medium pot and bring to a gentle simmer. Keep it gently simmering as you make the risotto.

Heat 2 tablespoons olive oil in a large deep skillet or pot over medium-high heat. Add the onion and sauté until softened but not browned, about 4-5 minutes. Add the rice and continuously stir to toast, about 2 minutes. Add the wine and stir until all the liquid has been absorbed.

Begin adding vegetable broth to the rice, a small ladle at a time, stirring rice constantly. When each addition of liquid is absorbed by the rice, add another small ladleful. Continue adding broth and stirring for about 20 minutes total, until rice is creamy and al dente. Have a kettle of boiled water nearby so that if you run out of vegetable stock, you can add water from the kettle instead.

Add beet purée, diced beets, beet greens (if using), and goat cheese to the rice. Stir until goat cheese is melted. Remove from heat. Taste, and if you would like a stronger cheese flavour, add the parmesan cheese and stir. Season with salt and pepper if desired.

Serve warm, garnished with parsley.

December 29, 2011

Risotto with Peas

risotto with peas
I absolutely love risotto, but for some reason, I’ve never made it myself. I guess it’s one of those things that I’ve always just assumed is way too hard for someone like me to make (probably because I watch too much Top Chef and risotto always seems to be the dish that the judges criticize the most).

Today, however, I discovered that risotto is actually quite easy to make at home, and I’m kicking myself for not trying it sooner! I feel like now I have to go back and find all those delicious risotto recipes I’ve seen on other blogs but haven’t bothered to bookmark because I thought I couldn’t make them (most recently, for example, this farro risotto with squash and kale from Love & Olive Oil).

Sure, it’s a bit labor intensive because you have to stir the risotto constantly for 20 minutes, but just think of it as your workout for the day. I’m sure you could simultaneously throw in some squats or lunges as you stir, but because I’m on holidays, stirring was enough exertion for me. The rest is easy peasy, as long as you get all your ingredients ready ahead of time (which doesn’t take long at all).

risotto with peas
I was nervous that because this was my first time making risotto, it would end up inedible, but it turned out to be amazing! The risotto was creamy, the rice was just the right al dente texture, and the peas added the perfect burst of sweetness to balance out the richness of the dish. Even my dad exclaimed that it was delicious, and he is much more experienced at making risotto than I am!

I’ve written out the recipe as I made it below, but the original version is actually from a video (or “recipideo”: a recipe demonstrated in a video in under 4 minutes), so you can watch this link to see exactly how the risotto is made (and how easy it is!) As you can see, I made a few changes to the original recipe, such as adding parsley, garlic, salt and pepper for added flavour, and leaving out the butter because I thought the risotto tasted rich enough without it.

Now here’s the fun part: Aurora, the company that makes all those delicious Italian products you see in the grocery stores, and who made the recipideo for this risotto, is offering you the chance to win a $50.00 gift certificate to My Italian Cantina, an online store where you can purchase a variety of Italian and European products. All you have to do is make this risotto with peas dish yourself at home (and feel free to make your own substitutions like I did), then snap a photo and visit this link to submit it and be entered to win the $50.00 gift certificate! You have until January 3rd to enter, and the winners will be announced January 6th. So hurry up and watch the recipideo, make this delicious risotto, take a quick picture, and enter the contest! Just be warned that the video is set to an extremely catchy song that may end up stuck in your head all day :) Good luck!

UPDATE: The above contest is now closed.

risotto with peas
Risotto with Peas

Adapted from Aurora Importing

Serves 4-6

Ingredients:

9 cups water
2 tablespoons olive oil
1 medium yellow onion, finely chopped
1 vegetable bouillon cube (chicken bouillon would also work)
1-1/2 cups superfine Arborio rice
3 cloves garlic, minced
1/2 cup dry white wine
1-1/2 cups frozen peas, thawed
1/4 cup grated parmesan cheese
3-4 tablespoons chopped parsley
Salt & pepper

Directions:

Add the water to a large pot and bring to a boil on the stove. Leave simmering as you make the risotto.

As you wait for the water to boil, prepare all your ingredients so everything is ready to go (chop onion, garlic, and parsley; rinse peas to thaw; grate parmesan; measure out the rice and wine).

Heat olive oil in a large deep skillet over medium-high heat. Add the chopped onion and sauté until soft, about 5 minutes. Add the bouillon cube, rice, and garlic, and stir for about 30 seconds. Add the white wine and stir until absorbed. Set a timer for 18 minutes.

For the duration of the timer, continuously add the simmering water to the rice a ladle at a time, stir until absorbed by the rice, then add another ladle, stir again, etc. Keep stirring constantly! When there are about 3 minutes left on the timer, add the peas.
By the time the 18 minutes is up, you should be almost out of water and the rice should be creamy and al dente.

When done, remove from heat and stir in the parmesan cheese and parsley. Season with salt and pepper to taste. Serve warm.

Ingredient Index

Related Posts Plugin for WordPress, Blogger...