Showing posts with label yogurt - plain Greek. Show all posts

June 11, 2013

Lemon Chickpea Quinoa Burgers

Lemon Chickpea Quinoa Burgers

I love those free little newspaper/magazines that grocery stores put out to advertise their new products every season, mostly because I love anything that’s free, but also because I’m always looking for new sources of inspiration for ingredients and recipes.  It’s not often that I find a recipe I actually like in there, but when I saw these lemon chickpea quinoa burgers in the latest issue of Inspired (by Sobeys), I was intrigued because I’ve never seen anything quite like it.

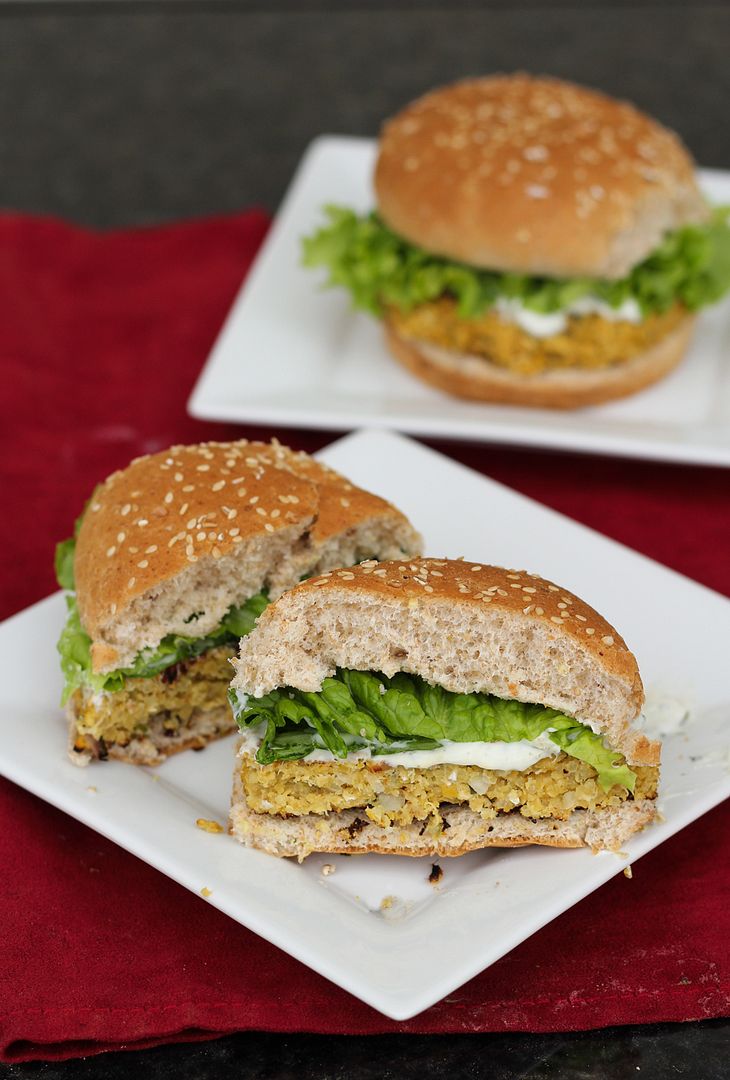
So, I got right to work making my own version, with shallots instead of red onion, basil instead of parsley, more oats to firm the mixture up a bit, and a lemon yogurt sauce to serve with them.  I also refrained from processing the whole mixture to keep some texture in them, and I pan-fried my burgers instead of barbequing them (because I don’t have a bbq), but I think they’d be firm enough to bbq if you want to give it a try!

Lemon Chickpea Quinoa Burgers

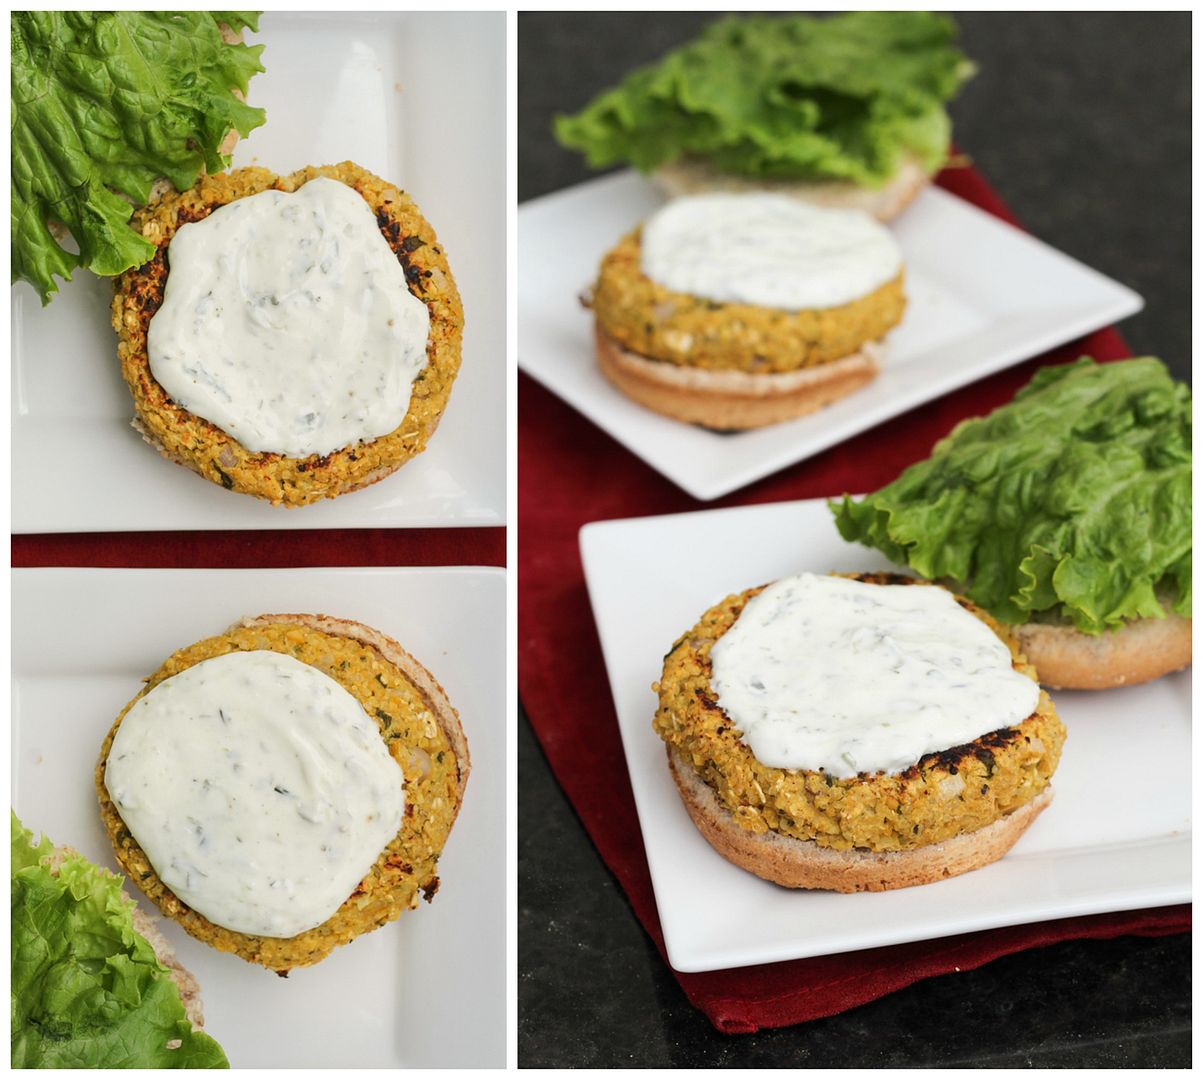
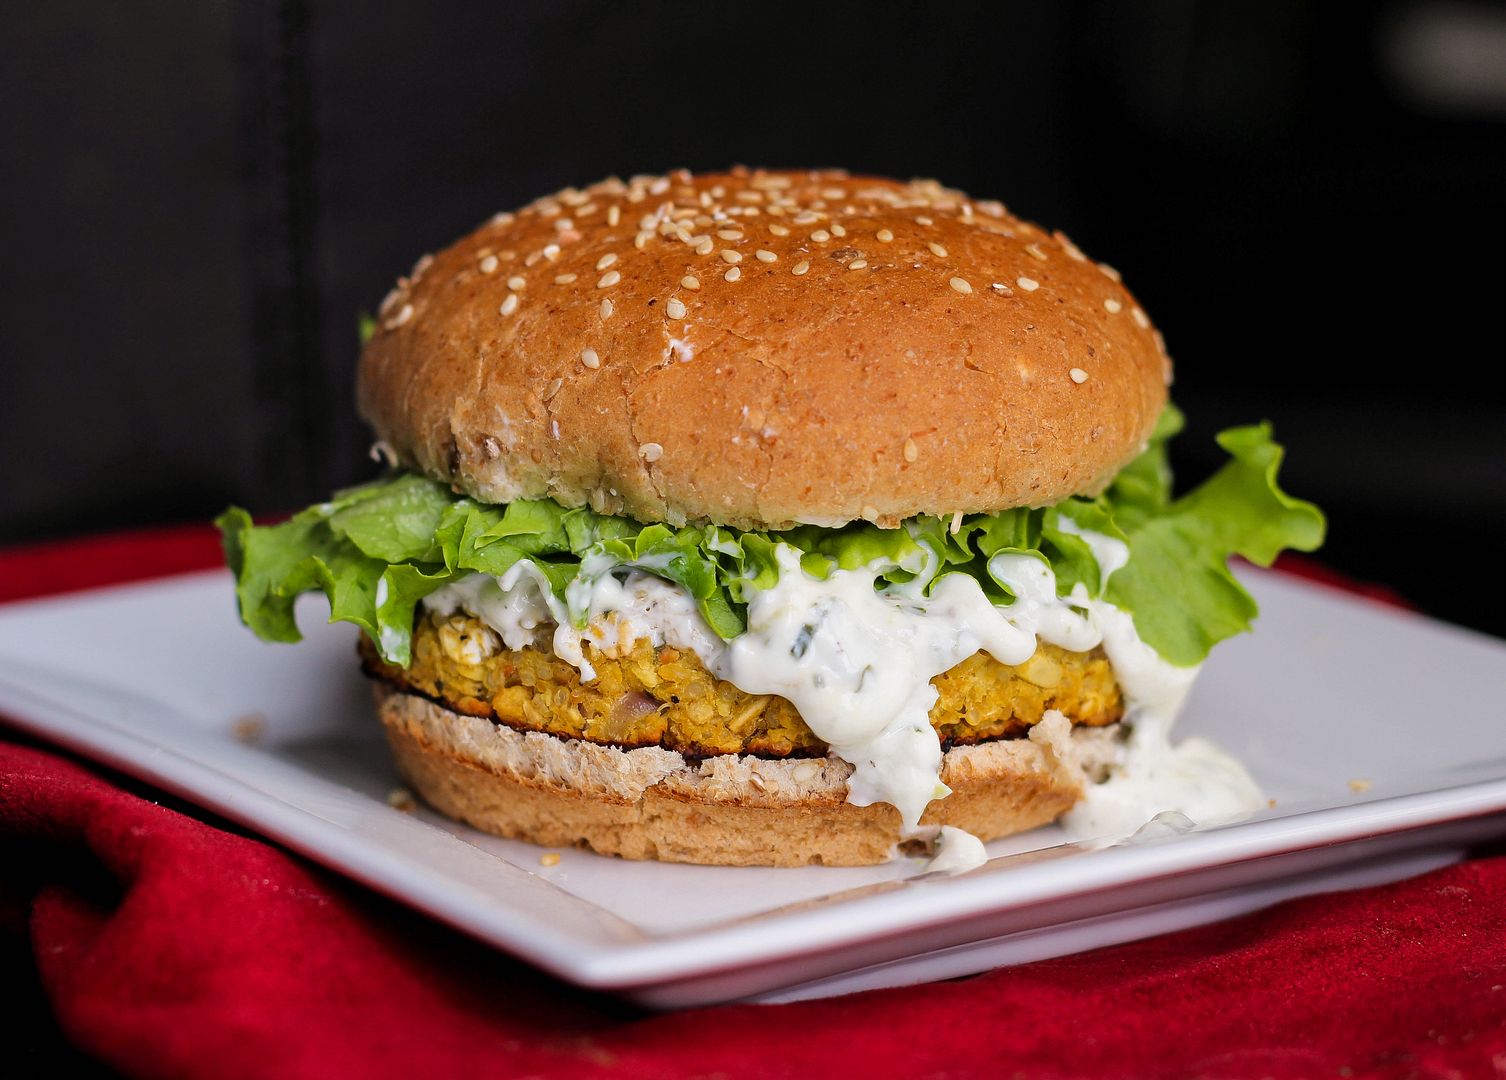
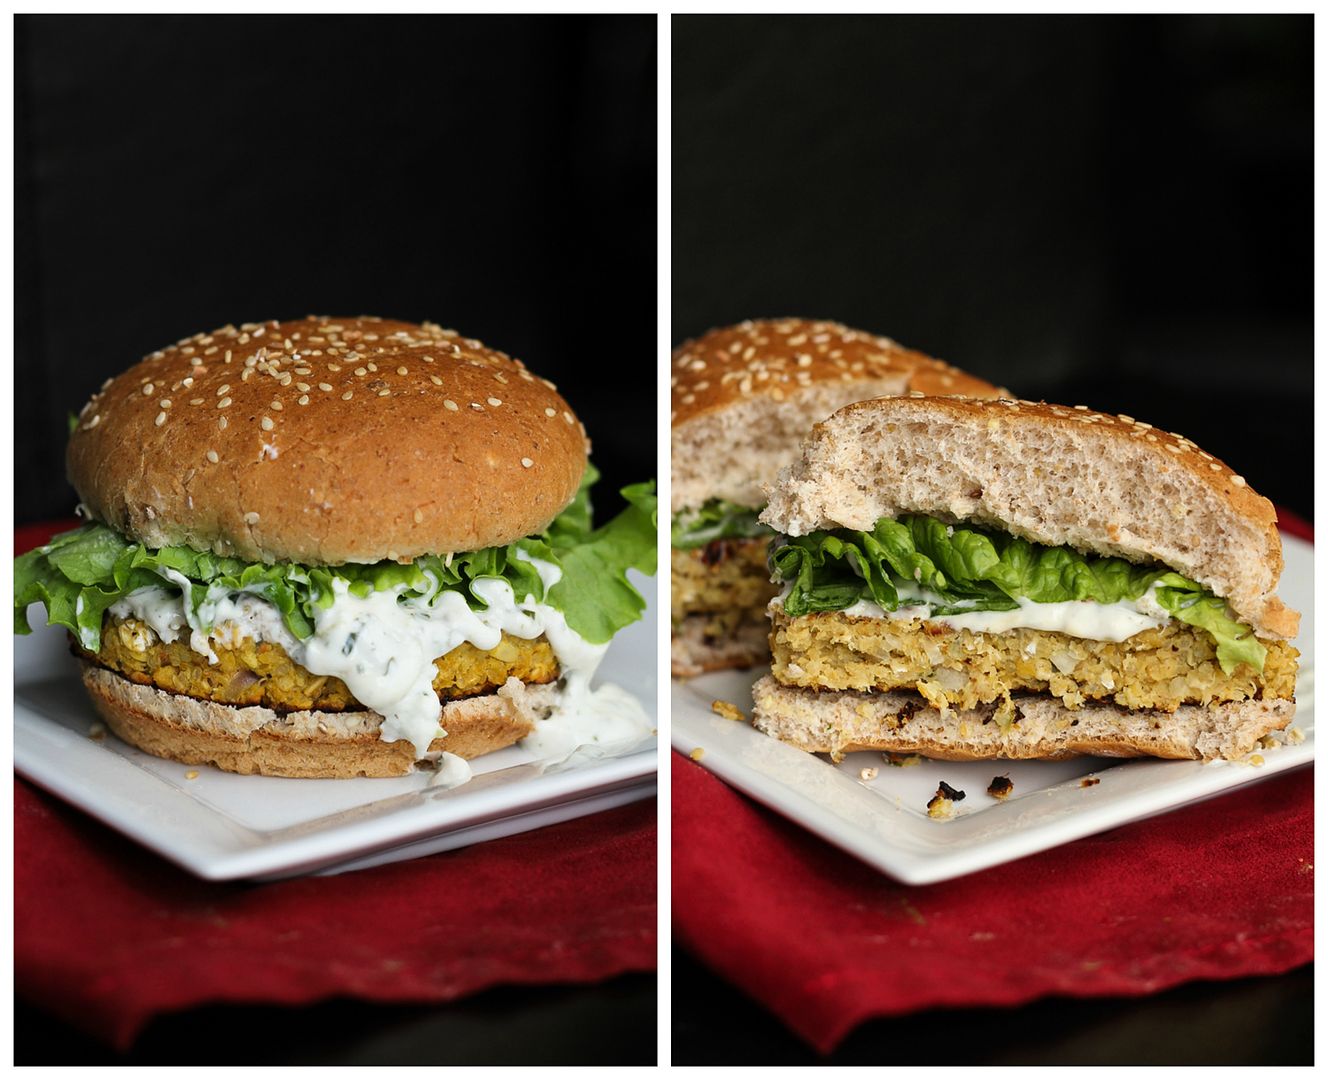
I loved the texture of the burgers, which held their shape and had a bit of crunch from the quinoa, and I loved the bright lemon flavour that really shone through in both the burgers and yogurt sauce.  I also think they would work really well as cute little vegetarian sliders at a bbq!

And as far as burgers go, these are pretty darn healthy!  They’re full of protein from the addition of chickpeas, quinoa, and Greek yogurt, as well as fiber from the oats and whole grain buns, and vitamins from the veggies and lemon.  

Lemon Chickpea Quinoa Burgers

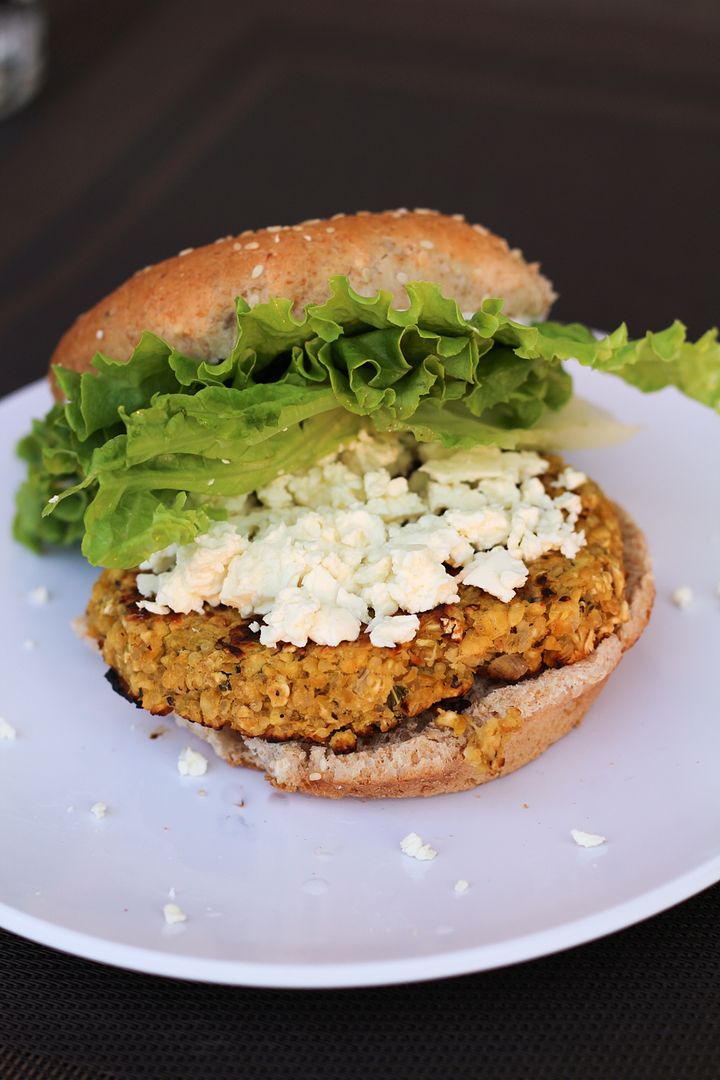
After tasting them, I did think they needed a little something extra to balance out all the lemony-ness, so the next night I added feta cheese on top of the burger, and the saltiness of the feta was the perfect thing to balance out the sour lemon.  So don’t leave out the feta!

(I had to take a quick shot the next night to document the feta since it wasn’t in any of the other pictures.  I went a little heavy with the feta, but a lot of it falls out anyway!  The sauce is still there, on top of the lettuce):

Lemon Chickpea Quinoa Burgers

Of course, the boyfriend said that these were good, but that next time I should maybe make them with buffalo or chipotle sauce instead of lemon (he’s not much of a lemon person, except for lemon poppy seed bread). 

But while these may not be much of a manly burger, I think the fact that he was willing to eat them for dinner three nights in a row shows that they’re still pretty tasty!

Lemon Chickpea Quinoa Burgers

Lemon Chickpea Quinoa Burgers

Adapted from Inspired

Makes 5 burgers

Ingredients:

For the Burgers:
1/4 cup uncooked quinoa
1 (540mL) can of chickpeas, drained and rinsed
1/2 cup rolled oats
1/4 cup minced shallot
2 garlic cloves, minced
1 tablespoon lemon zest
2 tablespoons fresh lemon juice
1 large egg, lightly beaten
1 teaspoon cumin
1/2 teaspoon salt
1/2 teaspoon pepper
2-3 tablespoons packed minced basil (or parsley if you like)

For the Sauce:
1/2 cup plain Greek yogurt
1 tablespoon fresh lemon juice
1 tablespoon minced basil
Salt and pepper

For Assembly:
5 whole grain hamburger buns
Lettuce
Feta cheese (low-fat, if desired)

Directions:

Bring 1/2 cup water to a boil.  Add quinoa, cover, reduce heat and let simmer 15 minutes.  Remove from heat and keep covered for 5 minutes.  Fluff with a fork and let cool slightly.

Meanwhile, add chickpeas to the bowl of a food processor or mini chopper and pulse until they are finely ground.  Transfer to a large bowl.  Add oats to same food processor and pulse a few times to break them down into fine crumbs (but not a powder).  Add to chickpeas in large bowl.  Add to the bowl the shallots, garlic, lemon zest, lemon juice, egg, cumin, salt, pepper, and basil.  Add quinoa.  Mix everything together with a large fork until well combined.  (note: leave the egg to mix in last if you want to be able to taste the mixture first and adjust seasonings or lemon juice to your liking). Divide and shape into 5 patties.

Heat a non-stick skillet over medium-high heat and cook patties for about 4-5 minutes per side.

Meanwhile, prepare yogurt sauce by mixing yogurt, lemon juice, and basil, and seasoning with salt and pepper to taste.

Assemble burgers with yogurt sauce, lettuce, and feta on whole grain buns.

May 21, 2013

Greek Yogurt BBQ Chicken Pasta Salad

Healthy Greek Yogurt BBQ Chicken Pasta Salad

This past weekend was a long weekend for us Canadians, meaning the summer has (unofficially) begun!  And it has definitely felt like summer the past few days; yesterday the temperature went up to about 28°C (around 83F) here in Southern Ontario and I was reminded what it’s like to sweat just standing outside (and in my case, just sitting in your apartment too)!  It was perfect weather for sitting outside for a barbeque on Sunday and laying on the beach Monday (though with the lake still freezing cold, we didn’t last long on the sand without having a way to cool off)!

With the long weekend for my American friends coming up next, I thought this would be a good time to share a pasta salad recipe – the perfect thing to take with you to a summer bbq or picnic.  And feel free to bring me along too, I need another long weekend already!

Healthy Greek Yogurt BBQ Chicken Pasta Salad

This pasta salad is made with all whole wheat pasta, non-fat Greek yogurt in place of mayonnaise, with veggies for nutrition and chicken for protein - but with the delicious creamy BBQ flavour, no one would ever guess it’s healthy!  I loved the crunch of veggies and the kick of spice in this pasta salad that’s unlike any I’ve tried before; my boyfriend loved this too and couldn’t even tell the pasta was whole wheat or had Greek yogurt.

You could leave out the chicken if you wanted this to be a lighter side dish, but we loved the flavour and texture the chicken added.  And if you’re vegetarian, I think black beans would give this a fun southwestern twist!  

The Tuesdays after a long weekend are the worst, but thankfully this day's already almost over and I can start counting down the days until the next long weekend!

Healthy Greek Yogurt BBQ Chicken Pasta Salad

BBQ Chicken Whole Wheat Pasta Salad with Greek Yogurt

Recipe inspired by Gonna Want Seconds (who adapted a dish from Cook’s Illustrated)

Makes around 4-5 large servings or 8-10 side dish servings

Ingredients:

1 375g (13oz) box of whole wheat macaroni
1 teaspoon hot sauce
1/4 teaspoon garlic powder
1/2 teaspoon each salt and pepper
2 teaspoons chili powder
1 tablespoon brown sugar
1-1/2 tablespoons apple cider vinegar
1 small shallot, minced
1 cup non-fat plain Greek yogurt (you can replace part of the yogurt with low-fat mayo if desired, but I used all yogurt)
1/2 cup BBQ sauce
1 red bell pepper, diced
1 yellow bell pepper, diced
4 green onions, chopped
2 cooked boneless skinless chicken breasts, shredded and seasoned with salt & pepper, and tossed with a bit of bbq sauce if desired (or use around 12-14 oz of rotisserie chicken and shred it)

Directions:

Bring a large pot of salted water to a boil.  Cook macaroni according to package directions.  Drain and rinse thoroughly with cold water until cool.  Let drain in colander then transfer back to a large bowl.

Add hot sauce, garlic powder, salt and pepper, chili powder, brown sugar, vinegar, and shallots to the pasta and toss to coat.  Let stand for about 2 minutes to absorb.  Next, mix the Greek yogurt and BBQ sauce together in a small bowl, then add to the pasta and toss to coat.  Stir in diced peppers, green onions, and shredded chicken.  Mix and adjust any seasonings if necessary.  Serve cold or at room temperature.

*Note: Feel free to add a bit of BBQ sauce to leftovers before eating if the sauce dries up at all in the fridge (I didn't really have this problem, but I still liked to stir in a little extra sauce to my leftovers)

April 16, 2013

Lemon Yogurt Snack Cake with Coconut Cream Cheese Frosting

Lemon Yogurt Snack Cake with Coconut Cream Cheese Frosting

The sun has finally come through shining here the past few days, but for those who are still buried in snow, and for all of those affected by the events in Boston this past week, I'm sharing this bright and light lemon yogurt cake with coconut cream cheese frosting to help spread some warm and sunny thoughts.

Lemon Yogurt Snack Cake with Coconut Cream Cheese Frosting

This is a simple snack cake made of a dense lemon yogurt cake base topped with a coconut cream cheese frosting and some toasted coconut flakes.  I tried to lighten it up a bit from the original recipe by reducing the oil and sugar, and the texture still came out great and I loved how the lemon and coconut flavours shone through and complemented each other.  This is a great spring cake to make and share with others to spread the sunshine :)

Lemon Yogurt Snack Cake with Coconut Cream Cheese Frosting


Lemon Yogurt Snack Cake with Coconut Cream Cheese Frosting

Adapted from Emily Loves Food

Makes one 9x9-inch cake, about 16-20 squares

Ingredients:

For the Cake:
1 cup plain low-fat Greek yogurt
1/3 cup vegetable oil
1/3 cup fresh lemon juice
2 teaspoons grated lemon zest
1/2 teaspoon vanilla
3/4 cup sugar
2 large eggs
2 cups all-purpose flour
1 tablespoon baking powder
1/2 teaspoon salt

For the Frosting:
8 oz cream cheese (reduced fat, if desired), at room temperature
1/4 cup unsalted butter, at room temperature
1-1/2 cups icing sugar (use 2 if you want it sweeter)
1/2 teaspoon vanilla extract (or coconut extract, if desired)
1/2 cup sweetened shredded coconut

1/2 cup sweetened shredded coconut, toasted for topping

Directions:

Preheat oven to 350°F.  Line a 9x9-inch baking pan with parchment paper on the bottom.

Mix the “wet” ingredients together with a whisk until well combined: yogurt, oil, lemon juice, lemon zest, vanilla, sugar, and eggs.  In a separate bowl, whisk together the dry ingredients: flour, baking powder, and salt.  Add the dry ingredients to the wet ingredients and stir until just combined.  Spread mixture into prepared baking pan and even out with a spatula.  Bake in preheated oven for 30-35 minutes, until a toothpick inserted in the middle comes out clean.  Remove from oven and let cake sit in pan for about 10 minutes to cool, then transfer cake to a wire rack to cool completely.

Meanwhile, prepare frosting.  Beat cream cheese and butter until smooth, about 2-3 minutes.  Add icing sugar and beat until combined.  Add vanilla and coconut and beat until just combined.  When cake has cooled, frost the top with the frosting.  It should  make a thick layer.

Toast the additional 1/2 cup of coconut in a dry skillet over medium heat until golden brown.  Sprinkle overtop frosting.

February 05, 2012

Chili Lime Yogurt Dip with Salsa Pita Chips

chili lime yogurt dip with salsa pita chipsI wasn't planning on posting any more Super Bowl recipes after my big recipe round-up on Friday, but when Danone Canada offered Canadian food bloggers the chance to win some free yogurt by making a recipe with Oikos Greek yogurt, I couldn't resist!

I often eat yogurt for breakfast, snacks, and dessert, so I go through at least a couple tubs of yogurt a week. Greek yogurt makes for one of my favourite breakfasts, with its high protein, low fat, and minimal ingredients list, but there never used to be a lot of options for different flavours here in Canada. I used to have to stock up on Greek yogurt when I made trips to the US, but lately the selection has greatly improved here, which makes my breakfasts a lot more enjoyable!

I'd never really thought to use yogurt in savory snacks, so I was very curious how a chipotle lime yogurt dip would taste. It looked like an easy and healthy snack to whip up, so I bought another tub of yogurt yesterday to give it a try!

salsa pita chips
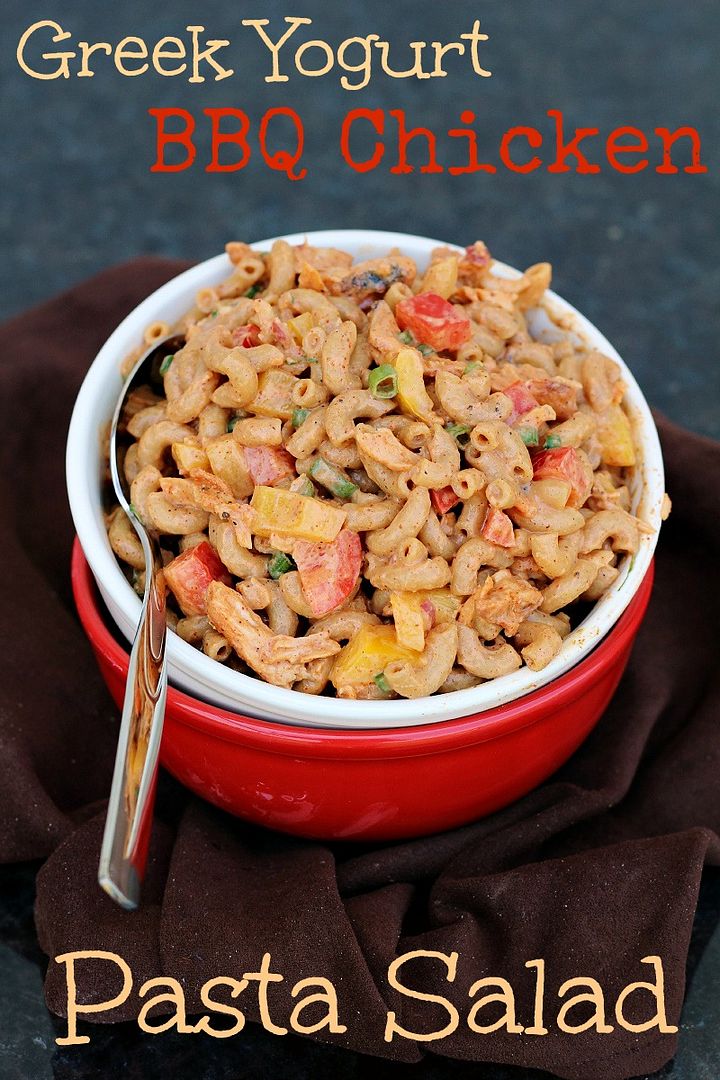
I have to admit I was skeptical about adding things like chili powder and Worcestershire sauce to yogurt, so I was surprised when I finished mixing everything together and tasted the dip - the flavour was amazing! The Worcestershire sauce and chili powder add depth of flavour that is balanced out perfectly by the sweetness from the honey and acidity from the lime, and the whole thing has just the right amount of kick from the spice. And the best part is that this dip is actually healthy for you, especially if you pair it with veggies as dippers.

I've been enjoying this dip with baby carrots, but also decided to try out the salsa pita chips from the recipe. I've made pita chips in the oven before, but had never thought of flavouring them with something like salsa. I was worried that they wouldn't bake properly after being soaked with salsa, but while mine required a bit longer of a baking time than what was suggested, they still crisped up fine and were delicious! They made a great pairing for the chili lime dip, but were even great on their own.

If you're still looking for last-minute Super Bowl recipes and want something healthy to snack on among the other not-so-healthy food that will likely be served for the big game, try this dip! Or if you want to indulge today, you could make this later in the week when you're craving snacks that you can feel good about eating. You guys know I love dips from the amount of hummus recipes on my site, and I think this is going to be one of my new go-to dips to have around when I want something fresh and light to snack on.

Happy Super Bowl Sunday!

chili lime yogurt dip with salsa pita chips
Chili Lime Yogurt Dip with Salsa Pita Chips


Serves a group as an appetizer

Ingredients:

For the Pita Chips:
2 large pita pockets (I used whole-wheat)
1/2 cup salsa

For the Dip:
2 cups non-fat plain Greek yogurt (about one 500g tub)
1 tablespoon honey
2-3 teaspoons chili powder (start with less for less spice)
1/2 teaspoon Worcestershire sauce
1/2 teaspoon hot sauce (optional for more spice)
2 tablespoons fresh lime juice
1/2 cup chopped cilantro (optional - I liked the dip with and without cilantro)

Directions:

Preheat oven to 400°F. Line a large baking sheet with parchment paper.

Cut through the edges of each pita pocket to separate it into two circles. Cut each circle into smaller chip-sized triangles. Use a cooking brush to brush salsa onto both sides of each pita chip, then place pita chips onto parchment paper-lined baking sheet. Bake in preheated oven until crisp, about 15-20 minutes, flipping once halfway through. Baking time may vary depending on type of pita, size of chips, and amount of salsa on each chip, so keep an eye on them and adjust time accordingly.

Meanwhile, mix all ingredients for the yogurt dip in a medium bowl. Taste and adjust any of the ingredients to your liking.

Keep dip refrigerated until ready to serve. Serve with salsa pita chips and veggies.

*Note: Make as many pita chips as you like – you may wish for more than what’s stated in the recipe if you are not serving any other dippers like vegetables. But, I have found that they are not as good the next day, so only make as much as you will need that day.

Ingredient Index

Related Posts Plugin for WordPress, Blogger...